Smooth Div Scroll is a jQuery plugin that scrolls content horizontally left or right. Apart from many of the other scrolling plugins that have been written for jQuery, Smooth Div Scroll does not limit the scroling to distinct steps. As the name of the plugin hints, scrolling is smooth. There are no visible buttons or links since the scrolling is done using hotspots within the scrollable area or via autoscrolling. Unobtrusive and smooth is the key here.
Table of contents
- What is Smooth Div Scroll?
- Simple demo
- More examples!
- Options
- Altering options after initialization
- Public methods
- Callbacks
- The CSS
- Dependencies
What is Smooth Div Scroll?
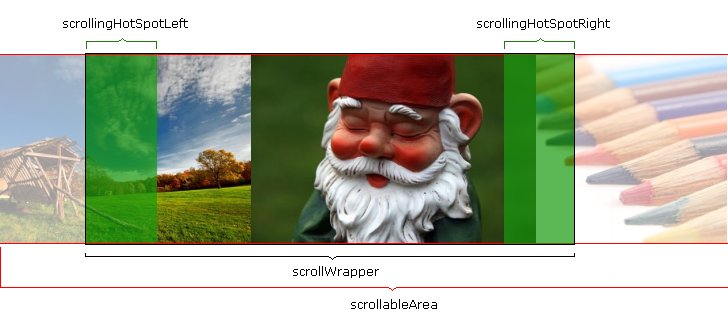
The basic principle behind Smooth Div Scroll is simple: let one div (scrollableArea) scroll inside another div (scrollWrapper). Ether two hotspots are used to trigger the actual scrolling (scrollingHotSpotLeft and scrollingHotSpotRight) or you can let it autoscroll. The scrollWrapper determines how much of the scrollableArea that should be visible - everything outside the scrollWrapper is hidden from view.
Simple demo
Here's a quick demo of Smooth Div Scroll in action:


The jQuery code for this demo looks like this:
<script type="text/javascript">

		$(function() {
			$("div#makeMeScrollable").smoothDivScroll({ autoScroll: "onstart", autoScrollDirection: "backandforth", autoScrollStep: 1, autoScrollInterval: 15, startAtElementId: "startAtMe", visibleHotSpots: "always"});
		});
</script>
I've set some options that are not default for this demo:
- I set the autoscrolling to "onstart" (autoScroll: "onstart") so I get autoscrolling until the user uses one of the hotspots.
- I want the autoscrolling to go back and forth (autoScrollDirection: "backandforth").
- Custom autoscrolling speed (autoScrollStep: 1 and autoScrollInterval: 15).
- I've set the option for starting at a specific element inside the scrollable area. In this case I've given the element that I want to start at the id "startAtMe" but you can name it whatever you like as long as you tell Smooth Div Scroll which element it is.
- I want the hotspots to be visible all the time (visibleHotSpots: "always").
(In this example I've used only a couple of the available options. You'll find all the options described here.) In the demo above the (X)HTML-code looks like this:
	<div id="makeMeScrollable">
		<div class="scrollingHotSpotLeft"></div>

		<div class="scrollingHotSpotRight"></div>
		<div class="scrollWrapper">
			<div class="scrollableArea">
				<img src="images/demo/field.jpg" alt="Demo image" width="497" height="330" />
				<img src="images/demo/gnome.jpg" alt="Demo image" width="496" height="330" />
				<img src="images/demo/pencils.jpg" alt="Demo image" width="496" height="330" />

				<img src="images/demo/golf.jpg" alt="Demo image" width="366" height="330" id="startAtMe" />
				<img src="images/demo/river.jpg" alt="Demo image" width="496" height="330" />
				<img src="images/demo/train.jpg" alt="Demo image" width="440" height="330" />
				<img src="images/demo/leaf.jpg" alt="Demo image" width="496" height="330" />
				<img src="images/demo/dog.jpg" alt="Demo image" width="497" height="330"/>
			</div>

		</div>
	</div>
As you can see there is a surrounding div with the id makeMeScrollable. This is the element that I turn into a Smooth Div Scroll. You can also see the element that I've given the ID startAtMe so I can tell Smooth Div Scroll that I want it to start the scrolling at this element using the option startAtElementId: "startAtMe".
Please note that you may have to give the elements that you put inside the scrollable area some styling to make sure that they are positioned like you want them. Here's a good template to start with:
	#makeMeScrollable div.scrollableArea *
	{
		position: relative;
		display: block;
		float: left;
		padding: 0;
		margin: 0;
	}
In this example there's no space between the elements (in this case images) inside the scrollable area. If you want a space between them, use padding and not margin since margin tends to generate errors in Internet Explorer.
Also make it a habit to add width and height to the element tags. Otherwise some browsers will have problems calculating the total width of all the elements inside the scroller.
Back to table of contentsOptions
Here are the options that can be used to configure and control the plugin. You can always leave all options out. Smooth Div Scroll will then use the default values.
| Option | Default value | Comment |
|---|---|---|
| scrollingHotSpotLeft: | "div.scrollingHotSpotLeft" | The CSS class or id for the hotspot that triggers scrolling left. |
| scrollingHotSpotRight: | "div.scrollingHotSpotRight" | The CSS class or id for the hotspot that triggers scrolling right. |
| scrollWrapper: | "div.scrollWrapper" | The CSS class or id of the wrapper element that surrounds the scrollable area. |
| scrollableArea: | "div.scrollableArea" | The CSS class or id of the actual element that is scrolled left or right. |
| hiddenOnStart: | false | True or false. Determines whether the element should be visible or hidden on start. This can be useful if you combine Smooth Div Scroll with some other jQuery plugin that shows or hides areas, like an accordion. |
| ajaxContentURL: | "" | Optional. If supplied, the content of scrollableArea is fetched via AJAX using the supplied URL. |
| countOnlyClass: | "" | Optional. If supplied, the function that calculates the total width of the scrollable area will only count the width of the elements that have this class. This can be useful if you have content grouped in columns and only the columns should be made scrollable. Otherwise Smooth Div Scroll will sum up the total width of all the elements in the columns and in this case you only want the width of the actual columns. |
| scrollStep | 15 | Optional. Determines how many pixels the scrollable area should move in each scrolling cycle when scrolling manually. High value means bigger steps which means faster scrolling. But always make sure you balance this value with the scrollInterval since bigger steps also means "choppier" scrolling. |
| scrollInterval | 10 | Optional. Determines the elapsed time between each call to the function that does the manual scrolling. If you'd compare scrolling with an animated movie, this option would be the equivalent of the number of frames per second in the movie. For really slow manual scrolling you'd set scrollStep to 1 and scrollInterval to 100 (100 milliseconds = ten calls/frames per second). So a lower value means more calls per second and thus faster scrolling. A higher value means fewer calls per second and slower scrolling. Balance this option together with the scrollStep option to get the speed you want and at the same time a scrolling that is as smooth as possible. |
| mouseDownSpeedBooster: | 3 | Use this if you want a speed boost when the user presses the mouse button while hovering over one of the hotspots. 1 = normal speed (no boost) 2 is twice as fast as normal 3 is three times as fast and so on. The default value is three times as fast. |
| autoScroll: | "" | Optional. Leave it out if you don't want any autoscrolling. Otherwise use the values "onstart" or "always". Using onstart the scrolling will start automatically after the page has loaded and scroll according to the method you've selected using the autoScrollDirection option. When the user moves the mouse over the left or right hotspot the autoscroll will stop. After that the scrolling will only be triggered by the hotspots. Using always - the hotspots are disabled alltogether and the scrollable area will only scroll automatically. |
| autoScrollDirection | "right" | Optional. This option controls the direction and behavior of the autoscrolling and is only used if autoscrolling is activated. Using right Smooth Div Scroll autoscrolls right and stops when it reaches the end. Using left it will autoscroll left and stop when it reaches the end. Setting the option to "left" is only relevant if you have set the option startAtElementId. Otherwise you will be at the first element and therefore you can't scroll any further left. If you set the value to backandforth Smooth Div Scroll starts autoscrolling right and when it reaches the end, switches to autoscrolling left and so on - ping-pong style. Setting the option to endlessloopright will give you continuous scrolling right and setting it to endlessloopleft will give you continuous scrolling left. |
| autoScrollStep: | 5 | Optional. Determines how many pixels the scrollable area should move in each scrolling cycle. High value means bigger steps which means faster scrolling. But always make sure you balance this value with the autoScrollInterval since bigger steps also means "choppier" scrolling. |
| autoScrollInterval | 10 | Optional. Determines the elapsed time between each call to the autoscrolling function. If you'd compare scrolling with an animated movie, this option would be the equivalent of the number of frames per second in the movie. For really slow autoscrolling you'd set autoScrollStep to 1 and autoScrollInterval to 100 (100 milliseconds = ten calls/frames per second). So a lower value means more calls per second and thus faster scrolling. A higher value means fewer calls per second and slower scrolling. Again, try to balance this option together with the autoScrollStep option to get the speed you want and still get the scrolling as smooth as possible. |
| visibleHotSpots: | "" | Optional. Leave it blank for invisible hotspots. Otherwise use the values "onstart" or "always". Onstart makes the hotspots visible for X-number of seconds (controlled via hotSpotsVisibleTime) directly after the page has loaded, then they become invisible. Always is for making them visible all the time. Feel free to alter the graphics and CSS for the visible hotspots. The CSS and graphics supplied with the plugin can serve as a good starting point. |
| hotSpotsVisibleTime: | 5 | Optional. If you have set "onstart" as the value for the option visibleHotSpots, you set the number of seconds that you want the hotspots to be visible. After this time they will become invisible again. |
| startAtElementId: | "" | Optional. Use this option if you want the offset of the scrollable area to be positioned at a specific element directly after the page has loaded. First give your element an ID in the HTML code and then provide this ID as a option. |
Altering options after initialization
A really nice thing about the jQuery UI widget factory is that it supports altering options after the plugin has initialized (altering options during runtime). If you want to alter an option after the plugin has loaded, it looks like this:
$("#makeMeScrollable").smoothDivScroll("option","autoScrollDirection","endlessloopright");
Looking at the syntax, the three parameters you supply are these:
- "option" - tells the plugin that you want to alter an option.
- "autoScrollDirection" - the name of the option that you want to alter, in this case the autoscroll direction.
- "endlessloopright" - the value you want to set for this option, in this case "endlessloopright".
If you don't want to alter the option - just get its value, you just leave out the last parameter, like this:
$("#makeMeScrollable").smoothDivScroll("option","autoScrollDirection");
Currently altering some of the options won't do anything, for example changing the options scrollingHotSpotLeft, scrollingHotSpotRight, scrollableArea and scrollWrapper. To be perfectly honest I haven't tried altering all the options after initialization so let me know if you stumble upon some odd behaviors or bugs, or if there's an option that you need to change that can't be changed after initialization.
Public methods
Being able to interact with the plugin after initialization through public methods was the main reason why I chose to rewrite the plugin and base it on jQuery UI widget factory. Many users want to combine Smooth Div Scroll with other jQuery plugins and having access to public methods makes this so much easier.
The public methods that you can use are these:
| Method | Parameters | What it does | |
|---|---|---|---|
| showHotSpotBackgrounds | optional parameter fadeSpeed (in milliseconds) | If you want the hotspots to fade in. If fadeSpeed is omited they are shown instantly. | |
| hideHotSpotBackgrounds | optional parameter fadeSpeed (in milliseconds) | If you want the hotspots to fade out. If fadeSpeed is omited they are hidden instantly. | |
| moveToElement | required parameter moveTo ("first", "start", "last", "number"), optional parameter elementNumber | This moves the scrollable area to the element you specify with the parameter moveTo. "first" moves to the first element, "start" moves to the start element (the element that you have specified with the option "startAtElementId", "last" moves to the last element and "number" moves to the element number that you specify using the optional parameter "elementNumber". | |
| addContent | required paramteter ajaxContentURL, optional parameter addWhere | This adds new content to the scrollable area. Using optional parameter "addWhere" you control where the content is added. Setting addWhere to "first" adds the new content before the currently present content. If the parameter "addWhere" is omited, the new content is added after the currently present content. | |
| replaceContent | required parameter ajaxContentURL | This method replaces the currently present content. | |
| recalculateScrollableArea | no parameters | This method simply recalculates and sets the width of the scrollable area. It's used internally when content is changed, for example if you call addContent or replaceContent. But I've decided to expose it as a public method in case you need to recalculate the scrollable area, for example if you add or remove elements inside the scrollable area from outside the plugin. | |
| stopAutoScroll | no parameters | This simply stops any ongoing autoscrolling. A very simple method, but very useful. | |
| startAutoScroll | no parameters | Starts the autoscrolling. | |
| restoreOriginalElements | no parameters | When the plugin is initialized, it stores the original elements (and their order). If you call this method, these stored elements are restored (they replace the current elements). | |
| show | no parameters | Shows the whole scroller if it's hidden. | |
| destroy | no parameters | This method is part of the widget factory. It removes all the functionality and DOM-changes that SmoothDivScroll has added to the original element. |
Here's how you call a public method:
$("#makeMeScrollable").smoothDivScroll("stopAutoScroll");
...and if the method has parameters, it looks like this:
$("#makeMeScrollable").smoothDivScroll("moveToElement", "first");
...or like this, if there are more than one parameters:
$("#makeMeScrollable").smoothDivScroll("moveToElement", "number", 2);
Callbacks
I know how much I love when plugin developers supply you with callbacks for major events in their plugins so I've added this as well. The callbacks that are currently implemented are:
| Callback | Triggers |
|---|---|
| autoScrollLeftLimitReached | Triggered when the autoscroller can't scroll any further left. |
| autoScrollRightLimitReached | Triggered when the autoscroller can't scroll any further right. |
| scrollLeftLimitReached | Triggered when the manual scroller can't scroll any further left. |
| scrollRightLimitReached | Triggered when the manual scroller can't scroll any further right. |
| mouseOverLeftHotSpot | Triggered when the user moves the mouse pointer over the left hotspot. |
| mouseOverRightHotSpot | Triggered when the user moves the mouse pointer over the right hotspot. |
| autoScrollStopped | Triggered when autoscrolling stops. |
| autoScrollStarted | Triggered when autoscrolling starts. |
| movedToFirstElement | Triggers after you have moved to the first element. |
| movedToStartElement | Triggers after you have moved to the start element. |
| movedToLastElement | Triggers after you have moved to the last element. |
| movedToElementNumber | Triggers after you have moved to a certain element (elementNumber). |
| windowResized | Triggers when the browser window is resized. |
If you want to hook on to a callback you need to write a function that responds to the callback. This function is added to the options when you initialize the plugin. It's sort of like regular options, but instead of values you supply functions. Here's an example of what it can look like:
$("#makeMeScrollable").smoothDivScroll({autoScrollLeftLimitReached: function() {alert("Autoscroll left limit reached
");}, movedToElementNumber: function(eventObj, data) {alert("Moved to element number " + data["elementNumber"] + ".
");}
});
In the example above I've chosen to hook on to two of the callbacks: autoScrollLeftLimitReached and movedToElementNumber. All I do is throw up an alertbox, but you'd probably do other stuff in these functions. In the second callback you see an example where the callback not just triggers but also sends some data along, in this case the element number it moved to.
The CSS
There is a CSS that accompanies the Smooth Div Scroll jQuery plugin. It looks like this:
/* You can alter this CSS in order to give SmoothDivScroll your own look'n'feel */

/* Invisible left hotspot */
div.scrollingHotSpotLeft
{
	/* The hotspots have a minimum width of 75 pixels
	   and if there is room the will grow and occupy 10%
	   of the scrollable area (20% combined).
	   Adjust it to your own taste. */
	min-width: 75px;
	width: 10%;
	height: 100%;
	/* There is a big background image and it's used to
	solve some problems I experienced in Internet Explorer 6. */
	background-image: url(../images/big_transparent.gif);
	background-repeat: repeat;
	background-position: center center;
	position: absolute;
	z-index: 200;
	left: 0;
	/*  The first cursor url is for Firefox and other
	    browsers, the second is for Internet Explorer */
	cursor: url(../images/cursors/cursor_arrow_left.cur), url(images/cursors/cursor_arrow_left.cur),w-resize;
}

/* Visible left hotspot */
div.scrollingHotSpotLeftVisible
{
	background-image: url(../images/arrow_left.gif);
	background-color: #fff;
	background-repeat: no-repeat;
	/* Standard CSS3 opacity setting */
	opacity: 0.35;
	/* Opacity for really old versions of
	   Mozilla Firefox (0.9 or older) */
	-moz-opacity: 0.35;
	/* Opacity for Internet Explorer. */
	filter: alpha(opacity = 35);
	/* Use zoom to Trigger "hasLayout" in
	   Internet Explorer 6 or older versions */
	zoom: 1;
}

/* Invisible right hotspot */
div.scrollingHotSpotRight
{
	min-width: 75px;
	width: 10%;
	height: 100%;
	background-image: url(../images/big_transparent.gif);
	background-repeat: repeat;
	background-position: center center;
	position: absolute;
	z-index: 200;
	right: 0;
	cursor: url(../images/cursors/cursor_arrow_right.cur), url(images/cursors/cursor_arrow_right.cur),e-resize;
}

/* Visible right hotspot */
div.scrollingHotSpotRightVisible
{
	background-image: url(../images/arrow_right.gif);
	background-color: #fff;
	background-repeat: no-repeat;
	opacity: 0.35;
	filter: alpha(opacity = 35);
	-moz-opacity: 0.35;
	zoom: 1;
}

/* The scroll wrapper is always the same width and
   height as the containing element (div). Overflow
   is hidden because you don't want to show all of
   the scrollable area.
*/
div.scrollWrapper
{
	position: relative;
	overflow: hidden;
	width: 100%;
	height: 100%;
}

div.scrollableArea
{
	position: relative;
	width: auto;
	height: 100%;
}
Dependencies
jquery.ui.widget.js
In version 1.0 large parts of the code has been rewritten from scratch. Smooth Div Scroll is now a stateful plugin based on the jQuery UI widget factory which enables nice stuff like public methods, the ability to alter options after the plugin has initialized and callbacks. Since it's based on the jQuery UI widget factory, you need to add the library component jquery.ui.widget.js to the page where you are using Smooth Div Scroll. The jQuery UI widget component is a part of the jQuery UI core library, but if you don't need all the other stuff in the jQuery UI library you can add only jquery.ui.widget.js as a stand-alone file to your page.
Check out the jQuery UI homepage for more info and downloads.
jQuery 1.4.x
Then of course you need to add a reference to the jQuery core library. I prefer to use the Google Libraries API to add jQuery to my page using a URL:
http://ajax.googleapis.com/ajax/libs/jquery/1.4.2/jquery.min.js
Check out the Google Libraries API page for jQuery for more info on how to add it to your page.
Back to table of contents