 Subscribe
 Follow Us
jQuery Real-Time Form Validation plugin
 12 years ago
 15797
15797 4060
4060

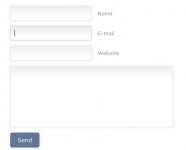
Client-side validation is something every web form should have, no doubts about that. While server-side validation does its job, it certainly lacks good user experience. What is so great about client-side validation then?
Not only is it useful to the user because it makes the process of filling out the form a lot quicker and a lot less painful, but it also shows that you actually care about them. For the user there’s nothing better than knowing right away if they’re doing it correctly.
In this tutorial we’re going to learn how to build real-time form validation using jQuery.
How Will We Achieve That?
Now, there are actually many ways to do that; here are the most common:
-
We could put
</span>(which will be holding validation info) next to our form field and give it anIDso we can easily access its content later -
We could wrap every field in
</p>with appliedID, and put</span>(which will be holding validation info) inside it, so we can easily access its content, through that</p>‘s child-span -
We could wrap every field in
</p>with appliedID, and inject</span>with validation info to it
It will all work, but neither is the optimal way. Why? Because there’s too much messing with your HTML code and you’ll end up with bunch of needless tags that are required by your validation script, but which your form doesn’t really need.
It’s clearly not the way to go, so instead we’re going to do this the way I do it myself. In my opinion it’s the best solution, although it’s not very common; I honestly have never came across this method, I’ve never seen it used by someone. But if you have, please let me know in the comments.
OK, so what are we going to do?
- We’re going to write simplest form possible, nice and clean, no unnecessary tags whatsoever
-
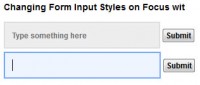
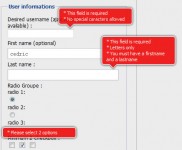
As the user fills out particular field, we’re goinng to validate it on the fly and:
- grab its position in the window (top and left)
- grab its width
- add width and the left offset (from the field’s position) together so we know where the field ends
-
put validation info into
</div>with appliedID, inject it to the document, position it absolutely on the spot where the field ends, and manipulate itsclassas needed (for example.corrector.incorrect)
That way we keep our HTML code nice and clean.
Note: It’s vital to always provide server-side validation as well (for users with turned off JavaScript).
Project Structure
We are going to need three files:
- index.html
- style.css
- validation.js
I’m gonna go roughly through the HTML coding, provide you with all needed CSS – and then focus mostly on our jQuery script, which is the most important thing and what we’re hoping to learn today.
Coding the HTML
Step 1: Some Basic HTML and Importing jQuery + Validation Script
First, make index.html file and put some basic code there; you can see that we imported jQuery at the bottom, along with our validation.js file, which will contain our validation script:
<!DOCTYPE html PUBLIC "-//W3C//DTD XHTML 1.0 Strict//EN" "http://www.w3.org/TR/xhtml1/DTD/xhtml1-strict.dtd">
<html xmlns="http://www.w3.org/1999/xhtml">
<head>
<title>Real-Time Form Validation Using jQuery</title>
<meta http-equiv="Content-Type" content="text/html; charset=utf-8" />
<link rel="stylesheet" href="style.css" type="text/css" media="screen" />
</head>
<body>

<div id="content">

</div><!-- content -->

<script type="text/javascript" src="http://ajax.googleapis.com/ajax/libs/jquery/1.4.2/jquery.min.js" charset="utf-8"></script>
<script type="text/javascript" src="validate.js" charset="utf-8"></script>
</body>
</html>
Read more:http://www.1stwebdesigner.com/tutorials/building-real-time-form-validation-using-jquery/
You might also like
Tags
accordion accordion menu animation navigation animation navigation menu carousel checkbox inputs css3 css3 menu css3 navigation date picker dialog drag drop drop down menu drop down navigation menu elastic navigation form form validation gallery glide navigation horizontal navigation menu hover effect image gallery image hover image lightbox image scroller image slideshow multi-level navigation menus rating select dependent select list slide image slider menu stylish form table tabs text effect text scroller tooltips tree menu vertical navigation menu