 Subscribe
 Follow Us
jQuery Vertical Tabs Plugin
 12 years ago
 49129
49129 10460
10460
jQuery plugin for Vertical Tabs .
There are 3 steps to (almost) every jQuery plugin: the HTML, the CSS and the JavaScript code.
Step 1. The HTML
<div id="vtab">
<ul>
<li class="home"></li>
<li class="login"></li>
<li class="support"></li>
</ul>
<div>
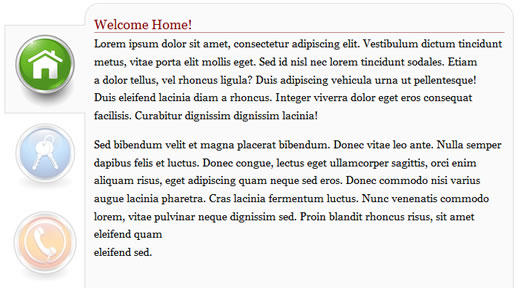
<h4>Welcome Home!</h4>
HOME CONTENT
</div>
<div>
<h4>Secure Login</h4>
LOGIN CONTENT
</div>
<div>
<h4>Online Support</h4>
SUPPORT CONTENT
</div>
</div>
There’s nothing special about this HTML. It just uses a div, that’s being identified by vtab, where it contains two elements: An unordered list that represents the left-side tabs, and a 3 different divs, each of which is associated with a given list item. For example, the first div indicates the content of the first tab, say, that’s being marked with home class. If you need more tabs, you can easily add them to the above HTML structure.
Step 2. The CSS
#vtab {
    margin: auto;
    width: 800px;
    height: 100%;
}
#vtab > ul > li {
    width: 110px;
    height: 110px;
    background-color: #fff !important;
    list-style-type: none;
    display: block;
    text-align: center;
    margin: auto;
    padding-bottom: 10px;
    border: 1px solid #fff;
    position: relative;
    border-right: none;
    opacity: .3;
    -ms-filter: "progid:DXImageTransform.Microsoft.Alpha(Opacity=30)";
    filter: progid:DXImageTransform.Microsoft.Alpha(Opacity=30);
}
#vtab > ul > li.home {
    background: url('home.png') no-repeat center center;
}
#vtab > ul > li.login {
    background: url('login.png') no-repeat center center;
}
#vtab > ul > li.support {
    background: url('support.png') no-repeat center center;
}
#vtab > ul > li.selected {
    opacity: 1;
    -ms-filter: "progid:DXImageTransform.Microsoft.Alpha(Opacity=100)";
    filter: progid:DXImageTransform.Microsoft.Alpha(Opacity=100);
    border: 1px solid #ddd;
    border-right: none;
    z-index: 10;
    background-color: #fafafa !important;
    position: relative;
}
#vtab > ul {
    float: left;
    width: 110px;
    text-align: left;
    display: block;
    margin: auto 0;
    padding: 0;
    position: relative;
    top: 30px;
}
#vtab > div {
    background-color: #fafafa;
    margin-left: 110px;
    border: 1px solid #ddd;
    min-height: 500px;
    padding: 12px;
    position: relative;
    z-index: 9;
    -moz-border-radius: 20px;
}
#vtab > div > h4 {
    color: #800;
    font-size: 1.2em;
    border-bottom: 1px dotted #800;
    padding-top: 5px;
    margin-top: 0;
}
Well, the style sheet is simple. However, it’s somehow tricky since I needed to hide the right border of the selected tab. The trick is that I just move the content’s div to a layer index that’s being positioned below the selected tab. This way, the selected tab will be placed over the content and the right border will be gone. The rest is fairly straight forward.
There’s still one more thing to mention. And that’s the support for IE7. Here’s the CSS that’s being used to address IE7. The important thing here is the z-index of the tabs contents:
#vtab > ul > li.selected{
    border-right: 1px solid #fff !important;
}
#vtab > ul > li {
    border-right: 1px solid #ddd !important;
}
#vtab > div {
    z-index: -1 !important;
    left:1px;
}
Step 3. The JavaScript
And here comes the fun part:
var $items = $('#vtab>ul>li');
$items.mouseover(function() {
    $items.removeClass('selected');
    $(this).addClass('selected');

    var index = $items.index($(this));
    $('#vtab>div').hide().eq(index).show();
}).eq(1).mouseover();
The article source:http://mehdi.biz/blog/2010/02/05/vertical-tabs-for-jquery-lovers/
You might also like

Tags
accordion accordion menu animation navigation animation navigation menu carousel checkbox inputs css3 css3 menu css3 navigation date picker dialog drag drop drop down menu drop down navigation menu elastic navigation form form validation gallery glide navigation horizontal navigation menu hover effect image gallery image hover image lightbox image scroller image slideshow multi-level navigation menus rating select dependent select list slide image slider menu stylish form table tabs text effect text scroller tooltips tree menu vertical navigation menu