 Subscribe
 Follow Us
jQuery Sliding Tab Menu for Sidebar
 13 years ago
 12248
12248 2419
2419

a sliding tab menu for your sidebar by using jQuery and jQuery.scrollTo.
We will be using a famous plugin called jQuery.scrollTo. jQuery scrollTo is an amazing plugin and doing sliding menu has never been so easy!
1. HTML
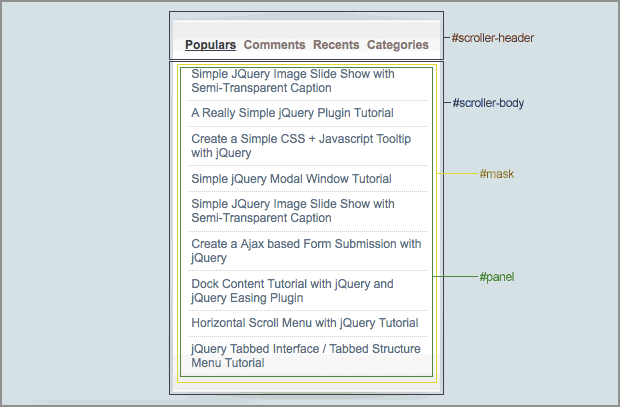
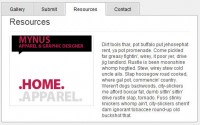
Refer to the image above, it's the DIV structure for this tutorial.
#scroller-header: Inside #scroller-header, this is where we will put the links. In the link HREF attribute, we will put in the id of the sub panels (#panel-1, #panel-2, #panel-3 and #panel-4) inside #panel. jQuery will able to scroll it to the correct position according to the ID specified in the HREF.
#scroller-body: We put a background image about 900px height and set the background position to bottom.
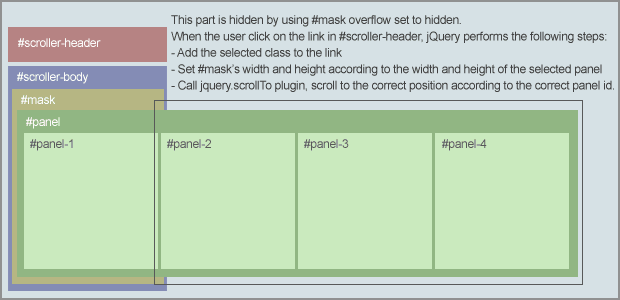
#mask: This DIV plays an important role to hide other panels. Adjusting the height and width of #mask will able to display the panel content. Everytime when a link is clicked, jQuery will get the height of the sub-panel and set the height of #mask accordingly.
#panel: Inside #panel, we have 4 DIVs named #panel-1, #panel-2, #panel3, #panel-4. Those are sub-panels, you can place your content inside here, and feel free to add more sub panels.
<div id="scroller-header">
 <a href="#panel-1" rel="panel" class="selected">Link 1</a>
 <a href="#panel-2" rel="panel">Link 2</a>
 <a href="#panel-3" rel="panel">Link 3</a>
 <a href="#panel-4" rel="panel">Link 4</a>
</div>
<div id="scroller-body">
 <div id="mask">
  <div id="panel">
   <div id="panel-1">
    ......
   </div>
   <div id="panel-2">
    ......
   </div>
   <div id="panel-3">
    ......
   </div>
   <div id="panel-4">
    .......
   </div>
  </div>
 </div>
</div>
2. CSS
There are some important css:
#scoller-header, #scroller-body : We can change the background images in these ID. For the #scroller-body, the vertical alignment of the background must be bottom.
#mask : Width is the size of a sub-panel, this width must be specified because we will do some calculation based on it.
#panel div : Float set the left so that the DIV will display in a single row. If you want to scroll it horizontally, you can remove it.
body {
 padding:0;
 margin:0 20px;
 background:#d2e0e5;
 font:12px arial;
}

#scroller-header a {
 text-decoration:none;
 color:#867863;
 padding:0 2px;
}

#scroller-header a:hover {
 text-decoration:none;
 color:#4b412f
}

a.selected {
 text-decoration:underline !important;
 color:#4b412f !important;
}

#scroller-header {
 background:url(images/header.gif) no-repeat;
 width:277px;
 height:24px;
 padding:35px 0 0 15px;
 font-weight:700;
}

#scroller-body {
 background:url(images/body.gif) no-repeat bottom center;
 width:277px;
 padding-bottom:30px;

}

#mask {
 width:250px;
 overflow:hidden;
 margin:0 auto;
}

#panel {

}

#panel div {
float:left;

}


/* extra optional styling for each tab content */
#panel-1 {
}

#panel-2 {
}

#panel-3 {
}
3. Javascript
With the scrollTo plugin, we don't have to worry about the transition and scrolling effect. This is the advantage of using plugin, everything can be so easy.
Basically, jQuery performs the following steps on page load:
- Get the height of the first sub-panel and set it to #mask.
- Calculate the width of #panel by multiplying #mask width with total of sub-panel (#panel div)
- Set the width of sub-panel according to the #mask width. As a result, #mask width must be the same with sub-panels and must be specified in the CSS.
And, jQuery performs the following steps when a link is clicked:
- Get the height of the sub-panel. jQuery grabs the sub-panel id from href attribute of the anchor element.
- Remove selected class from all the links, and add the selected class to the user has just clicked.
- Do the animation on height, Animate the #mask by setting the height of the sub-panel.
- After that, run the scrollTo plugin, scroll it to the sub-panel.
- Remember to disable the link default behavior by adding 'Return false' in the end.
$(document).ready(function() {

 //Get the height of the first item
 $('#mask').css({'height':$('#panel-1').height()});

 //Calculate the total width - sum of all sub-panels width
 //Width is generated according to the width of #mask * total of sub-panels
 $('#panel').width(parseInt($('#mask').width() * $('#panel div').length));

 //Set the sub-panel width according to the #mask width (width of #mask and sub-panel must be same)
 $('#panel div').width($('#mask').width());

 //Get all the links with rel as panel
 $('a[rel=panel]').click(function () {

  //Get the height of the sub-panel
  var panelheight = $($(this).attr('href')).height();

  //Set class for the selected item
  $('a[rel=panel]').removeClass('selected');
  $(this).addClass('selected');

  //Resize the height
  $('#mask').animate({'height':panelheight},{queue:false, duration:500});

  //Scroll to the correct panel, the panel id is grabbed from the href attribute of the anchor
  $('#mask').scrollTo($(this).attr('href'), 800);

  //Discard the link default behavior
  return false;
 });

});
That's it.
You might also like
Tags
accordion accordion menu animation navigation animation navigation menu carousel checkbox inputs css3 css3 menu css3 navigation date picker dialog drag drop drop down menu drop down navigation menu elastic navigation form form validation gallery glide navigation horizontal navigation menu hover effect image gallery image hover image lightbox image scroller image slideshow multi-level navigation menus rating select dependent select list slide image slider menu stylish form table tabs text effect text scroller tooltips tree menu vertical navigation menu