 Subscribe
 Follow Us
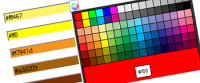
Color Picker ColorSphere Plugin (Mootools)
 13 years ago
  7090
7090  1806
1806
 n/a
n/a
Initialization
new UvumiSphere(selector,options);
Arguments
- Selector: string defining a CSS rule that will select the elements to be turned into color pickers. These elements should be text inputs in the beginning.
- Options: an object that will allow you to modify some properties of the picker. As the name suggests, options are optional.
Options
- defaultColor: If an input has no color value on initialization, the cursor should still have a default position. The default one is #ffffff (white), but you can set it to a different value, by passing an hexadecimal string here.
- specterImage: If you customize the sphere with a new background image, or rename/move it, the script needs to know because it tries to preload it on intialization. This is not required for the script, this is only for a better looking result and if you want to update this value, you must specify a path, absolute or relative to the document (not to the javascript file). The default value is css/circle.jpg because that's where the file is assumed to be when you download the package.
- cursorImage: Like the specterImage, the script tries to preload the images required by the CSS so they show up instantly the first time you display the sphere. This option is for the circular cursor. The default is css/miniCurr.gif. So you must have an image file at this location, or set this option.
- buttonText: The source inputs are replaced by <button> elements. This indicates what should be written in the button. The default is "Pick", but you can write whatever you want, including an image tag (yes, it is valid). Don't forget you can also style those buttons in the provided CSS file.
- onChange: This option recieves a function. The function will be executed everytime the sphere's cursor is moved. You can use this function to do anything javascript will allow, including modifying the color of an HTML element, because it receives the the new color value and the source input as arguments. See the last example to see how this option works.
- onComplete: Same is onChange, except it is only fired when the cursor is released. It is useful to have two separate functions, because onChange will be fired much more often than onComplete (every time the cursor is color cursor moves actually). This way you can set the simple tasks to onChange (like updating an element's color), and do the big stuff when the color has been picked in the onComplete function (like submitting the new color value to the server).
Implementation
First, you simply import the files provided in the zip archive into your document. While you can insert <script> tags anywhere, we recommend you put them inside the <head> tag of your document:
 <head>
<!-- Insert these lines in your document's head -->
<link rel="stylesheet" type="text/css" media="screen" href="css/uvumi-sphere.css"/>
<script type="text/javascript" src="js/mootools-for-sphere.js"> </script>
<script type="text/javascript" src="js/UvumiSphere.js"> </script>
</head>
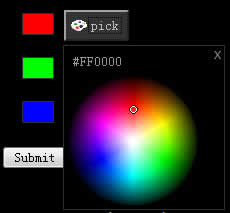
Then you must prepare the HTML code for your ColorSphere. For one color, all it requires is a single text input. Let's say we want the color to be set to pure red the first time you open the picker. So we set the input value to "#f00". We suppose the reason you pick a color is to submit it to a server, so we put this input inside a form.
 <form id="color-form" action="submit-color.php" method="post" >
<p>
<!-- This is our color input -->
<input id="color-input" name="color" type="text" value="#F00" />
</p>
<p>
<button type="submit">Send</button>
</p>
</form>
So far we have a form that will send a value named 'color' as a 'POST' parameter to the script 'submit-color.php', which is a name we just made up. It will be your job to write a server-side script to catch this value and do something useful with it. The value for 'color' is '#F00' unless the user types in something else. Techinically it is functional and could totaly work as it is.
Then we are ready to initialize the sphere script. By default, the sphere recieves only one argument, the selector. The selector is a string that works like a CSS rule. Using the exact same syntax, it will tell the script which HTML elements it should apply to. In our case there is only one input, so we are going to use a '#' for id selection, but you can create more complex rules, using tags and class selections. If you are familiar with CSS styling, this should not be a problem for you.
 <!-- We create a CSS selector that match our color input's id.
Here we added 'input' to make more obvious,
but since an id is supposed to unique,
'#color-input' would have been enough. -->
<script type="text/javascript">
new UvumiSphere('input#color-input');
</script>
In the end, we put everything together. Mootools requires a strict Doctype to work properly. We get something like this:
 <!DOCTYPE html PUBLIC "-//W3C//DTD XHTML 1.0 Strict//EN"
"http://www.w3.org/TR/xhtml1/DTD/xhtml1-strict.dtd">
<html>
<head>
<link rel="stylesheet" type="text/css" media="screen" href="css/uvumi-sphere.css"/>
<script type="text/javascript" src="js/mootools-for-sphere.js"> </script>
<script type="text/javascript" src="js/UvumiSphere.js"> </script>
<script type="text/javascript">
new UvumiSphere('input#color-input');
</script>
</head>
<body>
<div>
<form id="color-form" action="submit-color.php" method="post" >
<p>
<input id="color-input" name="color" type="text" value="#F00" />
</p>
<p>
<button type="submit">Send</button>
</p>
</form>
</div>
</body>
</html>
Technically speaking, that should work. The text input will be virtually replaced with a 'pick' button. Virtally, because the input still exists, it is simply hidden. It will be constantly updated, and submited along with the form.
This is for the default, simple usage. We are going to see how to apply the sphere to several inputs. Let's say we have four color inputs this time, all needing the ColorSphere.
We saw how to use an ID selector. We could use an ID selector again, by just listing the inputs IDs, separated by commas: #input1,#inpu2,#input3,#input4. It will work, but we can use any CSS rule (including advanced CSS3 rules that are not even supported by all browsers).
We could use a rule to apply the sphere to any input inside the form: form#color-form input . Problem is, this will turn every input tag into color pickers, even if they are checkboxes or radio buttons. Probably not what we want.
The best way to filter the inputs we want is to use the class property: we add a class to the inputs we want to apply the sphere to, and we use this class in the selector, thanks to the dot character:
 <form id="color-form" action="submit-color.php" method="post" >
<p>
<input class="color-input" name="color1" type="text" value="#F00" />
<input class="color-input" name="color2" type="text" value="#0F0" />
<input class="color-input" name="color3" type="text" value="#00F" />
</p>
<p>
<button type="submit">Send</button>
</p>
</form>
 <!-- the dot before color-input is not a typo, this is what define the selection rule by class.
This means "select the element with class color-input"-->
<script type="text/javascript">
new UvumiSphere('.color-input');
</script>
If we have two forms, and we went a separate picker for each, we can create two instances (eventually with different options), and specify in the css rules which form they should affect:
 <!-- Here we create two ColorSphere instances, one for each form,
using the forms' ID to differenciation the selectors.
The two instances also have different options:
In the first form, inputs don't have values, so we set a defaut color to #f00 (red)
In the second form, we want the buttons to say 'Select',
So we set the buttonText option accordingly. -->
<script type="text/javascript">
new UvumiSphere('form#color-form1 input.color-input',{defaultColor:'#f00'});
new UvumiSphere('form#color-form2 input.color-input',{buttonText:'Select'});
</script>
<form id="color-form1" action="submit-color.php" method="post" >
<p>
<input class="color-input" name="color1" type="text" />
<input class="color-input" name="color2" type="text" />
</p>
<p>
<button type="submit">Send</button>
</p>
</form> <form id="color-form2" action="submit-color.php" method="post" >
<p>
<input class="color-input" name="color1" type="text" value="#F00" />
<input class="color-input" name="color2" type="text" value="#0F0" />
</p>
<p>
<button type="submit">Send</button>
</p>
</form>
Known Issues
- No gray level: Yeah, if you take a closer look at the ColorSphere, you'll notice that beside pure black and pure white, there are no gray values. The only way to select one is to type it in. Not much can be done about it, except adding an extra column on the side with a gray gradient. But the point of this color picker is to be as simple as possible, so we're leaving it as is for now.
- One color at a time: Because the ColorSphere is optimized so one instance covers every color input, it also means only one picker can be displayed at atime. As a result, if you want to adjust two colors simultaneously, you'll have to open/close the picker on every adjustment, which might become annoying. You can still create multiple instances of the picker, assigning there is a different collection of inputs for each instance, but in this case your resources will not be optimized how we intended.
You might also like
Tags
accordion accordion menu animation navigation animation navigation menu carousel checkbox inputs css3 css3 menu css3 navigation date picker dialog drag drop drop down menu drop down navigation menu elastic navigation form form validation gallery glide navigation horizontal navigation menu hover effect image gallery image hover image lightbox image scroller image slideshow multi-level navigation menus rating select dependent select list slide image slider menu stylish form table tabs text effect text scroller tooltips tree menu vertical navigation menu