 Subscribe
 Follow Us
LavaLamp jQuery Sliding Menu
 13 years ago
 18969
18969 3267
3267
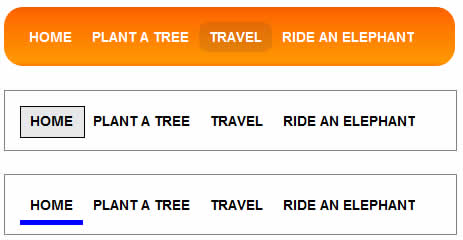
It is a jQuery sliding nifty effect menu with light weight code and extra two more interface styles.
Step 1: The HTML
Since most UI developers believe that an unordered list(ul) represents the correct semantic structure for a Menu/Navbar, we will start by writing just that.
<ul class="lavaLamp">
            <li><a href="#">Home</a></li>
            <li><a href="#">Plant a tree</a></li>
            <li><a href="#">Travel</a></li>
            <li><a href="#">Ride an elephant</a></li>
        </ul>
In the markup above, “ul” represents the menu, and each “li” represents a menu-item. At this point it is crucial to understand that we will be adding another artificial “li” to represent the background of the currently highlighted menu-item. Since the background itself is cosmetic and doesn’t represent a menu-item, we will be adding it from javascript. Just to make sure we are in sync, “you need not add this li”, the LavaLamp plugin will take care of it. Once added, the “li” representing the background will look like this.
<li class="back"><div class="left"></div></li>
Step 2: The CSS
You can skin this markup in many different ways to achieve your own personalized menu. The following style sheet is just one possibility. A few more possibilities are demonstrated in the “Bonus” section towards the end of this blog entry.
/* Styles for the entire LavaLamp menu */
.lavaLamp {
    position: relative;
    height: 29px; width: 421px;
    background: url("../image/bg.gif") no-repeat top;
    padding: 15px; margin: 10px 0;
    overflow: hidden;
}
    /* Force the list to flow horizontally */
    .lavaLamp li {
        float: left;
        list-style: none;
    }
        /* Represents the background of the highlighted menu-item. */
        .lavaLamp li.back {
            background: url("../image/lava.gif") no-repeat right -30px;
            width: 9px; height: 30px;
            z-index: 8;
            position: absolute;
        }
            .lavaLamp li.back .left {
                background: url("../image/lava.gif") no-repeat top left;
                height: 30px;
                margin-right: 9px;
            }
        /* Styles for each menu-item. */
        .lavaLamp li a {
            position: relative; overflow: hidden;
            text-decoration: none;
            text-transform: uppercase;
            font: bold 14px arial;
            color: #fff; outline: none;
            text-align: center;
            height: 30px; top: 7px;
            z-index: 10; letter-spacing: 0;
            float: left; display: block;
            margin: auto 10px;
        }
Trust me, this is a simple style sheet. Follow along to understand what is done in each of its sections.
First, we style the “ul” with the bright orange background image and some basic properties like height, width, padding, margin etc. We use relative positioning because, that way we can absolutely position the background “li” relative to the “ul”. This helps by enabling us to move this background “li” freely within the context of the parent “ul”.
Next, we make the “li”s flow horizontally instead of vertically. By default, it flows vertically. There are a couple of techniques to do this. In this case, we are using the “float:left” to achieve this effect.
Next, we style the artifical “li” that represents the background of the currently highlighted menu-item. This uses the sliding doors technique. Also, notice the absolute positioning used as mentioned above.
Finally, we style the anchor that represents the actual clickable portion of each menu-item. These styles are mostly cosmetic and self-explanatory.
Some of the above rules may not be obvious if you are not very confident in how “positioning” works in CSS. For those, i highly encourage you to quickly read this article on CSS positioning. It is short, sweet and very informative.
Step 3: The Javascript
This is the easy part. Most of the javascript work is taken care by the Lava Lamp plugin itself. As a developer, you just have to include the mandatory and/or optional javascript files and fire a call to initialize the menu.
<script type="text/javascript" src="path/to/jquery.js"></script>
<script type="text/javascript" src="path/to/jquery.lavalamp.js"></script>
<!-- Optional -->
<script type="text/javascript" src="path/to/jquery.easing.js"></script>

<script type="text/javascript">
    $(function() { $(".lavaLamp").lavaLamp({ fx: "backout", speed: 700 })});
</script>
Include a reference to the jQuery library and the LavaLamp plugin. Optionally, include the easing plugin as well.in the document.ready event, fire a call to initialize the menu. You have the option to supply an easing “fx” , the “speed” with which the animation happens and a callback to be executed when a menu-item is clicked. They are optional, the default “fx” being “linear” and the default “speed” being “500″ ms. That’s it.
You might also like
Tags
accordion accordion menu animation navigation animation navigation menu carousel checkbox inputs css3 css3 menu css3 navigation date picker dialog drag drop drop down menu drop down navigation menu elastic navigation form form validation gallery glide navigation horizontal navigation menu hover effect image gallery image hover image lightbox image scroller image slideshow multi-level navigation menus rating select dependent select list slide image slider menu stylish form table tabs text effect text scroller tooltips tree menu vertical navigation menu