 Subscribe
 Follow Us
jQuery Awesome modal Navigation Menu
 13 years ago
 21929
21929 2614
2614
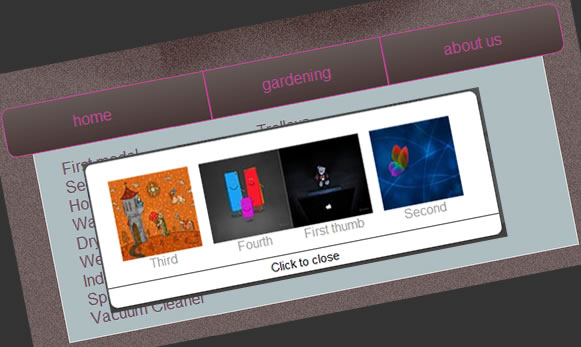
We have a horizontal menu with a few categories. Each category has multiple subcategories and each such subcategory may contain a random number of products. For easier and faster movement of users thorough the site, we won’t reload the page once a subcategory is clicked. Instead, we will display all products in a modal window.
How does the modal work?
Once someone clicks a subcategory link, the modal window will be displayed and the products will show up. The modal will close when products are clicked, and the browser is targeted to a new page, when the user clicks the close button or when the overlay is clicked. It isn’t that hard is it?
The main issue is that we need different content in the modal window. Each subcategory will have its own products and we need to find out which products to display. We will do this with the help of jQuery as you’ll find out in just a few minutes.
But first, lets get to coding the structure and design of the modal window. First of all, we have the overlay mask, which will be an empty div. We need to make sure the overlay mask will be on top of all site content but beneath the modal window, so we will use z-index:1100 for modal content and z-index:1000 for the overlay. The overlay won’t be displayed unless a subcategory is clicked, so display:none is also mandatory. You should also choose your favorite color for the overlay, and set it absolutely to top left 0 pixels.
<div></div>
#overlay-mask {
 display:none;
 z-index:1000;
 background-color:#333;
 position:absolute;
 top:0;
 left:0;
 }
The modal window will be something like this. An outer div to hold everything in place, another inner div to hold the products, and a link that will server as a close modal window button. Because we want the button to span all the way, we had to use an outer div for the content of the modal, so that’s why there’s 2 divs and not just one.
<div class="awesome hidden">
   <a href="#" target="_new" class="thumb"><img src="http://www.htmldrive.net/edit_media/2010/201008/20100819/news-ticker/images/1.jpg" width="102" height="102" alt="Wash1" /><span>First thumb</span></a>
   <a href="#" target="_new" class="thumb"><img src="http://www.htmldrive.net/edit_media/2010/201008/20100819/news-ticker/images/2.jpg" width="102" height="102" alt="Wash2" /><span>Second</span></a>
   <a href="#" target="_new" class="thumb"><img src="http://www.htmldrive.net/edit_media/2010/201008/20100819/news-ticker/images/3.jpg" width="102" height="102" alt="Wash3" /><span>Third</span></a>
   <a href="#" target="_new" class="thumb last"><img src="http://www.htmldrive.net/edit_media/2010/201008/20100819/news-ticker/images/4.jpg" width="102" height="102" alt="Wash4" /><span>Fourth</span></a>
  </div>
As you see, each product is in fact a link containing a product thumbnail and some text. Lets see how we style them. the purpose of the tutorial is creating the modal window, not styling it, so the style is really basic, especially if you take out the rounded corners.
#overlay-content {
 width:500px;
 }

#overlay-content div {
 width:450px;
 padding:25px;
 padding-bottom:10px;
 }

#overlay-content a.close {
 display:block;
 padding:0px;
 border-top:1px solid #333;
 font-size:15px;
 line-height:25px;
 height:25px;
 text-align:center;
 }

#overlay-content a.thumb {
 display:block;
 width:102px;
 height:122px;
 padding:0px;
 margin:0px 14px 0px 0px;
 float:left;
 text-decoration:none;
 }

#overlay-content a.thumb img {
 display:block;
 width:102px;
 height:102px;
 padding:0px;
 border:0px;
 }

#overlay-content a.thumb span {
 display:block;
 width:102px;
 height:20px;
 padding:0px;
 text-align:center;
 color:#999;
 }

#overlay-content a.last {
 margin-right:0px;
 }

#overlay-content div {
 overflow:auto;
 }
The first two lines are just setting the dimensions of the modal window, for the purpose of a modal window that contains four products, all on the same line. The anchor tag with the “close” class is in fact the button that will be displayed in the bottom of the modal that will be used to close to modal window if needed.
The thumb classed anchor will contain the image and the text description contained in a span tag. As all thumbnails have a small right margin, we need the additional last class to remove the right margin from the last product in the modal. The overflow is used to cancel the collapsing of the inner div that contains only floating elements.
We finished with structure and styling, so lets move on to jQuery coding. Take a look at the code in its entirety and try to understand it. The explanations will follow it just below.
var opacity = '0.8'; // can be up to 1

$('a[name=modal]').removeAttr('href');  //javascript on, no need to redirect to a link here
$('a[name=modal]').click(function ()
 {
 var maskHeight = $(document).height();
 var maskWidth = $(document).width();
 var windowHeight = $(window).height();
 var windowWidth = $(window).width();
 var contentWidth = $('#overlay-content').width(); // width
 var contentHeight = $('#overlay-content').height(); // and height of content area

 //Set height and width to mask to fill up the whole screen
 $('#overlay-mask').css({'width':maskWidth,'height':maskHeight});
 $('#overlay-mask').css('opacity',opacity);
 $('#overlay-mask').css('display','block');

        // put the overlay content area in the center of the window
 $('#overlay-content').css('display','block');
 $('#overlay-content').css('left',(windowWidth-contentWidth)/2);
 $('#overlay-content').css('top',(windowHeight-contentHeight)/2);
 });

 // move overlay content to center of the window
$(window).resize(function ()
 {
 var maskHeight = $(document).height();
 var maskWidth = $(window).width();
 var windowHeight = $(window).height();
 var windowWidth = $(window).width();
 var contentWidth = $('#overlay-content').width(); // width
 var contentHeight = $('#overlay-content').height(); // and height of content area

 //Set height and width to mask to fill up the whole screen
 $('#overlay-mask').css({'width':maskWidth,'height':maskHeight});
 $('#overlay-content').css({'left':(windowWidth-contentWidth)/2});
 $('#overlay-content').css({'top':(windowHeight-contentHeight)/2});
 });

var $scrollingDiv = $("#overlay-content");
$(window).scroll(function()
 {
 $scrollingDiv.stop().animate({"marginTop": ($(window).scrollTop()) + "px"}, "fast" );
 });

$('#overlay-mask').click(function ()
 {
 $('#overlay-mask').css('display','none');
 $('#overlay-content').css('display','none');
 });

$('.close').click(function ()
 {
 $('#overlay-mask').css('display','none');
 $('#overlay-content').css('display','none');
 });
The opacity variable will set the overlays opacity. It would look really odd with a non transparent overlay, so perhaps anything below .8 will do just fine. Except if you have it completely transparent when there isn’t going to be any overlay.
We find all anchor tags that has “modal” as name, and remove their href attribute, as we don’t want to move to another page before seeing the overlay, don’t we?
Then we have the on click behavior. As soon as an anchor link that has an attached modal window is clicked, we get the sizes of the document as well as those of the window. We also check out the width and height of the content inside the modal window.
Next, we set the width and height of the overlay mask using css attributes. We want the overlay to span across the entire page, right? We then set its opacity and make it appear in the page by changing its display property from none (set in the css) to block. We do the same with the content div, and also put it in the center of the browser window.
We also have a resize behavior, which will be triggered if you resize the browser after the page has loaded. If that happens, we check out the dimensions of the document and browser as well, and reset the content window in the center of the page. In the same time, we modify the width and height of the overlay so that it matches the changes triggered by resizing the browser.
If the page has a scrollbar and we scroll either up or down, we use the scroll jQuery trigger to animate the modal back to the center of the page. The stop function there before the animation will make sure that older animations will be stopped if the scroll is used continuously or with small pauses.
Finally, once the overlay mask or close button is clicked, we need to close the modal window, and the last two lines of code do just that.
One small, but real problem!
We haven’t taken in consideration the most important aspect. Each time we load the modal window the content needs to be different. The above code only works for the same content in the modal window such as a contact form, and we need to fix this issue.
First of all, we remove content from the overlay-content inner div and leave it empty. This div will auto-populate with proper content when a subcategory is clicked. Next, we add rel attributes to modal anchor links (those that were named “modal”). We will use unique rel attributes to identify the content we need to load.
We will also add divs that have classes corresponding to each rel attribute, which will contain the content we will load on click. We have to make this divs hidden so they don’t pop up god know where inside your site’s layout. Simple right? But how do we do this via jQuery? Even simpler, using only three lines of code.
Once a modal anchor is clicked we identify its rel attribute, get the html contents of the div that has the same class name as the rel attribute, then populate the inner div in the overlay content with the html content we found. Cool! Here’s the code for that, which we add just below the .click function.
var rel = $(this).attr('rel');
var modal_content = $('.'+rel).html();
$('#overlay-content div').html(modal_content);
And we’re done.
You might also like


Tags
accordion accordion menu animation navigation animation navigation menu carousel checkbox inputs css3 css3 menu css3 navigation date picker dialog drag drop drop down menu drop down navigation menu elastic navigation form form validation gallery glide navigation horizontal navigation menu hover effect image gallery image hover image lightbox image scroller image slideshow multi-level navigation menus rating select dependent select list slide image slider menu stylish form table tabs text effect text scroller tooltips tree menu vertical navigation menu