 Subscribe
 Follow Us
Great Round Image Galleries With jQuery
 13 years ago
 27351
27351 4868
4868
Hey guys. Quite often with image galleries powered by jQuery, we’re presented with a very similar layout – one which contains the images or items presented inside a rectangle. This is great for providing an experience users are used to, but there are a few interesting alternatives that you may like to hear about – how about displaying your images or items around a shape like a circle or an ellipse instead?. In today’s post I’ll be showing you how to do just that with a brand new plugin I’ve written called jQuery Roundrr.
I’ll also show you how you can leverage the power of math with JavaScript to generate coordinates for positioning your images in interesting ways without needing to use HTML5 or CSS3 – just pure javascript. The benefit of this approach is that much of what I show you today will work cross-browser right out of the box.
Before we get started, here are some demos of Roundrr in action. Remember you can also use the left and right keys on your keyboard to control the interface.
Today’s post is broken up into two parts. In part 1, I’m going to introduce you to some of the concepts involved in getting the coordinates we need to plot our image galleries around a shape and in part 2 I’ll introduce you to jQuery Roundrr plugin I wrote that will allow you to easily create interactive event-based galleries using jQuery and a little CSS.
Part 1 – Getting started with Shape-based coordinates
Understanding Coordinate-Based Positioning
In most programming languages that work with a visual window or canvas, you’re provided with a means for positioning content using the concept of X and Y coordinates. These allow you to tell the presentation layer or interpreter (in the case of the browser, CSS) where it is on the screen that you would like your content to be displayed.
Example 1. When you create a div container, center it and then fill it with a list of images without specific positions, what you’re allowing the browser to do is calculate these positions for you.
Example 2. If you tell the browser that each image in your list should be specifically positioned (using margin-left and margin-top) you’re taking control of exactly where you would like the content to be positioned. We’re going to leverage these two CSS attributes for today’s project.
A lot of the math that goes into basic shape-based positioning is relatively straight-forward. Chances are you probably already covered it in highschool, so much of this will seem familiar. Consider that a circle has a center (j,k) and a radius r. The x and y positions for any point that occurs on the circle’s path is then
x(t) = r cos (t) + j, y(t) = r sin(t) + k. A more generic way of writing this which can be used for our first attempt at coordinate-based positioning is:
- x = centerX + Math.cos(radians) * radius;
- y = centerY + Math.sin(radians) * radius;
where radians = (angle_of_the_circle/180) * Math.PI. centerX is the X center of the circle on our page and centerY is the Y center of the circle.
In a moment I’m going to show you how to get through this math in JavaScript and output the positions you need to display content around a circle.If we were to implement the above equations using jQuery (with vanilla JavaScript intact for the equations) this would look like:
/*
   drawCircle()
   selector : a jQuery selector defining an element or array of elements
   center : the center of the circle
   radius : the radius of the circle
   angle: the angle of the circle
   x: the left offset of all points on the circle
   y: the top offset of all points on the circle
   Sample usage:
   CSS: .box { background-color:red; height:90px; width:90px;  position:absolute; margin:5px;}
   JS:drawCircle('.box', 50, 200, 90, 310, 220);
*/
    function drawCircle(selector, center, radius, angle, x, y)
    {
    var total = $(selector).length;
    var alpha = Math.PI * 2 / total;
    $(selector).each(function(index)
    {
        var theta = alpha * index;
        var pointx  =  Math.floor(Math.cos( theta ) * radius);
        var pointy  = Math.floor(Math.sin( theta ) * radius );
        // here is where we're outputting the necessary
//X and Y coordinates
        $(this).css('margin-left', pointx + x + 'px');
        $(this).css('margin-top', pointy  + y  + 'px');
    });
   }
Now that we’ve covered circles lets move onto a slightly more advanced shape – the ellipse. Ellipses are two dimension-closed curves and one of the many in-the-wild examples of a common ellipse is the oval. The parametric form of an ellipse rotated by an angle k is:
- x = p + a * cos(t) * cos(k) – b * sin(t) * sin(k)
- y = q + b * sin(t) * cos(k) + a * cos(t) * sin(k)
Where a and b are two lengths which describe the curve and p and q define the center/offset of the ellipse relative to the page. Here is my version of the JavaScript code that draws the content of a selector around an Ellipse.
/*
   drawEllipse()
   selector : a jQuery selector defining an element or array of elements
   x: the left offset of all points on the ellipse
   y: the top offset of all points on the ellipse
   a: the height of the ellipse
   b: the width of the ellipse
   angle: the angle of the ellipse
   Sample usage:
   CSS: .box { background-color:red; height:60px; width:60px;  position:absolute; margin:5px;}
   JS:drawEllipse(".box", 230,300, 200, 350, 360);
*/
function drawEllipse(selector, x, y, a, b, angle)
{
        var steps = $(selector).length;
        var i = 0;
        var beta = -angle * (Math.PI / 180);
        var sinbeta = Math.sin(beta);
        var cosbeta = Math.cos(beta);
        $(selector).each(function(index)
        {
        i+= (360/steps);
        var alpha = i * (Math.PI / 180) ;
        var sinalpha = Math.sin(alpha);
        var cosalpha = Math.cos(alpha);
        var X = x + (a * cosalpha * cosbeta - b * sinalpha * sinbeta);
        var Y = y + (a * cosalpha * sinbeta + b * sinalpha * cosbeta);
        X = Math.floor(X);
        Y = Math.floor(Y);
//again, here's where the important X and Y coordinates
//are being output
        $(this).css('margin-top', X + 'px');
        $(this).css('margin-left', Y + 'px');
        });
}
Demos Set 1: Positioning Images Around A Circle or Ellipse
For the purposes of this section, I’ve written a very minimalist library called jsShapeLib which you can download or fork on Github here. It’s purpose is to provide you with raw coordinate positions using formulae for both circles and ellipses, such as the one I’ve mentioned above. To use jsShapeLib, all you need to do is call the drawCircle() or drawEllipse() functions with their relevant parameters.
See below for two demos of how you can use jsShapeLib to position items. Note that because we’re using primarily standard JavaScript functions to achieve our coordinate positioning, all of this code is cross-browser compatible out of the box.
Part 2 – jQuery Roundrr
Now that we’ve gone through how to plot images around a circle, how about we take this further?. When you move outside of the concept of using a rectangle for your content, you open up a whole new world of user interface possibilities.
How about automatically animating your circle, spinning it or turning it into a content gallery with a central area of focus?. I decided to take jsShapeLib further to provide all of these things in a jQuery plugin. I wanted to make sure that the plugin would be able to offer enough flexibility to do three things:
- Allow users to create interesting interfaces that go beyond just plotting
- Allow users the flexibility to add as many images as they wanted and easily configure the radius of the circle
- Offer a complete events model for interacting with the content circle with configuration options
Looking around I saw that there was already a plugin out there that did a little of what I wanted called RadMenu by Nirvana Tikku, so I decided to take the existing codebase, strip it down a little and then extend it to offer a better events model, more configuration options, autoplay features, ‘pick’ mode (which I will show you soon), keyboard event support and a few other extras.
How Does Roundrr Work?
Much like any other image gallery plugin, Roundrr works with normal lists of images and transforms them accordingly. It supports two modes which you can use depending on what you want to do – for most people the ‘standard’ mode should be fine but if you want to use ‘pick’ mode instead (see below) you can also take advantage of that.
To keep Roundrr compact, it encourages the idea of extending functionality through your front-end code using the events model. What this means is that Roundrr will provide you with the ability to plot, and animate in either direction your wheel/circle of images but more custom interaction features (such as displaying a larger image of a thumbnail in the center of the screen or displaying a tweet relevant to the thumbnail) are done outside of the plugin. This allows it to be relatively customizable.
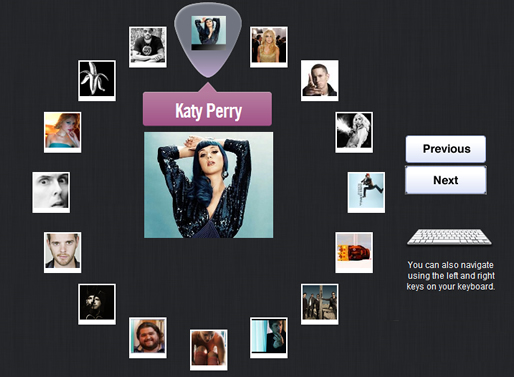
To demonstrate how to get setup with Roundrr, let’s take a look at the ‘Pick’ demo and how you can recreate it.
How To Get Started With ‘Pick’ Mode
Step 1: Include Dependancies
< script type="text/javascript" src="http://ajax.googleapis.com/ajax/libs/jquery/1.4.2/jquery.min.js">
< script type='text/javascript' src='scripts/ui/jQuery.roundrr.js'>
Step 2: HTML/CSS
<div class="container">
<div id="roundrr_navigation"> </div>

<div class="roundrr_center"> </div>

<div class="roundrr_speech"> </div>

<div id="roundrr_caption"> </div>

<div id="roundrr_pick"> </div>

<div id="roundrr_container">
<ul class="list">
<li class="item">
<div class="my_class"><img alt="Al Yankovic" src="http://a0.twimg.com/profile_images/246073324/IL2_bigger.jpg"></div>
</li>
<li class="item">
<div class="my_class"><img alt="Taylor Swift" src="http://a0.twimg.com/profile_images/390558464/Photo_190_bigger.jpg"></div>
</li>
<li class="item">
<div class="my_class"><img alt="Dandy Warhols" src="http://a1.twimg.com/profile_images/930308885/ban_bigger.jpg"></div>
</li>
<li class="item">
<div class="my_class"><img alt="Lenny Kravitz" src="http://a0.twimg.com/profile_images/1117384560/image_bigger.jpg"></div>
</li>
<li class="item">
<div class="my_class"><img alt="Katy Perry" src="http://a3.twimg.com/profile_images/1107052519/i_mblue_bigger.jpg"></div>
</li>
  etc.     </ul>
</div>
</div>
Step 3: JavaScript
Here’s the part where we initialize the Roundrr plugin through .roundrrwheel() and supply the configuration options we’d like to use. For further details on how to configure the plugin, please see the documentation section of this post.
         var currentImage = "";
         var interfaceLock = false;
    jQuery("#roundrr_container").roundrrwheel(
    {
   mode: 'pick', //mode can be pick or standard
   autoplay: false,
   autoplayDirection: 'anticlockwise',
   autoplayDuration: 4000,
   centerClass: 'roundrr_center',
   listClass: 'list',
   itemClass: 'item',
   radius: 220,
   animSpeed:400,
   centerX: 29,
   centerY: 60,
   animationEffect: 1, //(1:off, 5:light,10:heavy, 15:subtle)
   selectEvent: "click",
   centerImageSrc: "images/placeholder2.png",
   //function called when selecting an item
   onSelect: function($selected)
   {
showLargeImage($selected, 'noanim');
   },
   //function called before animating the circle clockwise
   onNextBegin: function($m)
   {
      interfaceLock = true;
   },
                        //fuction called before animating the circle anticlockwise
   onPrevBegin: function($m)
   {
      interfaceLock = true;
   },
   //function called once an image has moved under the 'pick'
   onImageFocus: function($item)
   {
                          showLargeImage($item, 'none');
   },
   //function called once an image/image set is no longer under the 'pick'
   onImageBlur:  function($item)
   {
   },
   //function called once the animation has completed
   onAnimationComplete: function($menu)
   {
        jQuery('.centerImage').attr('src', currentImage);
        jQuery('.centerImage').load(function()
        {
           interfaceLock = false;
        });
   },
   angleOffset: Math.PI,
//function called once the items have been displayed on screen
   onShow: function($menuitems)
   {
    $menuitems.each(function(i)
    {
     var $this = jQuery(this);
     $this.delay(i*100).fadeIn(500);
    });
   }
  });
Additional Functions
Here is an example of additional functions that are called during different events in the plugin setup. Here you’ll see how I call for a larger image to be displayed based on the thumbnail’s URL or how the clockwise/anticlockwise animations are called through next() and prev(). The keyboard events can also be seen below.
Query("#roundrr_container").roundrrwheel("show"); //initialize roundrrwheel
  $('#next').bind('click', spinMenuRight);
  $('#prev').bind('click', spinMenuLeft);
  function showLargeImage($i, mode)
  {
   interfaceLock = true;
   var thisImage   = $i.find('img');
   var focusedImage = thisImage.attr('src');
            var largerImage = focusedImage.replace('_bigger', '');
            var imageCaption = thisImage.attr('alt');
            var speechBubble =  jQuery('.roundrr_speech');
            speechBubble.fadeIn();
            currentImage = largerImage;
            jQuery('#roundrr_caption').fadeIn();
   jQuery('#roundrr_caption').html(imageCaption);
            if(mode=='noanim')
            {
                jQuery('.centerImage').attr('src', currentImage);
        jQuery('.centerImage').load(function()
        {
           interfaceLock = false;
        });
            }
  }
     /*Spin the menu to the left*/
   function spinMenuLeft()
   {
      if(!(interfaceLock))
     {
      jQuery("#roundrr_container").roundrrwheel("prev");
      }
   }
   /*Spin the menu to the right*/
   function spinMenuRight()
   {
        if(!(interfaceLock))
     {
      jQuery("#roundrr_container").roundrrwheel("next");
      }
   }
   /*Keydown events*/
   $(window).keydown(function(event)
   {
    var keycode = event.keyCode;
    switch(keycode)
    {
      case 39:
               spinMenuLeft();
        break;
        case 37:
               spinMenuRight();
         break;
       } });
   });
Documentation
If you would like to read more about the different configuration options available in Roundrr as well as find out what each of the plugin parameters do, you can find additional documentation on the Github page for the project here.
<link rel="stylesheet" type="text/css" href="/edit_media/2011/201101/20100118/addyosmani-jquery-roundrr-bff8ed8/fonts/stylesheet.css"></link>
<script type='text/javascript' src='/edit_media/2011/201101/20100118/addyosmani-jquery-roundrr-bff8ed8/scripts/ui/jQuery.roundrr.js'></script>
<script type='text/javascript' src='/edit_media/2011/201101/20100118/addyosmani-jquery-roundrr-bff8ed8/scripts/ui/app.js'></script>
<div class="container">
<!-- Right-hand navigation -->
<div id="roundrr_navigation">
<a href="#" id="next"></a>
<a href="#" id="prev"></a>
<img class="keyboard" src="/edit_media/2011/201101/20100118/addyosmani-jquery-roundrr-bff8ed8/images/keyboard.png"></img>
<p>
You can also navigate using the left and right keys on your keyboard.
</p>
</div>
<!-- central image -->
<div class="roundrr_center">
</div>
<!-- Speech bubble for captions -->
<div class="roundrr_speech">
</div>
<!-- actual caption text -->
<div id="roundrr_caption">
</div>
<!-- the pick which is displayed over the current image -->
<div id="roundrr_pick">
</div>
<!-- the container of images -->
<div id='roundrr_container'>
<ul class='list'>
<li class='item'>
<div class='my_class'>
<img alt="Al Yankovic" src="http://a0.twimg.com/profile_images/246073324/IL2_bigger.jpg"></img>
</div>
</li>
<li class='item'>
<div class='my_class'>
<img alt="Taylor Swift" src="http://a0.twimg.com/profile_images/390558464/Photo_190_bigger.jpg"></img> </div> </li>
<li class='item'>
<div class='my_class'>
<img alt="Dandy Warhols" src="http://a1.twimg.com/profile_images/930308885/ban_bigger.jpg"></img>
</div>
</li>
<li class='item'>
<div class='my_class'>
<img alt="Lenny Kravitz" src="http://a0.twimg.com/profile_images/1117384560/image_bigger.jpg"></img>
</div>
</li>
<li class='item'>
<div class='my_class'>
<img alt="Katy Perry" src="http://a3.twimg.com/profile_images/1107052519/i_mblue_bigger.jpg"></img> </div> </li>
<li class='item'>
<div class='my_class'>
<img alt="Ke$ha"src="http://a3.twimg.com/profile_images/676841123/kesha-grammy-2010_bigger.jpg"></img>
</div>
</li>
<li class='item'>
<div class='my_class'>
<img alt="Eminem" src="http://a0.twimg.com/profile_images/859433636/recoveryapprovedcrop_bigger.jpg"></img> </div>
</li>
<li class='item'>
<div class='my_class'>
<img alt="Lady Gaga" src="http://a3.twimg.com/profile_images/941805227/braphoto_bigger.jpg"></img> </div> </li>
<li class='item'>
<div class='my_class'>
<img alt="Chris Cornell" src="http://a1.twimg.com/profile_images/107748009/chris-cornell-scream_bigger.jpg"></img> </div>
</li>
<li class='item'>
<div class='my_class'>
<img alt="Kanye West" src="http://a2.twimg.com/profile_images/1132696610/securedownload_bigger.jpeg"></img> </div> </li>
<li class='item'>
<div class='my_class'>
<img alt="Stereophonics" src="http://a1.twimg.com/profile_images/402742469/myspacepic_bigger.jpg"></img> </div> </li>
<li class='item'>
<div class='my_class'>
<img alt="Rob Thomas" src="http://a2.twimg.com/profile_images/1008825866/RT600_53_bigger.jpg"></img> </div> </li>
<li class='item'>
<div class='my_class'>
<img alt="Pink" src="http://a3.twimg.com/profile_images/549375583/Pinkdeborahanderson_112_bigger.jpg"></img> </div> </li>
<li class='item'>
<div class='my_class'> <img alt="Weezer" src="http://a0.twimg.com/profile_images/1106738472/Hurley250_bigger.jpg"></img> </div>
</li>
<li class='item'>
<div class='my_class'>
<img alt="Eric Prydzz" src="http://a0.twimg.com/profile_images/425527348/ejebild_bigger.jpg"></img>
</div>
</li>
<li class='item'>
<div class='my_class'> <img alt="The Streets" src="http://a3.twimg.com/profile_images/121412115/Mike_Skinner-Big_Issue-00051_bigger.jpg"></img>
</div> </li>
</ul>
</div>
</div>
Tags
accordion accordion menu animation navigation animation navigation menu carousel checkbox inputs css3 css3 menu css3 navigation date picker dialog drag drop drop down menu drop down navigation menu elastic navigation form form validation gallery glide navigation horizontal navigation menu hover effect image gallery image hover image lightbox image scroller image slideshow multi-level navigation menus rating select dependent select list slide image slider menu stylish form table tabs text effect text scroller tooltips tree menu vertical navigation menu