 Subscribe
 Follow Us
cool Dashboard Menu with jQuery
 12 years ago
 18672
18672 3261
3261
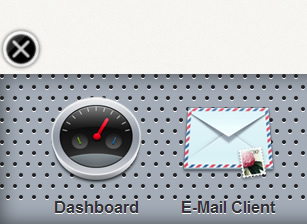
we are going to create our own dashboard menu as in Leopard dashboard. Dashboard menu in Leopard usually uses as a container for a tons of widgets we have and that will be nice if we have one on our web application.
Basic Technique
The dashboard will be hidden out of the webpage, in this case on the bottom of the page. We can do that by setting the dahboard position into absolute, put its bottom position with minus point and set the body’s overflow properties into hidden.
The problem with this technique is our document content will also hidden since the body’s overflow properties was set into hidden, we can solve them by moving the dashboard into the top of the page, but in this demo we’ll continue to put them on the bottom.
Build Dashboard
We’ll separate the dashboard contents into 3 parts : toggle for showing and hiding dahsboard, dashboard menu for wrapping widgets list and dot container for wrapping dashboard’s background with metallic effect. Wrap them all on one div (as a container) so we can easily move these 3 parts only by styling this div.
<div id="dashboard">
	<img src="images/toggle.png" id="toggle">
<div id="dashboard-menu">
		<!-- list of widgets -->
	</div>
<div id="dot-container">
		<!-- dots groups -->
	</div>
</div>
Now we will styling them. Set the dashboard’s width into 100%, position absolute, bottom into 0px and also add inset box shadow into them to make emboss effect. Put the toggle’s position on top of the dashboard to make it always visible even the dashboard is hidden.
#dashboard {
	font-family: Arial;
	font-style: normal;
	background: #a3acb7;
	display: block;
	width: 100%;
	height: 150px;
	margin-right: auto;
	margin-left: auto;
	-webkit-box-shadow: inset 0px 0px 20px rgba(0, 0, 0, .6);
	-moz-box-shadow: inset 0px 0px 20px rgba(0, 0, 0, .6);
	box-shadow: inset 0px 0px 20px rgba(0, 0, 0, .6);
	position: absolute;
	bottom: 0px;
}

#dashboard-menu {
	position: absolute;
	display: block;
	z-index: 2;
}

#dot-container {
	display: block;
	width: 200%;
	text-align: left;
	position: absolute;
	left: 0;
	top: 0;
	z-index: 1;
}

#toggle {
	display: inline-block;
	margin-top: -3em;
	left: 0;
	position: absolute;
	cursor: pointer;
}
Create Metallic Effect With CSS and jQuery
The most interesting technique is how to create metallic effect on dashboard’s background using only CSS and jQuery. The effect are a groups of black circle div with white shadow on it, we can repeat them horizontally until it’s equal to document width and after that repeat them vertically. Move some pixel the odd dots group’s position to make it more real.
<!-- example : 1 dot -->
<div id="dot-container">
	<span class="dot"> </span><span class="dot"> </span><span class="dot"> </span><span class="dot"> </span><span class="dot"> </span><span class="dot"> </span>
</div>

<!-- example : dot groups -->
<div id="dot-container">
<div style="margin-left:0em; margin-bottom: -.5em">
		<span class="dot"> </span><span class="dot"> </span><span class="dot"> </span><span class="dot"> </span><span class="dot"> </span><span class="dot"> </span>
	</div>
<div style="margin-left:0.4em; margin-bottom: -.5em">
		<span class="dot"> </span><span class="dot"> </span><span class="dot"> </span><span class="dot"> </span>
	</div>
</div>
.dot {
	background: #1f1f1f;
	width: 4px;
	height: 4px;
	display: inline-block;
	-webkit-border-radius: 4px;
	-moz-border-radius: 4px;
	border-radius: 4px;
	-webkit-box-shadow: 0px 1px 0px #ffffff;
	-moz-box-shadow: 0px 1px 0px #ffffff;
	box-shadow: 0px 1px 0px #ffffff;
	margin-right: .3em;
}
Expected Result:
We won’t create each dot by copy and paste the span since jQuery can generate and repeat them dynamically. Repeat horizontally the dots until it’s equal to document’s width and after that repeat them vertically. The last thing to do is insert them into dot container div.
//Create base variable, check document width and count how much dot per line.
var a, b, element = '';
documentWidth		= $(window).width();
dotLength			= parseInt(documentWidth/10);

//Loop dot per line
for(a=0; a<= 11; a++) {

	//Check is even or odd to add some pixel to the margin left
	className= ((a%2) == 0) ? '0' : '0.4em';
	element 	= element + '
<div style="margin-left:'+className+'; margin-bottom: -.5em">\n';

		//Loop to create the dot
		for(b=0; b<=dotLength; b++) {
			element = element + '\t<span class="dot"> </span>';
		}

	element = element + '</div>

';
}

//Insert dots on #dot-container
$('#dot-container').html(element);
Put The Widgets
The dashboard was setted perfectly, now we’ll put the widgets list. Put each widgets on unordered list and add its widget name below the widget.
<div id="dashboard-menu">
<ul>
<li>
		<img src="images/gauge.png"> <br> Dashboard
		</li>
<li>
		<img src="images/mail.png"> <br> E-Mail Client
		</li>
<li>
		<img src="images/calendar.png"> <br> Calendar
		</li>
<li>
		<img src="images/map.png"> <br> Geolocation
		</li>
<li>
		<img src="images/note.png"> <br> Sticky Note
		</li>
<li>
		<img src="images/wireless.png"> <br> AirPort
		</li>
<li>
		<img src="images/calculator.png"> <br> Calculator
		</li>
</ul>
</div>
Expected Result:
The list still appear vertical, now we must set them into horizontal orientation by set its display properties into inline-block. Add the distance on each widget and set its margin properly.
#dashboard-menu {
	position: absolute;
	display: block;
	left: -65em;
	z-index: 2;
}

	#dashboard-menu ul li {
		display: inline-block;
		text-align: center;
		margin-right: 2em;
		margin-top: 1em;
		color: #313235;
		text-shadow: 0px 1px 0px #fff;
		font-weight: bold;
	}

	li img {
		margin-bottom: .7em;
		border: 0;
		cursor: pointer;
	}
Expected Result:
We want the widgets is moving from left to right when the dashboard is show up, so we need to set its left property into -65em.
Hide and Seek
Now we’ll add some jQuery code to the dashboard to make it able showing and hiding. Firstly we must hide the dashboard position by setting its position with some minus pixels, so it will be hidden.
#dashboard {
	font-family: Arial;
	font-style: normal;
	background: #a3acb7;
	display: block;
	width: 100%;
	height: 150px;
	margin-right: auto;
	margin-left: auto;
	-webkit-box-shadow: inset 0px 0px 20px rgba(0, 0, 0, .6);
	-moz-box-shadow: inset 0px 0px 20px rgba(0, 0, 0, .6);
	box-shadow: inset 0px 0px 20px rgba(0, 0, 0, .6);
	position: absolute;
	bottom: -150px;
}
Add toggle function to the image toggle, the first function will rotate the image toggle by set its rotate property into 45 degree (we need zachstronaut’s plugin for doing this), show the dashboard by set its bottom property value into 0px and show the menu by set its left into 3em. These action is in animate function so any change will have animation. For the second function we just need to revert these value.
//Add event toggle on #toggle
$('#toggle').toggle(

	function() {

		//Rotate toggle
		$(this).stop().animate({rotate : '-=45deg'});
		$('#dashboard').stop().animate({bottom : '0px'});
		$('#dashboard-menu').stop().animate({left : '3em'});
	},

	function() {

		//Revert rotate toggle
		$(this).stop().animate({rotate : '0deg'});
		$('#dashboard').stop().animate({bottom : '-150px'}, 700);
		$('#dashboard-menu').stop().animate({left : '-65em'});
	}
);
That’s it ,hope you enjoy it!
The article source:http://www.webstuffshare.com/2010/06/create-your-own-dashboard-menu/
You might also like


Tags
accordion accordion menu animation navigation animation navigation menu carousel checkbox inputs css3 css3 menu css3 navigation date picker dialog drag drop drop down menu drop down navigation menu elastic navigation form form validation gallery glide navigation horizontal navigation menu hover effect image gallery image hover image lightbox image scroller image slideshow multi-level navigation menus rating select dependent select list slide image slider menu stylish form table tabs text effect text scroller tooltips tree menu vertical navigation menu