 Subscribe
 Follow Us
jQuery images dynamic form preview
 12 years ago
 11425
11425 1728
1728
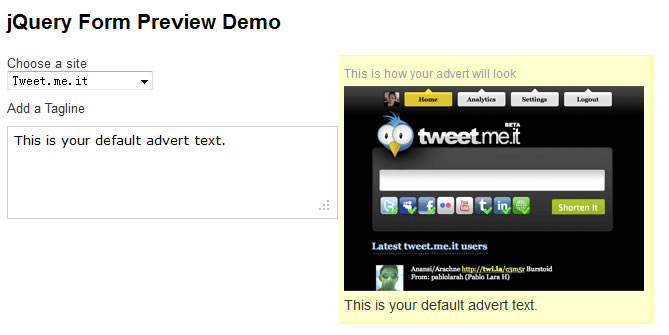
a dynamic form preview tool for work so clients could preview how the text and images would look before submitting the content to be published. I’ve trimmed down the code and removed the database part completely from this example so we can concentrate purely on the JavaScript.
The JavaScript
$(document).ready(function(){
$('#preview').hide();
$("#photo").click(update);
$("#title").keypress(update);
});

function update(){

$('#preview').slideDown('slow');
var title = $("#title").val();
var photo = $("#photo").val();
$('#Displaytitle').html(title);
$('#image').html('<img src="'+photo+'"/>');
}
The HTML
<div class="left">
    <form>
      Choose a site<br/>
      <select name="pic" class="click" id="photo">
        <option value="images/photo1.png">Tweet.me.it</option>
        <option value="images/photo2.png">Dotdashcreate.com</option>
        <option value="images/photo3.png">Papermashup.com</option>
      </select>
      <br/>
      Add a Tagline
      <textarea id="title" class="click" name="title" cols="40" rows="4">This is your default advert text. </textarea>
    </form>
  </div>
  <div class="right">
    <noscript>
    This is where you could put a link for users who have JavaScript disabled to see a preview
</noscript>
    <div id="preview"> This is how your advert will look
      <div id="image"></div>
      <div id="Displaytitle"></div>
    </div>
  </div>

<div class="clear"></div>
In the dom ready function we’re simply hiding the div ‘#preview’ as this is our container for the contents of our form preview. next we setup the ‘.click’ and ‘.keypress’ listeners that execute that function ‘update()’ to display the preview of our form contents. Next looking at the ‘update()’ function we firstly display the ‘#preview’ div. Then set the variables ‘title’ and ‘photo’ with the values of the form using the ‘.val()’ attribute. Then to update our form preview we use ‘.html()’ to replace the contents of the selected div.
Using .html .append & .prepend
Its useful to know that ‘.html’ will replace the contents of the div with whatever you specify as shown below.
.html()
<div id="replace">This will be replaced</div>
$('#replace').html('with this text');
You can however use ‘.prepend’ and ‘.append’ to add the new contents before or after the current contents as shown below.
.append()
<div id="time">The time is: </div>
$('#time').append('12:00pm');
.prepend()
<div id="time"> is the time</div>
$('#time').prepend('12:00pm');
The article source:http://papermashup.com/create-a-dynamic-form-preview/
You might also like


Tags
accordion accordion menu animation navigation animation navigation menu carousel checkbox inputs css3 css3 menu css3 navigation date picker dialog drag drop drop down menu drop down navigation menu elastic navigation form form validation gallery glide navigation horizontal navigation menu hover effect image gallery image hover image lightbox image scroller image slideshow multi-level navigation menus rating select dependent select list slide image slider menu stylish form table tabs text effect text scroller tooltips tree menu vertical navigation menu