 Subscribe
 Follow Us
an inline lightbox alternative jQuery.popeye
 13 years ago
  10449
10449  2024
2024
 n/a
n/a
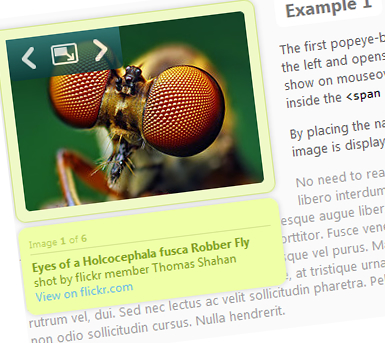
jQuery.popeye take a list of thumbnails and links to images and converts them into a popeye box . To set up the plugin, you need to include the JavaScript file jquery.popeye-2.0.min.js (see hint on preventing flash of unstyled content) as well as the stylesheets jquery.popeye.css and jquery.popeye.style.css into your HTML document.
You activate the plugin by passing one or multiple HTML elements to the function:
$(document).ready(function () {
    $(YOUR_ELEMENT_SELECTOR).popeye();
});
You may also customize the behaviour by setting options with a JavaScript options object:
$(document).ready(function () {
    var options = {
        caption:    false,
        navigation: 'permanent',
        direction:  'left'
    }
    $(YOUR_ELEMENT_SELECTOR).popeye(options);
});
Options
| Option | Type | Default | Description |
|---|---|---|---|
navigation |
string | 'hover' |
The visibility of the navigation. Can be 'hover' (show on mouseover) or 'permanent' or false (don't show caption) |
caption |
string | 'hover' |
The visibility of the navigation. Can be 'hover' (show on mouseover) or 'permanent' |
zindex |
int | 10000 |
z-index of the expanded popeye-box. Enter a z-index that works well with your site and doesn't overlay your site's navigational elements like dropdowns. |
direction |
string | 'right' |
direction that popeye-box opens, can be 'left' or 'right' |
duration |
integer | 240 |
duration of transitional effect when enlarging or closing the box |
opacity |
integer | 0.8 |
opacity of navigational overlay |
easing |
string | 'swing' |
easing type, can be 'swing', 'linear' or any of jQuery Easing Plugin types (Plugin required) |
HTML structure
jQuery.popeye lets you decide how to set up the HTML code for the popeye-box. Nevertheless, there are certain required elements without which it won't work. Most important: The CSS classes with the prefix ppy- are mandatory, they have to be used.
The image list
To tell the script which images, thumbnails and captions to use, there has to be a list like this one:
<ul class="ppy-imglist">
    <li><a href="URL_OF_BIG_IMAGE"><img src="URL_OF_THUMBNAIL" alt="CAPTION_STRING" /></a></li>
    <li>...</li>
</ul>
If you want to include HTML in the captions, say, to include links, use this structure:
<ul class="ppy-imglist">
    <li>
        <a href="URL_OF_BIG_IMAGE"><img src="URL_OF_THUMBNAIL" alt="" /></a>
        <span class="ppy-extcaption">
            HTML_CAPTION
        </span>
    </li>
    <li>...</li>
</ul>
The popeye box
The popeye box can be set up in a number of ways, but it needs certain elements to work. There has to be a stage area (CSS: .ppy-stage) - this is where the thumbnails as well as the big images will be shown. It needs to be wrapped in .ppy-outer.
The navigation consists of
- a next link (CSS:
.ppy-next), - a previous link (CSS:
.ppy-prev), - an enlarge link (CSS:
.ppy-switch-enlarge) and - a compact link (CSS:
.ppy-switch-compact) - this one will be hidden in thumbnail mode.
Wrap it all up in .ppy-nav and put it where you like. The caption needs a wrapper called .ppy-caption and a text container called .ppy-text inside the wrapper. You can also add a counter, if you like. .ppy-current will display the current image number and .ppy-total the total number of images. Just make sure to wrap the counter in .ppy-counter.
Confusing? Let's see some examples!
Example 1: Navigation on top of the stage, counter inside the caption
<div class="ppy-outer">
    <div class="ppy-stage">
        <div class="ppy-nav">
            <a class="ppy-prev" title="Previous image">Previous image</a>
            <a class="ppy-switch-enlarge" title="Enlarge">Enlarge</a>
            <a class="ppy-switch-compact" title="Close">Close</a>
            <a class="ppy-next" title="Next image">Next image</a>
        </div>
    </div>
</div>
<div class="ppy-caption">
    <div class="ppy-counter">
        Image <strong class="ppy-current"></strong> of <strong class="ppy-total"></strong>
    </div>
    <span class="ppy-text"></span>
</div>
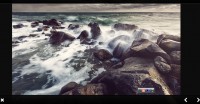
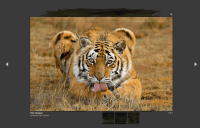
Example 2: Navigation outside of the stage, counter inside the stage, no caption
<div class="ppy-outer">
    <div class="ppy-stage">
        <div class="ppy-counter">
            <strong class="ppy-current"></strong> / <strong class="ppy-total"></strong>
        </div>
    </div>
    <div class="ppy-nav">
        <a class="ppy-next" title="Next image">Next image</a>
        <a class="ppy-prev" title="Previous image">Previous image</a>
        <a class="ppy-switch-enlarge" title="Enlarge">Enlarge</a>
        <a class="ppy-switch-compact" title="Close">Close</a>
    </div>
</div>
Put the popeye box HTML and the image list inside a wrapper called .ppy. This wrapper element should be passed to the jQuery.popeye plugin to initiate a popeye box.
Example 3: Complete setup
<div class="ppy" id="ID_CAN_BE_USED_TO_START_POPEYE_SCRIPT">
    <ul class="ppy-imglist">
        <li><a href="URL_OF_BIG_IMAGE"><img src="URL_OF_THUMBNAIL" alt="CAPTION_STRING" /></a></li>
        <li>...</li>
    </ul>
    <div class="ppy-outer">
        <div class="ppy-stage">
            <div class="ppy-counter">
                <strong class="ppy-current"></strong> / <strong class="ppy-total"></strong>
            </div>
        </div>
        <div class="ppy-nav">
            <a class="ppy-next" title="Next image">Next image</a>
            <a class="ppy-prev" title="Previous image">Previous image</a>
            <a class="ppy-switch-enlarge" title="Enlarge">Enlarge</a>
            <a class="ppy-switch-compact" title="Close">Close</a>
        </div>
    </div>
</div>
Styling
There are two css files included with the plugin:
jquery.popeye.css- Mandatory CSS file, should not be changedjquery.popeye.style.css- CSS skin file
The best start for CSS styling is to take a look at the CSS skin file. It contains three different CSS Skins which are used in the Demo and offers a good start to understand and modify. There are some important CSS classes:
.ppy-active- As soon as the popeye box is generated, this class is added to the wrapper.ppy. In most cases, it should have a set width and float to the left or right..ppy-stage- needs the width and height of your thumbnail images. If you use thumbs of different sizes, you should use the smallest width and height in your thumbnail set or there will be a visible border around the smaller thumbs..ppy-stagewrapand.ppy-captionwrapwill be added to special DIV elements created by popeye. Their names should make clear what they do ;-) They can also be used for styling.ppy-expanded- this class will be added only to the enlarged popeye box..ppy-loading- while popeye is preloading a new image, this class will be temporarily added to.ppy-stagewrap. It can be used to show a loading status image.
If you need additional HTML container for styling, you can easily add them to the HTML setup.
<!-- | | BEGIN Fallback styling | | -->Fallback styling
Don't forget to throw in some nice extra styles for your users without JavaScript. They get to see the original image list, so make sure it looks nice ;-)
Single Image Mode
jQuery.Popeye switches to Single Image Mode when there's only one image in the list. The previous/next links will then be removed, since only enlargment is needed.
<!-- | | BEGIN Preventing flash of unstyled content | | -->Preventing flash of unstyled content
jQuery.popeye converts the original image list into a popeye-box and then removes the image list from the page. This usually takes a couple of milliseconds, so you might encounter a phenomenon known as flash of unstyled content just after page load. To prevent this, you can include the plugin file in the head of your HTML document. Another way is to add the following code to the head of you HTML:
$('head').append('<style type="text/css"> .ppy-imglist { position: absolute; top: -1000em; left: -1000em; } </style>');
You might also like
Tags
accordion accordion menu animation navigation animation navigation menu carousel checkbox inputs css3 css3 menu css3 navigation date picker dialog drag drop drop down menu drop down navigation menu elastic navigation form form validation gallery glide navigation horizontal navigation menu hover effect image gallery image hover image lightbox image scroller image slideshow multi-level navigation menus rating select dependent select list slide image slider menu stylish form table tabs text effect text scroller tooltips tree menu vertical navigation menu