 Subscribe
 Follow Us
CSS Image Maps With Pop-Up Tool Tips
 13 years ago
 20175
20175 2925
2925
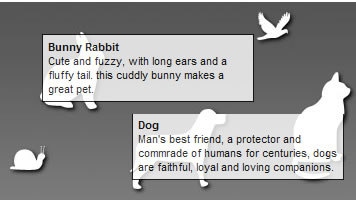
Using an unordered list, a couple of images, and a little CSS, we can create an accessible "image map" with pop-up tool tips that provide our readers more information on the links the map contains. There are several techniques out there for doing this, but, unlike some, the one outlined here has the advantage of working in older versions of Internet Explorer.
To begin, we'll need two images, the first one being our image map, and the second one being a 1px by 1px transparent GIF image, which we'll use as a background image for the map's "hot spots" in order to work around a bug in earlier versions of IE.
Now we can move on to the HTML. Essentially, what we'll do is create an unordered list of links that each contain a span tag which holds information about the link for our tool tip pop-up. We'll give each link its own class name, so that we can define the area and position for the link's hot spot on the image.
Here's the HTML for my map.
HTML:
<ul id="map">
 <li><a class="bunny" href="#" title="Bunny"><span><b>Bunny Rabbit</b><br>
  Cute and fuzzy, with long ears and a fluffy tail. this cuddly bunny
  makes a great pet.</span></a></li>

 <li><a class="parrot" href="#" title="Parrot"><span><b>Parrot</b><br>
  With a lifespan of up to 40 years, these bright, colorful birds
  are wonderful life-long pets. One of only a few birds
  capable of learning to speak, parrots are intelilgent and
  highly social animals.</span></a></li>

 <li><a class="snail" href="#" title="Snail"><span><b>Snail</b><br>
  Snails are a wonderful addition to any aquarium-- just make
  sure that its tank-mates aren't going to eat it! Snails say
  "Meow."</span></a></li>

 <li><a class="dog" href="#" title="Dog"><span><b>Dog</b><br>
  Man's best friend, a protector and commrade of humans for
  centuries, dogs are faithful, loyal and loving companions.
  </span></a></li>

 <li><a class="cat" href="#" title="Cat"><span><b>Cat</b><br>
  Another popular pet, these felines were once viewd as a
  sacred creature amont the ancient Egyptians. Independant,
  sociable, and with a rumbling purr, cats make wonderful
  pets.</span></a></li>
</ul>
Now let's move on to the CSS, starting with the list itself, which we've given the ID of "map." We want to set the margin and padding for our list to zero and then we want to define the size of the list, which should be equal to the size of the image we're using for our map (in this case, 400x200 pixels). Then we'll set that map image as the background. I'm also defining some font styles here, so I don't have to do it later.
CSS:
  #map {
   margin:0;
   padding:0;
   width:400px;
   height:250px;
   background:url(map.jpg) top left no-repeat #fff;
   font-family:arial, helvetica, sans-serif;
   font-size:8pt;
  }
Then we'll do the list items themselves-- simple stuff, just get rid of the formatting applied by the browser.
  #map li {
   margin:0;
   padding:0;
   list-style:none;
  }
Now we need to apply some styling to the links. Each link will need its own dimensions and positioning (which is why we gave them class names), but they'll also share some common properties, like the fact that they should be absolutely positioned block elements, with the transparent GIF for their background.
  #map li a {
   position:absolute;
   display:block;
   /*
      Specifying a background image
      (a 1px by 1px transparent gif)
      fixes a bug in older versions of
      IE that causeses the block to not
      render at its full dimensions.
   */
      background:url(blank.gif);
      text-decoration:none;
   color:#000;
  }
Next, we simply need to hide the span inside of our links.
#map li a span { display:none; }
After we've done that, we need to define the style, size and position of the tool tip itself. We need to make it visible on mouse over and it should be relatively positioned in relation to the link we're hovering over, with a bit of an offset (20px x 20px in this case). Then we'll make it look pretty, giving it a white background, a border, padding, and lower the opacity slightly, so you can still see what's under the tool tip. We'll set a width of 200px, but we'll let the height be automatically determined by the amount of content in the tool tip. We'll also set the color of the text and get rid of the underline.
#map li a:hover span {
   position:relative;
   display:block;
   width:200px;
   left:20px;
   top:20px;
   border:1px solid #000;
   background:#fff;
   padding:5px;
    filter:alpha(opacity=80);
   opacity:0.8;
    }
Now all that's left is to define our link hot spots and set the size and position of the links, by class name, that correspond with the images. You'll have to do a little bit of measuring here, just as you would with any image map. Just find X, Y coordinates where the top left corner of the hot spot should be, and then determine the height and width from there.
  #map a.bunny {
   top:20px;
   left:60px;
   width:80px;
   height:90px;
  }

  #map a.parrot {
   top:1px;
   left:275px;
   width:50px;
   height:50px;
  }

  #map a.snail {
   top:135px;
   left:30px;
   width:50px;
   height:50px;
  }

  #map a.dog {
   top:100px;
   left:150px;
   width:115px;
   height:95px;
  }

  #map a.cat {
   top:65px;
   left:315px;
   width:70px;
   height:120px;
  }
You might also like
Tags
accordion accordion menu animation navigation animation navigation menu carousel checkbox inputs css3 css3 menu css3 navigation date picker dialog drag drop drop down menu drop down navigation menu elastic navigation form form validation gallery glide navigation horizontal navigation menu hover effect image gallery image hover image lightbox image scroller image slideshow multi-level navigation menus rating select dependent select list slide image slider menu stylish form table tabs text effect text scroller tooltips tree menu vertical navigation menu