 Subscribe
 Follow Us
HTML5 jQuery Slideshow w/ Canvas
 13 years ago
 36386
36386 4782
4782
You’ve probably heard a lot about the new HTML5 canvas element. As the name implies, this is a special element that allows us to create and modify graphics. In addition, we can also use it like any other element on the page – apply jQuery animations on it, listen for events and integrate it deeply into our layouts.
All uses of canvas you’ve come so far are probably limited to games and other proof of concept demos. Today, however, we are doing something practical – we are making a progressively enhanced slideshow with a fancy transitioning effect, which is perfectly functional in older browsers as well.
The Idea
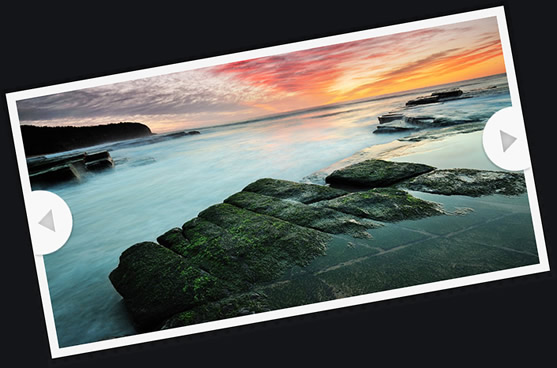
With JavaScript, we are going to apply a special filter to every image in the slideshow. We will create a new version of the images, with higher contrast and more vivid colors, and store it in a canvas elements.
When the user chooses to proceed to another slide, the canvas is shown with a fadeIn animation, creating a smooth lighting effect.
The HTML
The first step in creating the slideshow, is laying down the HTML markup of the page.
html5-slideshow.html
<!DOCTYPE html>
<html>
<head>
<meta http-equiv="Content-Type" content="text/html; charset=utf-8" />
<title>An HTML5 Slideshow w/ Canvas & jQuery | Tutorialzine Demo</title>

<link rel="stylesheet" type="text/css" href="styles.css" />

</head>

<body>

<div id="slideshow">

    <ul class="slides">
        <li><img src="img/photos/1.jpg" width="620" height="320" alt="Marsa Alam" /></li>
        <li><img src="img/photos/2.jpg" width="620" height="320" alt="Turrimetta Beach" /></li>
        <li><img src="img/photos/3.jpg" width="620" height="320" alt="Power Station" /></li>
        <li><img src="img/photos/4.jpg" width="620" height="320" alt="Colors of Nature" /></li>
    </ul>

    <span class="arrow previous"></span>
    <span class="arrow next"></span>
</div>

<script src="http://ajax.googleapis.com/ajax/libs/jquery/1.4.2/jquery.min.js"></script>
<script src="script.js"></script>
</body>
</html>
First we have the HTML5 doctype, followed by the head section of the document. After the title tag and the stylesheet we move on with the body.
You can see that the markup for the slideshow is really simple. The main containing div, #slideshow, holds an unordered list and the previous and next arrows. The unordered list holds the slides, with each defined as a LI element. As shown in the illustration above, this is where the canvas elements with the modified versions of the images are inserted.
Lastly we include jQuery and our script.js, to which we are going to get back to in the last step of this tutorial.
The CSS
All the styles for the slideshow reside in styles.css. I’ve used the #slideshow id of the main containment element as a namespace, so you can easily append these styles to your stylesheet without worrying about conflicts.
styles.css
#slideshow{
    background-color:#F5F5F5;
    border:1px solid #FFFFFF;
    height:340px;
    margin:150px auto 0;
    position:relative;
    width:640px;

    -moz-box-shadow:0 0 22px #111;
    -webkit-box-shadow:0 0 22px #111;
    box-shadow:0 0 22px #111;
}

#slideshow ul{
    height:320px;
    left:10px;
    list-style:none outside none;
    overflow:hidden;
    position:absolute;
    top:10px;
    width:620px;
}

#slideshow li{
    position:absolute;
    display:none;
    z-index:10;
}

#slideshow li:first-child{
    display:block;
    z-index:1000;
}

#slideshow .slideActive{
    z-index:1000;
}

#slideshow canvas{
    display:none;
    position:absolute;
    z-index:100;
}

#slideshow .arrow{
    height:86px;
    width:60px;
    position:absolute;
    background:url('img/arrows.png') no-repeat;
    top:50%;
    margin-top:-43px;
    cursor:pointer;
    z-index:5000;
}

#slideshow .previous{ background-position:left top;left:0;}
#slideshow .previous:hover{ background-position:left bottom;}

#slideshow .next{ background-position:right top;right:0;}
#slideshow .next:hover{ background-position:right bottom;}
We can split our visitors, which will interact with the slideshow, in three main groups:
- People with JavaScript switched off. These users will only see the first slide, and will be unable to switch to a different one;
- People with JavaScript switched on, but with no support for canvas. For visitors from this group, the slides will change instantaneously, without transitioning effects;
- People with JavaScript enabled and canvas support. These are people who use the latest versions of Firefox, Safari, Chrome, Opera and the soon to be released IE9. They will enjoy the slideshow in its full glory;
To account for the first two groups, a number of rules are applied to the stylesheet. With the help of the first-child selector, only the first slide is shown by default. Also a number of overflow:hidden rules are applied in a number of places just in case.
The JavaScript
Moving on to the last part of the tutorial – the JavaScript and jQuery code. As we already explained the basic principles behind the effect, lets move straight to the execution.
script.js – Part 1
$(window).load(function(){

    // We are listening to the window.load event, so we can be sure
    // that the images in the slideshow are loaded properly.

    // Testing wether the current browser supports the canvas element:
    var supportCanvas = 'getContext' in document.createElement('canvas');

    // The canvas manipulations of the images are CPU intensive,
    // this is why we are using setTimeout to make them asynchronous
    // and improve the responsiveness of the page.

    var slides = $('li'),
        current = 0,
        slideshow = {width:0,height:0};

    setTimeout(function(){

        if(supportCanvas){
            $('#slideshow img').each(function(){

                if(!slideshow.width){
                    // Saving the dimensions of the first image:
                    slideshow.width = this.width;
                    slideshow.height = this.height;
                }

                // Rendering the modified versions of the images:
                createCanvasOverlay(this);
            });
        }

        $('#slideshow .arrow').click(function(){
            var li            = slides.eq(current),
                canvas        = li.find('canvas'),
                nextIndex    = 0;

            // Depending on whether this is the next or previous
            // arrow, calculate the index of the next slide accordingly.

            if($(this).hasClass('next')){
                nextIndex = current >= slides.length-1 ? 0 : current+1;
            }
            else {
                nextIndex = current <= 0 ? slides.length-1 : current-1;
            }

            var next = slides.eq(nextIndex);

            if(supportCanvas){

                // This browser supports canvas, fade it into view:

                canvas.fadeIn(function(){

                    // Show the next slide below the current one:
                    next.show();
                    current = nextIndex;

                    // Fade the current slide out of view:
                    li.fadeOut(function(){
                        li.removeClass('slideActive');
                        canvas.hide();
                        next.addClass('slideActive');
                    });
                });
            }
            else {

                // This browser does not support canvas.
                // Use the plain version of the slideshow.

                current=nextIndex;
                next.addClass('slideActive').show();
                li.removeClass('slideActive').hide();
            }
        });

    },100);
With document.createElement(), you can create any DOM element that you like. So to test whether the browser really supports canvas (and doesn’t just create a generic element), we use the in operator to check for the getContext() method, which is an integral part of the standard. The result of this check is used throughout the code to account for users with browsers that do not yet support canvas.
Notice that the calls to the createCanvasOverlay function (which we will discuss in the second part of the code) are enclosed in a setTimeout statement. This is done because the function is processor intensive and might cause the browser window to stall. setTimeout breaks out of the main execution path and runs the code asynchronously, maximizing the responsiveness of the page.
script.js – Part 2
 // This function takes an image and renders
    // a version of it similar to the Overlay blending
    // mode in Photoshop.

    function createCanvasOverlay(image){

        var canvas            = document.createElement('canvas'),
            canvasContext    = canvas.getContext("2d");

        // Make it the same size as the image
        canvas.width = slideshow.width;
        canvas.height = slideshow.height;

        // Drawing the default version of the image on the canvas:
        canvasContext.drawImage(image,0,0);

        // Taking the image data and storing it in the imageData array:
        var imageData    = canvasContext.getImageData(0,0,canvas.width,canvas.height),
            data        = imageData.data;

        // Loop through all the pixels in the imageData array, and modify
        // the red, green, and blue color values.

        for(var i = 0,z=data.length;i<z;i++){

            // The values for red, green and blue are consecutive elements
            // in the imageData array. We modify the three of them at once:

            data[i] = ((data[i] < 128) ? (2*data[i]*data[i] / 255) :
                        (255 - 2 * (255 - data[i]) * (255 - data[i]) / 255));
            data[++i] = ((data[i] < 128) ? (2*data[i]*data[i] / 255) :
                        (255 - 2 * (255 - data[i]) * (255 - data[i]) / 255));
            data[++i] = ((data[i] < 128) ? (2*data[i]*data[i] / 255) :
                        (255 - 2 * (255 - data[i]) * (255 - data[i]) / 255));

            // After the RGB channels comes the alpha value, which we leave the same.
            ++i;
        }

        // Putting the modified imageData back on the canvas.
        canvasContext.putImageData(imageData,0,0,0,0,imageData.width,imageData.height);

        // Inserting the canvas in the DOM, before the image:
        image[removed].insertBefore(canvas,image);
    }

});
This is where the magic happens. The canvas element is basically one big piece of paper on which you can draw with JavaScript. The code above creates a blank canvas element and imports the image, which was passed as a parameter, with the drawImage() method. After this, we use the getImageData() method to export the contents of all the pixels of the canvas into the imageData array.
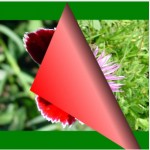
What is more, for each pixel of the image we have four entries in the array – one for the red, green and blue colors, and the alpha channel (the transparency). These are all numbers from 0 to 255. The main for loop has to go through all the pixels and apply a special filter equation that lightens the lighter colors and darkens the dark ones. It is the same effect that you get by using the overlay blending mode in photoshop.
The main for loop has to do an incredible amount of work – for a 600×400 pixel image it does 240 000 iterations! This means that your code must be as optimal as possible. This is why, in the loop, I copied the formula three times instead of calling a function. By removing the function calls the loop became nearly three times faster.
You might also like


Tags
accordion accordion menu animation navigation animation navigation menu carousel checkbox inputs css3 css3 menu css3 navigation date picker dialog drag drop drop down menu drop down navigation menu elastic navigation form form validation gallery glide navigation horizontal navigation menu hover effect image gallery image hover image lightbox image scroller image slideshow multi-level navigation menus rating select dependent select list slide image slider menu stylish form table tabs text effect text scroller tooltips tree menu vertical navigation menu