 Subscribe
 Follow Us
balupton edition jQuery Lightbox
 13 years ago
 14487
14487 2937
2937
Step 1. Download jQuery Lightbox, and extract it to your hard drive
- If the archive was extracted and you have a whole bunch of files and directories (folders), then you must create a new directory called
jquery-lightboxand move all the files and directories into that to continue. - If the archive was extracted and you have only one directory called
jquery-lightboxwhich has a whole bunch of stuff in it, then that is fine and you can continue onto the next step. - If the archive was extracted and you have only one directory and it is not called
jquery-lightboxthen you must rename it tojquery-lightboxto continue.
Step 2. Move the jquery-lightbox directory to somewhere on your webserver
Be sure to always keep the entire jquery-lightbox directory intact; this means if you were to only move some of the files instead of moving the entire directory, then you would run into problems due to the cross directory references would no longer be working.
Step 3. Include jQuery (insert into your page's head tag)
If your page already has jQuery included then you can skip this step.
<!-- Include jQuery (Lightbox Requirement) -->
   <script type="text/javascript" src="http://www.yoursite.com/somewhere/on/your/webserver/jquery-lightbox/scripts/jquery-1.4.2.min.js"></script>
Step 4. Include jQuery Lightbox (insert into your page's head tag)
We will auto include everything else for you, so you only have to insert the below into your head tag.
<!-- Include Lightbox (Production) -->
   <script type="text/javascript" src="http://www.yoursite.com/somewhere/on/your/webserver/jquery-lightbox/scripts/jquery.lightbox.min.js"></script>
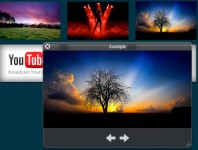
Usage
Introduction
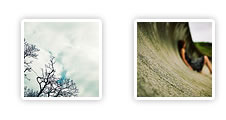
There are a few ways you can use jquery lightbox. Firstly, let's specify our gallery we will be using.
  <div class="gallery">
   <ul class="images">
    <li class="image">
     <a rel="lightbox-mygallery" href="http://www.htmldrive.net/edit_media/2010/201010/20101029/jquery.fancybox-1.3.2/example/1_b.jpg" title="tallest, deepest: Lovely photo of perth during the daytime."><img src="http://www.htmldrive.net/edit_media/2010/201010/20101029/jquery.fancybox-1.3.2/example/1_s.jpg" height="75" width="75"></a>
    </li>
</ul>
</div>
Making it work with lightbox
All we need to do, is add a rel attribute which contains lightbox to our gallery. We do this by changing:
<a href="...
</pre>
</p>
<p>To:
<pre class="brush: xml;fontsize: 100; first-line: 1; "><a rel="lightbox-mygallery" href="...</pre>
</p>
<p>Notice how we have <code>-mygallery</code> above, we do this to group  the images together in a lightbox. If you would like the lightbox to  only contain one image, you can use the simple:
<pre class="brush: xml;fontsize: 100; first-line: 1; "><a rel="lightbox" href="...
</pre>
</p>
<p>And that's all you need to know, when you reload the page your gallery will now use the lightbox script.</p>
<h3>Making it work, without editing our html</h3>
<p>But what if you would like to keep the html as it was, and not have to add the lightbox <code>rel</code> attribute?</p>
<p>You can do this by running the following instead:
<pre class="brush: jscript;fontsize: 100; first-line: 1; "><script type="text/javascript">
    $('a:has(img)').lightbox();
   </script>
And that will do it for you! You can also change the text a:has(img) which we use to whatever selector you would like to use for your lightboxes.
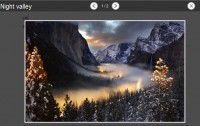
Titles and Descriptions
Remember for out gallery how we had titles and descriptions for our images. Let's refresh our memory:
<li class="image">
     <a rel="lightbox-mygallery" href="http://www.htmldrive.net/edit_media/2010/201010/20101029/jquery.fancybox-1.3.2/example/1_b.jpg" title="tallest, deepest: Lovely photo of perth during the daytime."><img src="http://www.htmldrive.net/edit_media/2010/201010/20101029/jquery.fancybox-1.3.2/example/1_s.jpg" height="75" width="75"></a>
    </li>
Notice the title attribute on both the a element? This stores our title and description.
We seperate the description by using a colon :, anything before the colon is the title, and anything after is the description.
Descriptions and titles and entirely optional. You can have neither, just a title, or a title and description.
Customisation
What if I would like to turn off the top right linkback?
Fair request, we've made this easy, so all you have to do is set the show_linkback option to false. This can be done two ways.
The first and simplest way we can do it, is to use a url variable. So alter our jQuery Lightbox include in step 4 to:
<!-- Include Lightbox (Production) -->
   <script type="text/javascript" src="http://www.yoursite.com/some/where/jquery-lightbox/scripts/jquery.lightbox.min.js?show_linkback=false"></script>
The other more complicated way (which is sometimes preferable) is to set the option via javascript. Like so:
<script type="text/javascript">$(function(){
    $.Lightbox.construct({
     "show_linkback": false
    });
   });</script>
So pick one or the other, and apply the customisation and you won't have the linkback anymore!
What if I would like to translate it into my own language?
You can do this too! So we are going to use the second style above, as there is a lot of text that could be translated. To translate from english to english we can use:
<script type="text/javascript">$(function(){
    $.Lightbox.construct({
     "text": {
      // For translating
      "image":  "Image",
      "of":   "of",
      "close":  "Close X",
      "closeInfo": "You can also click anywhere outside the image to close.",
      "download":  "Download.",
      "help": {
       "close": "Click to close",
       "interact": "Hover to interact"
      },
      "about": {
       "text":  "jQuery Lightbox Plugin (balupton edition)",
       "title": "Licenced under the GNU Affero General Public License.",
       "link":  ""
      }
     }
    });
   });</script>
So there you have it, the left side is what is to be translated, and the right is the text that will be used as the translation!. It's that easy.
That's cool, what other customisations do you support?
A whole bunch! But you will have to read the readme for all the details and use cases! You can find the readme in your jquery lightbox download as README.txt.
Styling your gallery
While not part of the lightbox script at all, here is some nice CSS so you can style your gallery like our example above.
/* Gallery Styling */
   .gallery .image-title,
   .gallery .image-description,
   .gallery .image-author,
   .gallery .image-link {
    display:none;
   }

   .gallery
   {
    width: 100%;
    text-align: center;
    margin-left: auto;
    margin-right: auto;
    padding: none;
   }

   .gallery ul.images
   {
    list-style-type: none;
    border: none;
    padding: none;
   }

   .gallery ul.images li.image
   {
    display: inline;
    line-height: 0;
   }

   .gallery ul.images li.image a
   {
    text-decoration: none;
    color: inherit;
    cursor: pointer;
    margin: 14px;
    display: inline-block;
    background: white;
    padding: 3px;
    line-height: 0;
    -webkit-border-radius: 4px 4px;
    -moz-border-radius: 4px 4px;
    border-radius: 4px 4px;
    -moz-box-shadow: 0px 0px 8px #AAA;
    -webkit-box-shadow: 0px 0px 8px #AAA;
    box-shadow: 0px 0px 8px #AAA;
    -webkit-transition: -webkit-box-shadow 0.1s ease-out;
    -moz-transition: -webkit-box-shadow 0.1s ease-out;
    -o-transition: -webkit-box-shadow 0.1s ease-out;
    transition: -webkit-box-shadow 0.1s ease-out;
   }

   .gallery ul.images li.image a img
   {
    border: none;
    padding: none;
    -webkit-border-radius: 4px 4px;
    -moz-border-radius: 4px 4px;
    border-radius: 4px 4px;
   }

   .gallery ul.images li.image a:hover
   {
    -moz-box-shadow: 0px 0px 8px #222;
    -webkit-box-shadow: 0px 0px 8px #222;
    box-shadow: 0px 0px 8px #222;
   }
You might also like

Tags
accordion accordion menu animation navigation animation navigation menu carousel checkbox inputs css3 css3 menu css3 navigation date picker dialog drag drop drop down menu drop down navigation menu elastic navigation form form validation gallery glide navigation horizontal navigation menu hover effect image gallery image hover image lightbox image scroller image slideshow multi-level navigation menus rating select dependent select list slide image slider menu stylish form table tabs text effect text scroller tooltips tree menu vertical navigation menu