 Subscribe
 Follow Us
jQuery different Photo comparing Effect
 13 years ago
 12372
12372 1878
1878
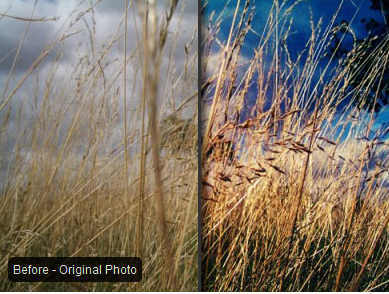
This plugin author by flood disaster triggered inspiration.Well, it is saddening to see all the damages the flood did. In the other hand, and also notice the way it presents the before and after photos.
It's just so intuitive and simple. So, we have decided to build something similar but with a few of enhancements. we'll going to show you how to build it and how to convert it to plugins. Tested on IE6, 7, 8, Firefox, Chrome and Safari.
HTML
The HTML really simple, just a div with 2 images in it. Things you need to know:
- value in ALT attribute will be used as caption
- width and height of the first image will be used for calculation, therefore, it's mandatory to have it defined
This is what you need to use it:
<div class="beforeafter">
    <img src="image1a.jpg" alt="Before" width="500" height="280">
        <img src="image2b.jpg" alt="After" width="500" height="280">
</div
However, the content in the div will be totally revamped once it's processed by javascript. This is the real structure:
<div class="beforeafter">
    <div class="ba-mask"></div>
    <div class="ba-bg"></div>
    <div class="ba-caption"></div>
    <img src="image1a.jpg" alt="Before" width="500" height="280">
    <img src="image2b.jpg" alt="After" width="500" height="280">
</div>
Javascript
Alright, some intensive stuff going on over here. The length of the script is pretty long, it's because I'm trying to make this script as flexible as possible and also make the HTML and CSS as simple as possible. You see, once we have the flexibility and simplicity lead to lengthly and complicated code.
$(document).ready(function() {

    // Some options for customization
    var leftgap = 10;       /* gap on the left */
    var rightgap = 10;      /* gap on the right */
    var defaultgap = 50;    /* the intro gap */
    var caption = true;     /* toggle caption */
    var reveal = 0.5;       /* define 0 - 1 far does it goes to reveal the second caption */

    // find each of the .beforeafter
    $('.beforeafter').each(function () {

        // set current selected item to variable
        var i = $(this);
        // get the source of the first image and second image using eq(index)
        var img_mask = i.children('img:eq(0)').attr('src');
        var img_bg = i.children('img:eq(1)').attr('src');

        // get the caption for the first image as default caption
        var img_cap_one = i.children('img:eq(0)').attr('alt');

        // get the dimension of the first image, assuming second image has the same dimension
        var width = i.children('img:eq(0)').width();
        var height = i.children('img:eq(0)').height();

        // hide the images, not removing it because we will need it later
        i.find('img').hide();

        // set some css attribute to current item for graceful degradation if javascript support is off
        i.css({'overflow': 'hidden', 'position': 'relative'});

        // append additional html element
        i.append('<div class="ba-mask"></div>');
        i.append('<div class="ba-bg"></div>');
        i.append('<div class="ba-caption">' + img_cap_one + '</div>');

        // set the dimension of appended html element
        i.children('.ba-mask, .ba-bg').width(width);
        i.children('.ba-mask, .ba-bg').height(height);

        // set the images as background for ba-mask and ba-bg
        i.children('.ba-mask').css('backgroundImage','url(' + img_mask + ')');
        i.children('.ba-bg').css('backgroundImage','url(' + img_bg + ')');

        // animate to reveal the background image
        i.children('.ba-mask').animate({'width':width - defaultgap}, 1000);

        // if caption is true, then display it, otherwise, hide it
        if (caption) i.children('.caption').show();
        else i.children('.ba-caption').hide();

    }).mousemove(function (e) {

        // set current selected item to variable
        var i = $(this);

        // get the position of the image
        pos_img = i.position()['left'];

        // get the position of the mouse pointer
        pos_mouse = e.pageX;

        // calculate the difference between the image and cursor
        // the difference will the width of the mask image
        new_width = pos_mouse - pos_img;
        img_width = i.width();

        // get the captions for first and second images
        img_cap_one = i.children('img:eq(0)').attr('alt');
        img_cap_two = i.children('img:eq(1)').attr('alt');

        /*
        // for debugging purposes
        $('#debug').html("X Axis : " + e.pageX + " | Y Axis " + e.pageY);
        $('#debug2').html(i.position()['left']);
        $('#debug3').html(new_width);
        */

        // make sure it reveal the image and left some gaps on left and right
        // it depends on the value of leftgap and rightgap
        if (new_width > leftgap && new_width < (img_width - rightgap)) {
            i.children('.ba-mask').width(new_width);
        }

        // toggle between captions.
        // it uses the reveal variable to calculate
        // eg, display caption two once the image is 50% (0.5) revealed.
        if (new_width < (img_width * reveal)) {
            i.children('.ba-caption').html(img_cap_two);
        } else {
            i.children('.ba-caption').html(img_cap_one);
        }

    });

 });
CSS
CSS isn't that complicated as well. I have illustrated how this script going to work which will make it easy to understand
#container {width:500px; margin:0 auto;}

/* width and height for the block */
.beforeafter {width:500px; height:280px;}


/* The following is the mandatory styling for the plugins */

.ba-mask {  /* first image */
    position:absolute;
    top:0;
    left:0;
    z-index:100;
    border-right:4px solid #000;
    overflow:hidden;
    box-shadow: 3px 5px 5px rgba(0, 0, 0, 0.6);
    box-shadow: 5px 5px 10px rgba(0, 0, 0, 0.6);
    -webkit-box-shadow: 5px 5px 7px rgba(0, 0, 0, 0.6);
    -moz-box-shadow: 5px 0 7px rgba(0, 0, 0, 0.6);
}

.ba-bg {    /* second image */
    position:absolute;
    top:0;
    left:0;
    z-index:0;
}

.ba-caption {   /* caption  */

    /* mandatory */
    position:absolute;
    bottom:10px;
    left:10px;
    z-index:120;

    /* customizable styling */
    background:#000;
    color:#fff;
    text-align:center;
    padding:5px;
    font-size:12px;
    font-family:arial;
    filter:alpha(opacity=80);-moz-opacity:0.8;-khtml-opacity: 0.8;opacity: 0.8;
    -webkit-border-radius:5px; -moz-border-radius:5px; border-radius:5px;
}
Convert to Plugin
First of all, what we need to know is the structure of a plugin.
//You need an anonymous function to wrap around your function to avoid conflict
(function($){

    //Attach this new method to jQuery
    $.fn.extend({

        //This is where you write your plugin's name
        pluginname: function() {

            //Iterate over the current set of matched elements
            return this.each(function() {

                //code to be inserted here

            });
        }
    });

//pass jQuery to the function,
//So that we will able to use any valid Javascript variable name
//to replace "$" SIGN. But, we'll stick to $ (I like dollar sign :) )
})(jQuery);
Alright, the next thing we need to do, mix the plugin stucture with the before after script, and this is the final result:
(function($){
   $.fn.extend({
        //plugin name - qbeforeafter
        qbeforeafter: function(options) {

            var defaults = {
                defaultgap: 50,
                leftgap: 10,
                rightgap: 10,
                caption: false,
                reveal: 0.5
            };

            var options = $.extend(defaults, options);

            return this.each(function() {

            var o = options;
            var i = $(this);
            var img_mask = i.children('img:eq(0)').attr('src');
            var img_bg = i.children('img:eq(1)').attr('src');
            var img_cap_one = i.children('img:eq(0)').attr('alt');

            var width = i.children('img:eq(0)').width();
            var height = i.children('img:eq(0)').height();

            i.children('img').hide();

            i.css({'overflow': 'hidden', 'position': 'relative'});
            i.append('<div class="ba-mask"></div>');
            i.append('<div class="ba-bg"></div>');
            i.append('<div class="ba-caption">' + img_cap_one + '</div>');

            i.children('.ba-mask, .ba-bg').width(width);
            i.children('.ba-mask, .ba-bg').height(height);
            i.children('.ba-mask').animate({'width':width - o.defaultgap}, 1000);

            i.children('.ba-mask').css('backgroundImage','url(' + img_mask + ')');
            i.children('.ba-bg').css('backgroundImage','url(' + img_bg + ')');

            if (o.caption) i.children('.ba-caption').show();

            }).mousemove(function (e) {

                var o = options;
                var i = $(this);

                pos_img = i.position()['left'];
                pos_mouse = e.pageX;
                new_width = pos_mouse - pos_img;
                img_width = i.width();
                img_cap_one = i.children('img:eq(0)').attr('alt');
                img_cap_two = i.children('img:eq(1)').attr('alt');

                if (new_width > o.leftgap && new_width < (img_width - o.rightgap)) {
                    i.children('.ba-mask').width(new_width);
                }

                if (new_width < (img_width * o.reveal)) {
                    i.children('.ba-caption').html(img_cap_two);
                } else {
                    i.children('.ba-caption').html(img_cap_one);
                }

            });
        }
   });
})(jQuery);
If we compared it to the non-plugin script, the major difference is how we convert the customizable setting (defaultgap, leftgap, rightgap, caption and reveal) to plugins. That's it, pretty straight forward, just copy and paste and slight modification
How to use this plugin
The usage is really simple, this is how you call the plugin:
$(function () {
    $('.large').qbeforeafter({defaultgap:50, leftgap:0, rightgap:10, caption: true, reveal: 0.5});
    $('.small').qbeforeafter({defaultgap:20, leftgap:5, rightgap:10, caption: false});
});
That's it,hope you like it.
You might also like


Tags
accordion accordion menu animation navigation animation navigation menu carousel checkbox inputs css3 css3 menu css3 navigation date picker dialog drag drop drop down menu drop down navigation menu elastic navigation form form validation gallery glide navigation horizontal navigation menu hover effect image gallery image hover image lightbox image scroller image slideshow multi-level navigation menus rating select dependent select list slide image slider menu stylish form table tabs text effect text scroller tooltips tree menu vertical navigation menu