 Subscribe
 Follow Us
HTML5 and jQuery Image uploader effect
 11 years ago
 15337
15337 2849
2849
We have received several inquiries for the last time from our readers with a question – how to upload photos to website. I think that this is an interesting question, and, I decided to lift the veil of this question. But, I think that the basic file upload is a bit boring thing, so, I decided to add an important feature – Cropping. It should be more attractive. Moreover, we are going to use HTML5 FileReader in order to perform cropping with Jcrop (jquery library) at client size. That will get rid of unnecessary steps. In the result – we should get 3-step process: select file -> crop -> upload. During selecting a file, we will check for the file type and size (in order to avoid huge files). Finally, when everything is ready and we have uploaded the cropped image – we will accept (upload) this file into our website (into certain folder). Please pay attention, that GD library is required to process images.
Step 1. HTML
Our first step is html markup. first, we have to put styles and scripts in the HEAD section:
<!-- add styles -->
<link href="css/main.css" rel="stylesheet" type="text/css" />
<link href="css/jquery.Jcrop.min.css" rel="stylesheet" type="text/css" />

<!-- add scripts -->
<script src="js/jquery.min.js"></script>
<script src="js/jquery.Jcrop.min.js"></script>
<script src="js/script.js"></script>
And now, in the BODY section we can put our form:
<div class="bbody">
<!-- upload form -->
<form id="upload_form" enctype="multipart/form-data" method="post" action="upload.php" onsubmit="return checkForm()">
<!-- hidden crop params -->
<input type="hidden" id="x1" name="x1" />
<input type="hidden" id="y1" name="y1" />
<input type="hidden" id="x2" name="x2" />
<input type="hidden" id="y2" name="y2" />
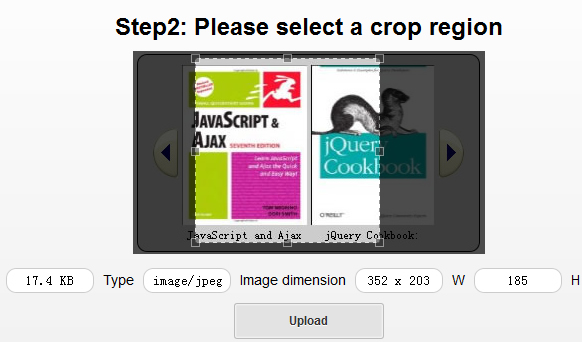
<h2>Step1: Please select image file</h2>
<div><input type="file" name="image_file" id="image_file" onchange="fileSelectHandler()" /></div>
<div class="error"></div>
<div class="step2">
<h2>Step2: Please select a crop region</h2>
<img id="preview" />
<div class="info">
<label>File size</label> <input type="text" id="filesize" name="filesize" />
<label>Type</label> <input type="text" id="filetype" name="filetype" />
<label>Image dimension</label> <input type="text" id="filedim" name="filedim" />
<label>W</label> <input type="text" id="w" name="w" />
<label>H</label> <input type="text" id="h" name="h" />
</div>
<input type="submit" value="Upload" />
</div>
</form>
</div>
I hope that all is clear at this step – this is usual upload form, with hidden and visible fields, once we have selected an image, we will see second step (crop). Once we have cropped necessary area, we can Upload our result.
Step 2. CSS
Now, I would like to give you CSS styles to stylize our form:
.bheader {
    background-color: #DDDDDD;
    border-radius: 10px 10px 0 0;
    padding: 10px 0;
    text-align: center;
}
.bbody {
    color: #000;
    overflow: hidden;
    padding-bottom: 20px;
    text-align: center;

    background: -moz-linear-gradient(#ffffff, #f2f2f2);
    background: -ms-linear-gradient(#ffffff, #f2f2f2);
    background: -webkit-gradient(linear, left top, left bottom, color-stop(0%, #ffffff), color-stop(100%, #f2f2f2));
    background: -webkit-linear-gradient(#ffffff, #f2f2f2);
    background: -o-linear-gradient(#ffffff, #f2f2f2);
    filter: progid:DXImageTransform.Microsoft.gradient(startColorstr='#ffffff', endColorstr='#f2f2f2');
    -ms-filter: "progid:DXImageTransform.Microsoft.gradient(startColorstr='#ffffff', endColorstr='#f2f2f2')";
    background: linear-gradient(#ffffff, #f2f2f2);
}
.bbody h2, .info, .error {
    margin: 10px 0;
}
.step2, .error {
    display: none;
}
.error {
    font-size: 18px;
    font-weight: bold;
    color: red;
}
.info {
    font-size: 14px;
}
label {
    margin: 0 5px;
}
input {
    border: 1px solid #CCCCCC;
    border-radius: 10px;
    padding: 4px 8px;
    text-align: center;
    width: 70px;
}
.jcrop-holder {
    display: inline-block;
}
input[type=submit] {
    background: #e3e3e3;
    border: 1px solid #bbb;
    border-radius: 3px;
    -webkit-box-shadow: inset 0 0 1px 1px #f6f6f6;
    box-shadow: inset 0 0 1px 1px #f6f6f6;
    color: #333;
    font: bold 12px/1 "helvetica neue", helvetica, arial, sans-serif;
    padding: 8px 0 9px;
    text-align: center;
    text-shadow: 0 1px 0 #fff;
    width: 150px;
}
input[type=submit]:hover {
    background: #d9d9d9;
    -webkit-box-shadow: inset 0 0 1px 1px #eaeaea;
    box-shadow: inset 0 0 1px 1px #eaeaea;
    color: #222;
    cursor: pointer;
}
input[type=submit]:active {
    background: #d0d0d0;
    -webkit-box-shadow: inset 0 0 1px 1px #e3e3e3;
    box-shadow: inset 0 0 1px 1px #e3e3e3;
    color: #000;
}
Read more:http://www.script-tutorials.com/html5-image-uploader-with-jcrop/
You might also like

Tags
accordion accordion menu animation navigation animation navigation menu carousel checkbox inputs css3 css3 menu css3 navigation date picker dialog drag drop drop down menu drop down navigation menu elastic navigation form form validation gallery glide navigation horizontal navigation menu hover effect image gallery image hover image lightbox image scroller image slideshow multi-level navigation menus rating select dependent select list slide image slider menu stylish form table tabs text effect text scroller tooltips tree menu vertical navigation menu