 Subscribe
 Follow Us
A Colorful Clock With CSS & jQuery
 13 years ago
 15039
15039 3156
3156
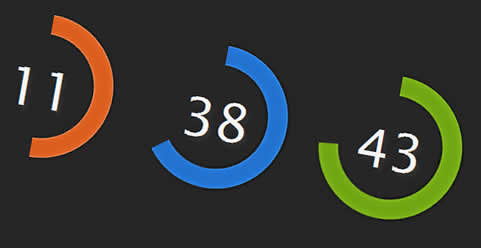
we are going to make a colorful jQuery & CSS clock
Step 1 – XHTML
As usual, we start with the XHTML markup. The difference is, that the XHTML is not contained in demo.html, but is dynamically inserted into the page by jQuery (well there is some markup left there after all we need at least one container div for the clock to be inserted in).
This saves us from having to manually type similar blocks of code for each one of the dials (there are three of them, one for the hours, the minutes and the seconds).
Lets take a look at the XHTML that is inserted by jQuery:
jquery.tzineClock.js
<!-- The first class (green in this case) is assigned dynamically -->
<div class="green clock"</div>

<!-- This div holds the value of the unit monitored - seconds, minutes or hours -->
<div class="display"></div>

<!-- A black area that hides the underlying background -->
<div class="front left"></div>

<!-- The left part of the background: -->
<div class="rotate left">
<div class="bg left"></div>
</div>

<!-- The right part of the background: -->
<div class="rotate right">
<div class="bg right"></div>
</div>

</div>
This code is contained in jquery.tzineClock/jquery.tzineClock.js. It is generated three times – once for the hours, minutes and seconds. Those are later animated and updated every second, as you’ll see in a moment.
There are three classes that are assigned to the topmost container during the generation process – green, blue and orange. Just by assigning one of those classes, we change the color of the dial.
Lets continue with the next step.
Step 2 – CSS
Before our style sheets can have any effect on the page, we have to include them in the head section of the file:
demo.html
<link rel="stylesheet" type="text/css" href="styles.css" />
<link rel="stylesheet" type="text/css" href="jquery.tzineClock/jquery.tzineClock.css" />
Those lines import styles.css and jquery.tzineClock.css in the page. The first one styles the demo page, and the second – the colorful dials (it is part of the plugin).
We can now take a closer look at the CSS rules.
styles.css
body,h1,h2,h3,p,quote,small,form,input,ul,li,ol,label{
 /* Simple page reset */
 margin:0;
 padding:0;
}

body{
 /* Setting default text color, background and a font stack */
 color:#dddddd;
 font-size:13px;
 background: #302b23;
 font-family:Arial, Helvetica, sans-serif;
}

#fancyClock{
 margin:40px auto;
 height:200px;
 border:1px solid #111111;
 width:600px;
}
Those few lines are all that is needed to style the demo page. We first implement a simple CSS reset, which will insure that the elements on the page look the same across the different browsers.
Later we style the body of the page and finally the fancyClock div, in which we will later insert the three dials.
jquery.tzineClock.css
.clock{
 /* The .clock div. Created dynamically by jQuery */
 background-color:#252525;
 height:200px;
 width:200px;
 position:relative;
 overflow:hidden;
 float:left;
}

.clock .rotate{
 /* There are two .rotate divs - one for each half of the background */
 position:absolute;
 width:200px;
 height:200px;
 top:0;
 left:0;
}

.rotate.right{
 display:none;
 z-index:11;
}

.clock .bg, .clock .front{
 width:100px;
 height:200px;
 background-color:#252525;
 position:absolute;
 top:0;
}

.clock .display{
 /* Holds the number of seconds, minutes or hours respectfully */
 position:absolute;
 width:200px;
 font-family:"Lucida Sans Unicode", "Lucida Grande", sans-serif;
 z-index:20;
 color:#F5F5F5;
 font-size:60px;
 text-align:center;
 top:65px;
 left:0;

 /* CSS3 text shadow: */
 text-shadow:4px 4px 5px #333333;
}

/* The left part of the background: */

.clock .bg.left{ left:0; }

/* Individual styles for each color: */
.orange .bg.left{ background:url(img/bg_orange.png) no-repeat left top; }
.green .bg.left{ background:url(img/bg_green.png) no-repeat left top; }
.blue .bg.left{ background:url(img/bg_blue.png) no-repeat left top; }

/* The right part of the background: */
.clock .bg.right{ left:100px; }

.orange .bg.right{ background:url(img/bg_orange.png) no-repeat right top; }
.green .bg.right{ background:url(img/bg_green.png) no-repeat right top; }
.blue .bg.right{ background:url(img/bg_blue.png) no-repeat right top; }

.clock .front.left{
 left:0;
 z-index:10;
}
jquery.tzineClock.css is a part of our plugin (alongside jquery.tzineClock.js) and it styles the colorful dials themselves.
One of the more interesting moments is the use of individual rules that style the colors of the dials, as I mentioned in step one.
Step 3 – jQuery
Moving all the JavaScript to the plugin makes it really easy to reuse the code and at the same time enables us to leverage the power of jQuery’s selectors and methods.
To be able to use the jQuery library, we first need to include a couple of scripts in the page:
demo.html
<script type="text/javascript" src="http://ajax.googleapis.com/ajax/libs/jquery/1.3.2/jquery.min.js"></script>
<script type="text/javascript" src="jquery.tzineClock/jquery.tzineClock.js"></script>
<script type="text/javascript" src="script.js"></script>
The first file is the library itself, included from Google’s CDN, later we have the plug-in and lastly the script file that runs the demo.
script.js
$(document).ready(function(){
 /* This code is executed after the DOM has been completely loaded */

 $('#fancyClock').tzineClock();

});
If you’ve followed some of our previous tutorials, you are probably expecting to see some 50+ lines of code here, but this time our scripts file contains only one line of code – a call to our plug-in.
This makes it extremely easy to include the code in an existing site (which is the purpose of jquery plugins in the first place).
Lets dig a little deeper into the plugin:
jquery.tzineClock.js – Part 1
(function($){
 // A global object used by the functions of the plug-in:
 var gVars = {};

 // Extending the jQuery core:

 $.fn.tzineClock = function(opts){

  // "this" contains the elements that were selected when calling the plugin:   $('elements').tzineClock();
  // If the selector returned more than one element, we use the first one:
  var container = this.eq(0);
  if(!container)
  {
   try{
    console.log("Invalid selector!");
   } catch(e){}

   return false;
  }

  if(!opts) opts = {};

  var defaults = {
   /* Additional options will be added in future versions of the plugin. */
  };

  /* Merging the provided options with the default ones (will be used in future versions of the plugin): */

  $.each(defaults,function(k,v){
   opts[k] = opts[k] || defaults[k];
  });

  // Calling the setUp function and passing the container,
  // will be available to the setUp function as "this":

  setUp.call(container);

  return this;
 }

 function setUp()
 {
  // The colors of the dials:
  var colors = ['orange','blue','green'];

  var tmp;
  for(var i=0;i<3;i++)
  {
   // Creating a new element and setting the color as a class name:

   tmp = $('<div>').attr('class',colors[i]+' clock').html(
    '<div class="display"></div>'+
    '<div class="front left"></div>'+
    '<div class="rotate left">'+
    '<div class="bg left"></div>'+
    '</div>'+
    '<div class="rotate right">'+
    '<div class="bg right"></div>'+
    '</div>'
   );

   // Appending to the fancyClock container:
   $(this).append(tmp);

   // Assigning some of the elements as variables for speed:
   tmp.rotateLeft = tmp.find('.rotate.left');
   tmp.rotateRight = tmp.find('.rotate.right');
   tmp.display = tmp.find('.display');

   // Adding the dial as a global variable. Will be available as gVars.colorName
   gVars[colors[i]] = tmp;
  }

  // Setting up a interval, executed every 1000 milliseconds:
  setInterval(function(){

   var currentTime = new Date();
   var h = currentTime.getHours();
   var m = currentTime.getMinutes();
   var s = currentTime.getSeconds();

   animation(gVars.green, s, 60);
   animation(gVars.blue, m, 60);
   animation(gVars.orange, h, 24);
  },1000);
 }
Making a plug-in for jQuery comes down to defining a custom function through the jQuery.fn method. This way your function is available on any elements that you normally use jQuery on.
For example, in script.js we select the div width an id of fancyClock and use the tzineClock() method on it: $(‘#fancyClock’).tzineClock();. The elements we selected are later passed to the tzineClock function and are available through the “this” property.
I have left place for future improvements of the plugin, like passing configuration options for the dimensions of the clock, color themes etc. Those will however be implemented in future releases of the plugin.
Because there might be more than one element selected, we extract only the first one of the set with the eq(0) method. Later we have the setUp() function that inserts the markup for the dials and sets up the interval which will update the figures every second.
jquery.tzineClock.js – Part 2
 function animation(clock, current, total)
 {
  // Calculating the current angle:
  var angle = (360/total)*(current+1);

  var element;

  if(current==0)
  {
   // Hiding the right half of the background:
   clock.rotateRight.hide();

   // Resetting the rotation of the left part:
   rotateElement(clock.rotateLeft,0);
  }

  if(angle<=180)
  {
   // The left part is rotated, and the right is currently hidden:
   element = clock.rotateLeft;
  }
  else
  {
   // The first part of the rotation has completed, so we start rotating the right part:
   clock.rotateRight.show();
   clock.rotateLeft.show();

   rotateElement(clock.rotateLeft,180);
   element = clock.rotateRight;

   angle = angle-180;
  }

  rotateElement(element,angle);

  // Setting the text inside of the display element, inserting a leading zero if needed:
  clock.display.html(current<10?'0'+current:current);
 }

 function rotateElement(element,angle)
 {
  // Rotating the element, depending on the browser:
  var rotate = 'rotate('+angle+'deg)';

  if(element.css('MozTransform')!=undefined)
   element.css('MozTransform',rotate);

  else if(element.css('WebkitTransform')!=undefined)
   element.css('WebkitTransform',rotate);

  // A version for internet explorer using filters, works but is a bit buggy (no surprise here):

  else if(element.css("filter")!=undefined)
  {
   var cos = Math.cos(Math.PI * 2 / 360 * angle);
   var sin = Math.sin(Math.PI * 2 / 360 * angle);

   element.css("filter","progid:DXImageTransform.Microsoft.Matrix(M11="+cos+",M12=-"+sin+",M21="+sin+",M22="+cos+",SizingMethod='auto expand',FilterType='nearest neighbor')");
   element.css("left",-Math.floor((element.width()-200)/2));
   element.css("top",-Math.floor((element.height()-200)/2));
  }
 }
})(jQuery)
The last two of the functions used by the plug-in are animation and rotateElement. The first one updates the dials according to the value passed (we also pass a parameter with the maximum value so that the function can calculate the rotation).
The next function is the one that actually rotates the passed element. The rotation works only for Firefox, Safari, Chrome and IE6+. Internet Explorer does not support the CSS3 rotation used by the other browsers, but provides a proprietary filter property which allows for a similar transformation.
With this our colorful jQuery clock is complete!
You might also like


Tags
accordion accordion menu animation navigation animation navigation menu carousel checkbox inputs css3 css3 menu css3 navigation date picker dialog drag drop drop down menu drop down navigation menu elastic navigation form form validation gallery glide navigation horizontal navigation menu hover effect image gallery image hover image lightbox image scroller image slideshow multi-level navigation menus rating select dependent select list slide image slider menu stylish form table tabs text effect text scroller tooltips tree menu vertical navigation menu