 Subscribe
 Follow Us
CSS Overlapping Tabs Menu
 13 years ago
 19005
19005 3301
3301

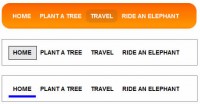
This example is a cool menu with overlapping tabs
First of all download the tab image (right-click, then Save As…) which contains both on and off states. You can edit/customize this image in any way you want to fit your pages. You need to place this image in the same folder as your page
The HTML
Create a new HTML page in Dreamweaver, or Notepad for that matter. Make sure you’ve got the DOCTYPE set as XHTML.
In the body tag of the page insert this code:
<div id="ts_tabmenu">
<ul>
<li><a href="http://www.tutorialsphere.com/"><strong>Tutorialsphere</strong></a></li>
<li><a href="http://www.tutorialsphere.com/tutorials/photoshop"><strong>Photoshop</strong></a></li>
<li><a href="http://www.tutorialsphere.com/tutorials/illustrator"><strong>Illustrator</strong></a></li>
<li><a href="http://www.tutorialsphere.com/tutorials/fireworks"><strong>Fireworks</strong></a></li>
<li><a href="http://www.tutorialsphere.com/tutorials/flash"><strong>Flash</strong></a></li>
<li><a href="http://www.tutorialsphere.com/tutorials/css"><strong>CSS</strong></a></li>
<li><a href="http://www.tutorialsphere.com/tutorials/php"><strong>PHP</strong></a></li>
</ul>
</div>
What I did there was assign to each menu item a list item from an Unordered List (UL). I did this for the convenience of easy formatting using CSS.
The way the above code works is as follows. Think of your tab image as a two piece puzzle. We need two pieces in order for our tabs to stretch according to the length of the word it contains. First piece of the puzzle is a 10px wide piece of the tab. The second piece is the remaining part of our tab.
The CSS
You can either paste this code in the HEAD section of your page, wrapped in STYLE tags, or you can create a stylesheet (.css) file and paste it in there, then link to it in your HTML page. In order for everything to work right off the bat, you need to place the .css file in the same folder as the image and the HTML page. Otherwise you need to adjust some paths in it.
#ts_tabmenu {
font-size: .75em; /* set the font size */
padding: 20px 0px 0px 20px; /* set the padding */
}
#ts_tabmenu ul {
line-height: 1em; /* setting the line height now so we don't have any headaches*/
margin: 0px; /* let's keep the margin set to 0 for the same reasons as above*/
list-style-type: none; /* we remove the UL's default disc bullets */
float: left; /* we float the list to the left like we will all the elements inside*/
padding: 0px 0px 0px 5px; /* give it a left padding of 5px to counter the effect of margin -5px below */
}
#ts_tabmenu ul li {
float: left; /* floatin' left */
}
#ts_tabmenu ul li a {
text-decoration: none; /* remove the default underline off the anchor text */
display: block; /* we display this text as block so that we can apply padding/margin without problems */
float: left; /* floatin' left, to make the menu horizontal */
padding: 0px 0px 0px 10px; /* we give it a left padding of 10px to show the first 10 pixels of the tabs image. you can also use padding-left: 10px; */
background: url(tabs.gif) no-repeat left top; /* we link to the tabs image, no tiling, showing the top left part of it */
margin-left: -5px; /* this is important for the overlapping part - we are overlapping the tabs by 5 px */
z-index: 0; /* keep it on layer 0 (default) */
position: relative; /* very important as this enables the z-index to work for us and keeps the tabs where they should be */
color: #666666; /* color of the tab text */
}
#ts_tabmenu ul li a strong {
font-weight: normal; /* remove the bold effect */
display: block; /* display the strong element as a block so we can pad it, etc. */
float: left; /* float it left as well */
background: url(tabs.gif) no-repeat right top; /* now we show the right part of the tab and we complete the "puzzle" */
padding: 6px 10px 7px 5px; /* important, as through this you define the position of the text within the tab */
cursor: pointer; /* this makes the browser show the "hand" cursor when hovering over the tab */
}
#ts_tabmenu ul li a:hover {
position: relative; /* again, keep things relative */
z-index: 5; /* we show this tab over all other tabs in the menu, which would be on layer 0, thus overlapping occurs */
background: url(tabs.gif) no-repeat left bottom; /* now we show the bottom part of the tabs image, the "hover" instance */
color: #000000; /* we color the hovered tab's text black */
}
#ts_tabmenu ul li a:hover strong {
background-image: url(tabs.gif) no-repeat;
position: relative; /* keep it relative */
z-index: 5; /* show this on layer 5 as well */
background-position: right bottom; /* we show the right bottom part of the tabs image (the hover instance) */
}
Something Extra
Some of you might want that tab to stay on when the user clicks it and enters that page. You can do that with this menu with two small code additions.
You need to give each list item (LI) an id, like so <li id="li_tsmenu2">. This id needs to be unique on that page. Now our HTML code would look like this:
<div id="ts_tabmenu">
<ul>
<li id="li_tsmenu1"><a href="http://www.tutorialsphere.com/"><strong>Tutorialsphere</strong></a></li>
<li id="li_tsmenu2"><a href="http://www.tutorialsphere.com/tutorials/photoshop"><strong>Photoshop</strong></a></li>
<li id="li_tsmenu3"><a href="http://www.tutorialsphere.com/tutorials/illustrator"><strong>Illustrator</strong></a></li>
<li id="li_tsmenu4"><a href="http://www.tutorialsphere.com/tutorials/fireworks"><strong>Fireworks</strong></a></li>
<li id="li_tsmenu5"><a href="http://www.tutorialsphere.com/tutorials/flash"><strong>Flash</strong></a></li>
<li id="li_tsmenu6"><a href="http://www.tutorialsphere.com/tutorials/css"><strong>CSS</strong></a></li>
<li id="li_tsmenu7"><a href="http://www.tutorialsphere.com/tutorials/php"><strong>PHP</strong></a></li>
</ul>
</div>
Now that we have our id’s in place, we need to specify the id of the body tag, which should be something similar to the id of the list item we want to highlight.
For example, say we want to highlight the Photoshop tab. Let’s give the body tag an id of “tsmenu2″
<body id="tsmenu2">
Up to this part, our modifications would be pretty much useless if we didn’t have the CSS to enable us to use them. We need to make the following addition to our CSS code:
#tsmenu1 #li_tsmenu1 a, #tsmenu2 #li_tsmenu2 a,
#tsmenu3 #li_tsmenu3 a, #tsmenu4 #li_tsmenu4 a,
#tsmenu5 #li_tsmenu5 a, #tsmenu6 #li_tsmenu6 a,
#tsmenu7 #li_tsmenu7 a {
position: relative;
z-index: 5;
background: url(tabs.gif) no-repeat left bottom;
color: #000000;
}
#tsmenu1 #li_tsmenu1 a strong, #tsmenu2 #li_tsmenu2 a strong,
#tsmenu3 #li_tsmenu3 a strong, #tsmenu4 #li_tsmenu4 a strong,
#tsmenu5 #li_tsmenu5 a strong, #tsmenu6 #li_tsmenu6 a strong,
#tsmenu7 #li_tsmenu7 a strong {
background-image: url(tabs.gif) no-repeat;
position: relative;
z-index: 5;
background-position: right bottom;
}
You will notice that we’ve used the same rules as we did for the hover state of our tabs. You can obviously modify this so that the “current” tab has a different look, but for now let’s go with this
What I did there was define rules for each of the menu items, but since they would all be the same, I’ve organized them into two groups. We got #tsmenu1 #li_tsmenu1 a which is a CSS rule with multiple selectors (3 in this case). The way this works right here is this rule is only applied to the anchor contained within an element with the id li_tsmenu1 which also must be contained within an element with the id tsmenu1. Which is what we need: we’ve got the body with the id #tsmenu1 containing the li with the id id li_tsmenu1 and the anchor inside the li – Bingo!
In order to change the currently highlighted tab you need to change only the id of the body tag and nothing else
You might also like

Tags
accordion accordion menu animation navigation animation navigation menu carousel checkbox inputs css3 css3 menu css3 navigation date picker dialog drag drop drop down menu drop down navigation menu elastic navigation form form validation gallery glide navigation horizontal navigation menu hover effect image gallery image hover image lightbox image scroller image slideshow multi-level navigation menus rating select dependent select list slide image slider menu stylish form table tabs text effect text scroller tooltips tree menu vertical navigation menu