 Subscribe
 Follow Us
CSS Image Viewer the Clever Way
 13 years ago
 14671
14671 2080
2080
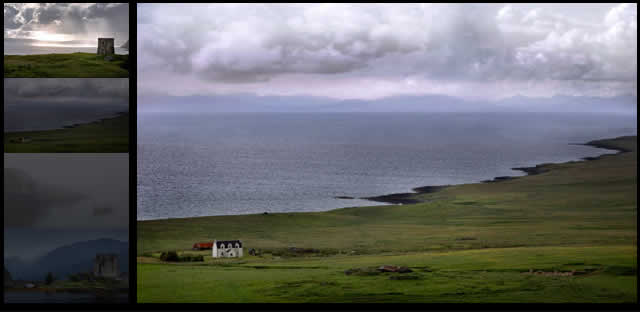
Image Viewers are fairly common on websites now-a-days. Most use some form of JavaScript to change images, some use Flash. This is a problem if the user doesn’t have either enabled on their browser. In this example we’ll cover how to create an image viewer with only using CSS and HTML.
What We Are Building
We be making a simple image viewer that has 4 tabs on the left and a main picture on the right. When the user clicks on one of the tabs it shows the new image.
Prepping the Images
First thing we’ll need are images. In this example I’ve used landscape images, but this could be promotional content, or whatever you like. I made the main image 500×300, and the tabs 75×125. I just picked a size for the main image, than divided the height by how many tabs I wanted. (e.g.. 300 / 4 = 75) This gives me the height of my tabs. The width of tab was arbitrary, I just resized the main image to the height of 75 and the width is whatever it falls at, in this case 125.
The Theory
The theory behind how this is all going to work really isn’t that difficult. We’re going to use anchor tags to jump from one image to the next. This is much like a “Back to Top” link that jumps to the top of the page when you click on it. The only difference is the images are going to be scrolling within a div wrapper instead up jumping up and down the page.
The HTML
The HTML itself is pretty simple. For the tabs it’s just an unordered list, with images inside of anchor tags. For the images they’re all wrapped in a div (this is important as we are going to hide the overflow so it only displays your selected image) Also each individual image is wrapped in a div along with a named anchor tag. These divs are there incase you want to use background images instead of regular images, we really don’t need them in this instance, they’re just there incase we change our mind.
Here is the HTML:
<div id="wrapper">
        <!-- Tabs -->
        <ul>
            <li><a href="#image1" id="tab1"><img src="tab1.jpg" alt="" title="" /></a></li>
            <li><a href="#image2" id="tab2"><img src="tab2.jpg" alt="" title="" /></a></li>
            <li><a href="#image3" id="tab3"><img src="tab3.jpg" alt="" title="" /></a></li>
            <li><a href="#image4" id="tab4"><img src="tab4.jpg" alt="" title="" /></a></li>
        </ul>

        <!-- Images -->
        <div id="images">
            <div><a name="image1"></a><img src="image1.jpg" alt="" title="" /></div>
            <div><a name="image2"></a><img src="image2.jpg" alt="" title="" /></div>
            <div><a name="image3"></a><img src="image3.jpg" alt="" title="" /></div>
            <div><a name="image4"></a><img src="image4.jpg" alt="" title="" /></div>
        </div>
    </div>
The CSS
What we’re going to do with the CSS is setup the tabs so they sit to the left and are stacked on top of one another. We’re also going to make it so the tabs originally sit at an opacity of 40%, then when a user rolls over the tab it will change to 100% opacity. Probably the most important part of the CSS will be for div wrapping the images. We just have to make sure the overflow is set to hidden.
Here is the CSS:
/* CSS Reset */
    * {
        margin: 0;
        padding: 0;
        border: 0;
        outline: 0;
    }

    /* Setup Tabs */

    ul{
        background:#000;
        width:125px; /* Width of Tab Image */
        float: left;
        list-style: none;
        border-right:8px solid black;
    }

    ul li{
        height:75px; /* Height of Tab Image */
    }

    /* Setup Tab so normal opacity is 40 and rollover is 100 */
    ul li a img{
        /* for IE */
        -ms-filter:"progid:DXImageTransform.Microsoft.Alpha(Opacity=40)";
        filter:alpha(opacity=40);

        /* CSS3 standard */
        opacity:0.4;

    }

    /* Change Opacity to 100% on roll over */
    ul li a:hover img{

        /* for IE */
        -ms-filter:"progid:DXImageTransform.Microsoft.Alpha(Opacity=100)";
        filter:alpha(opacity=100);

        /* CSS3 standard */
        opacity:1.0;
    }

    /* Places images to the right of the tabs,
    and hides non selected images */
    #images{
        width:500px;
        height:300px;
        overflow:hidden;  /* Hides the non selected images */
        float:left;
    }

    /* Places a black border around the entire viewer
    and centers it on the screen */
    #wrapper{
        width:633px;
        height:300px;
        border:8px solid black;
        margin:0px auto;
    }
You might also like


Tags
accordion accordion menu animation navigation animation navigation menu carousel checkbox inputs css3 css3 menu css3 navigation date picker dialog drag drop drop down menu drop down navigation menu elastic navigation form form validation gallery glide navigation horizontal navigation menu hover effect image gallery image hover image lightbox image scroller image slideshow multi-level navigation menus rating select dependent select list slide image slider menu stylish form table tabs text effect text scroller tooltips tree menu vertical navigation menu