 Subscribe
 Follow Us
Image splitting effect with CSS and JQuery
 13 years ago
 11469
11469 1743
1743
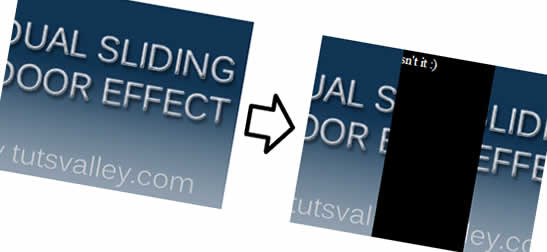
we are going to make an image splitting effect. What’s that? It’s simillar to a sliding door effect where the image slides to left or right side and reveals the text behind it, but the thing that makes this different is that the effect looks like the image is splitted into half and one goes left and the other one goes right. One thing that’s very important is that there won’t be 2 images, it’s only one
HTML
<!--START THE MAIN CONTAINER-->
<div class='box_container'>

        <!--START THE IMAGE PARTS HOLDER-->
        <div class='images_holder'>

            <!--INSERT THE SAME IMAGE IN 2 DIVS, THEY BOTH HAVE image_div CLASS AND left OR right CLASS DEPENDING ON POSITION-->
            <div class='image_div left'><img class='box_image' src='img.jpg' style='width:300px'/></div>
            <div class='image_div right'><img class='box_image' src='img.jpg' style='width:300px'/></div>

            <!-- WE USED CSS FLOAT PROPERY, SO WE NEED TO CLEAR NOW-->
            <div class='clear'></div>

        </div>
        <!--END THE IMAGE PARTS HOLDER-->

        <!--START THE TEXT-->
        Just some dummy text.
        <!--END THE TEXT-->

</div>
<!--END THE MAIN CONTAINER-->
Now, let’s make a CSS trick to show the first part of the image in one div and the second part in the other div.. It’s not hard.
CSS
    .box_container{
    position:relative; /* important */
    width:300px; /* we must set a specific width of the container, so it doesn't strech when the image starts moving */
    height:220px; /* important */
    overflow:hidden; /* hide the content that goes out of the div */
    /*just styling bellow*/
    background: black;
    color:white;
    }
    .images_holder{
    position:absolute; /* this is important, so the div is positioned on top of the text */
    }
    .image_div {
        position:relative; /* important so we can work with the left or right indent */
        overflow:hidden; /* hide the content outside the div (this is how we will hide the part of the image) */
        width:50%; /* make it 50% of the whole images_holder */
        float:left; /* make then inline */
    }
    .right img{
        margin-left: -100%; /* 100% is in this case 50% of the image, so this is how we show the second part of the image */
    }
    .clear{
        clear:both;
    }
That’s it. Looks like one whole image, right? Well there are 2 images making it to look like it’s one. ![]()
Now the JQuery part, it’s actualy pretty simple, and simillar to the sliding door effect i wrote a tutorial about before.
JQuery
$(document).ready(function() {

        //when the user hovers over the div that contains our html...
        $('.box_container').hover(function(){
            //... we get the width of the div and split it by 2  ...
            var width = $(this).outerWidth() / 2;
            /*... and using that width we move the left "part" of the image to left and right "part"
            to right by changing it's indent from left side or right side... '*/
            $(this).find('.left').animate({ right : width },{queue:false,duration:300});
            $(this).find('.right').animate({ left : width },{queue:false,duration:300});
        }, function(){
            //... and when he hovers out we get the images back to their's starting position using the same function... '
            $(this).find('.left').animate({ right : 0 },{queue:false,duration:300});
            $(this).find('.right').animate({ left : 0 },{queue:false,duration:300});
            //... close it and that's it
        });

});
And that’s it,
You might also like

Tags
accordion accordion menu animation navigation animation navigation menu carousel checkbox inputs css3 css3 menu css3 navigation date picker dialog drag drop drop down menu drop down navigation menu elastic navigation form form validation gallery glide navigation horizontal navigation menu hover effect image gallery image hover image lightbox image scroller image slideshow multi-level navigation menus rating select dependent select list slide image slider menu stylish form table tabs text effect text scroller tooltips tree menu vertical navigation menu