 Subscribe
 Follow Us
astonishing iCal-like calendars with jQuery
 13 years ago
 39382
39382 5890
5890

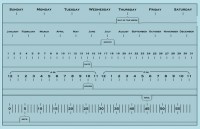
I wanted it to be similar to the iPhone Calendar application (or, if you want, to the little calendar on the left bottom corner in iCal). And I also wanted to keep the code as little and sweet as possible (we don’t like maintenance, do we?).
Here’s the simple HTML code I used, the simplest you could ever come up with:
<table cellspacing="0">
 <thead>
  <tr>
   <th>Mon</th><th>Tue</th><th>Wed</th>
   <th>Thu</th><th>Fri</th><th>Sat</th>
   <th>Sun</th>
  </tr>
 </thead>
 <tbody>
  <tr>
   <td class="padding" colspan="3"></td>
   <td> 1</td>
   <td> 2</td>
   <td> 3</td>
   <td> 4</td>
  </tr>
  <tr>
   <td> 5</td>
   <td> 6</td>
   <td> 7</td>
   <td> 8</td>
   <td class="today"> 9</td>
   <td>10</td>
   <td>11</td>
  </tr>
  <tr>
   <td>12</td>
   <td class="date_has_event">
    13
   </td>
   <td>14</td>
   <td>15</td>
   <td>16</td>
   <td>17</td>
   <td>18</td>
  </tr>
  <tr>
   <td>19</td>
   <td>20</td>
   <td>21</td>
   <td class="date_has_event">
    22
   </td>
   <td>23</td>
   <td>24</td>
   <td>25</td>
  </tr>
  <tr>
   <td>26</td>
   <td>27</td>
   <td>28</td>
   <td>29</td>
   <td>30</td>
   <td>31</td>
   <td class="padding"></td>
  </tr>
 </tbody>
 <tfoot>
  <th>Mon</th><th>Tue</th><th>Wed</th>
  <th>Thu</th><th>Fri</th><th>Sat</th>
  <th>Sun</th>
 </tfoot>
</table>
All the magic takes place with some ninja CSS:
table {
 border-collapse: separate;
 border: 1px solid #9DABCE;
 border-width: 0px 0px 1px 1px;
 margin: 10px auto;
 font-size: 20px;
}
td, th {
 width: 81px;
 height: 81px;
 text-align: center;
 vertical-align: middle;
 background: url(../img/cells.png);
 color: #444;
 position: relative;
}
th {
 height: 30px;
 font-weight: bold;
 font-size: 14px;
}
td:hover, th:hover {
 background-position: 0px -81px;
 color: #222;
}
td.date_has_event {
 background-position: 162px 0px;
 color: white;
}
td.date_has_event:hover {
 background-position: 162px -81px;
}
td.padding {
 background: url(../img/calpad.jpg);
}
td.today {
 background-position: 81px 0px;
 color: white;
}
td.today:hover {
 background-position: 81px -81px;
}
Please note a couple of things here, as it’s the trickiest part:
- Make your images seamless. Draw only the top and right border of the cells inside the image: neighbour cells will continue the pattern. Then add the bottom and left border to the table via CSS to complete the work.
- Use a single image for all the graphics whenever is possible to decrease the download speed time (just a single TCP three-way-handshake to manage, a single Apache request to be answered by your server, a single PNG header overhead to be downloaded).
In addition to the plain calendar structure, we obviously also want the events description to show up on mouse hover. To do that, just add this block inside the calendar cells:
<td class="date_has_event">
 13
 <div class="events">
  <ul>
   <li>
    <span class="title">Event 1</span>
    <span class="desc">Lorem ipsum dolor sit amet, consectetu adipisicing elit.</span>
   </li>
   <li>
    <span class="title">Event 2</span>
    <span class="desc">Excepteur sint occaecat cupidatat non proident, sunt in culpa qui officia deserunt mollit anim id est laborum.</span>
   </li>
  </ul>
 </div>
</td>
And use the beautiful, handy, lightweight Coda-like effect for jQuery to bring it to life (how I love jQuery?)
$(function () {
 $('.date_has_event').each(function () {
  // options
  var distance = 10;
  var time = 250;
  var hideDelay = 500;

  var hideDelayTimer = null;

  // tracker
  var beingShown = false;
  var shown = false;

  var trigger = $(this);
  var popup = $('.events ul', this).css('opacity', 0);

  // set the mouseover and mouseout on both element
  $([trigger.get(0), popup.get(0)]).mouseover(function () {
   // stops the hide event if we move from the trigger to the popup element
   if (hideDelayTimer) clearTimeout(hideDelayTimer);

   // don't trigger the animation again if we're being shown, or already visible
   if (beingShown || shown) {
    return;
   } else {
    beingShown = true;

    // reset position of popup box
    popup.css({
     bottom: 20,
     left: -76,
     display: 'block' // brings the popup back in to view
    })

    // (we're using chaining on the popup) now animate it's opacity and position
    .animate({
     bottom: '+=' + distance + 'px',
     opacity: 1
    }, time, 'swing', function() {
     // once the animation is complete, set the tracker variables
     beingShown = false;
     shown = true;
    });
   }
  }).mouseout(function () {
   // reset the timer if we get fired again - avoids double animations
   if (hideDelayTimer) clearTimeout(hideDelayTimer);

   // store the timer so that it can be cleared in the mouseover if required
   hideDelayTimer = setTimeout(function () {
    hideDelayTimer = null;
    popup.animate({
     bottom: '-=' + distance + 'px',
     opacity: 0
    }, time, 'swing', function () {
     // once the animate is complete, set the tracker variables
     shown = false;
     // hide the popup entirely after the effect (opacity alone doesn't do the job)
     popup.css('display', 'none');
    });
   }, hideDelay);
  });
 });
});
This is the CSS code used to style the popup div:
.events {
 position: relative;
}
.events ul {
 text-align: left;
 position: absolute;
 display: none;
 z-index: 1000;
 padding: 15px;
 background: #E7ECF2 url(../img/popup.png) no-repeat;
 color: white;
 border: 1px solid white;
 font-size: 15px;
 width: 200px;
 -moz-border-radius: 3px;
 -khtml-border-radius: 3px;
 -webkit-border-radius: 3px;
 -border-radius: 3px;
 list-style: none;
 color: #444444;
 -webkit-box-shadow: 0px 8px 8px #333;
}
.events li {
 padding-bottom: 5px;
}
.events li span {
 display: block;
 font-size: 12px;
 text-align: justify;
 color: #555;
}
.events li span.title {
 font-weight: bold;
 color: #222;
}
Please note how nice the box-shadow CSS property is when applied to the popup… unfortunately, this CSS3 property is still only implemented in WebKit browsers (Safari, Google Chrome), but more of them are about to support it.
And… that’s it. Simple and sweet, as we wanted. Obviously, you’ll have to properly configure your preferred Wordpress plugin to output a code like the one I showed you, but that’s the boring part of the lesson and I’ll skip it :) Instead, let me just add a note…
Choosing the right Wordpress Plugin
There are plenty of pretty good Wordpress calendar plugins around to facilitate your backend work. I can tell you I tried them all, and the one that convinced me the most was Event Calendar.
With Event Calendar you can add a countless number of events to any post or page directly within the New and Edit page, there’s a lot of great functions you can use to freely tweak the event-browsing experience within your PHP template — but some work still should be done in this direction — it’s AJAX ready and the plugin itself is already localized in 19 languages.
You might also like
Tags
accordion accordion menu animation navigation animation navigation menu carousel checkbox inputs css3 css3 menu css3 navigation date picker dialog drag drop drop down menu drop down navigation menu elastic navigation form form validation gallery glide navigation horizontal navigation menu hover effect image gallery image hover image lightbox image scroller image slideshow multi-level navigation menus rating select dependent select list slide image slider menu stylish form table tabs text effect text scroller tooltips tree menu vertical navigation menu