 Subscribe
 Follow Us
Cool jQuery photos Shutter Effect
 13 years ago
 16140
16140 3720
3720
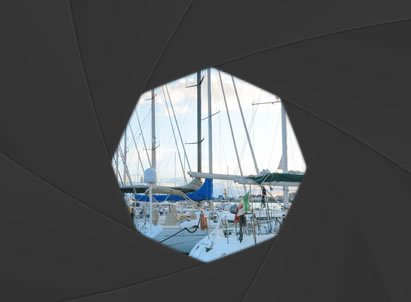
This is a using the HTML5 canvas element to create a simple photography portfolio, which displays a set of featured photos with a camera shutter effect. This functionality will come in the form of an easy to use jQuery plugin that you can easily incorporate into any website.
The Idea
The canvas element is a special area on which you can draw with JavaScript and apply all sorts of manipulations to your image. However, there are limitations to what can be done with it. Generating complex real-time animations is challenging, as you have to redraw the canvas on every frame.
This requires a lot of processing power that web browsers just cannot provide currently, and as a result smooth animations are nearly impossible. But there is a way around this limitation. If you’ve played around with the demo, you’ve noticed how smooth it runs. This is because the frames are generated ahead of time and each one is built as a separate canvas element.
After the initial load of the page (when the frames are generated), the job of the plugin becomes to simply cycle through the frames.
The shutter itself is generated by drawing the same slightly curved triangular image. With each frame, the opening is smaller until the peaces fit together.
HTML
First lets take a closer look at the HTML markup of the page. As we are using the canvas element, we need to define the document as HTML5 with the appropriate doctype.
index.html
<!DOCTYPE html> <!-- Defining the document as HTML5 -->
<html>
<head>
<meta http-equiv="Content-Type" content="text/html; charset=utf-8" />
<title>"Shutter Effect" with Canvas and jQuery | Tutorialzine Demo</title>
<link rel="stylesheet" type="text/css" href="assets/css/styles.css" />
<link rel="stylesheet" type="text/css" href="assets/jquery.shutter/jquery.shutter.css" />
</head>
<body>
<div id="top"></div>
<div id="page">
<h1>Shutter Folio Photography</h1>
<div id="container">
<ul>
<li><img src="assets/img/photos/1.jpg" width="640" height="400" /></li>
<li><img src="assets/img/photos/2.jpg" width="640" height="400" /></li>
<li><img src="assets/img/photos/3.jpg" width="640" height="400" /></li>
<li><img src="assets/img/photos/4.jpg" width="640" height="400" /></li>
</ul>
</div>
</div>
<script src="http://ajax.googleapis.com/ajax/libs/jquery/1.5.0/jquery.min.js"></script>
<script src="assets/jquery.shutter/jquery.shutter.js"></script>
<script src="assets/js/script.js"></script>
</body>
</html>
The stylesheets for the page and the plugin are included in the head section, and the script files just before the closing body tag. The #content div holds an unordered list with four photos, which are going to be displayed as a slideshow. If the user’s browser does not support the canvas element, we will just cycle through these images without displaying the shutter effect.
When the shutter plugin is called, it generates the following HTML markup. In our example, we are calling it on the #content div, so the code below is appended to it.
Generated HTML
<div class="shutterAnimationHolder" style="width: 640px; height: 400px;">
  <div class="film"
  style="height: 15000px; width: 1000px; margin-left: -500px; top: -300px;">

    <canvas width="1000" height="1000"></canvas>
    <canvas width="1000" height="1000"></canvas>
    <canvas width="1000" height="1000"></canvas>
    <canvas width="1000" height="1000"></canvas>
    <canvas width="1000" height="1000"></canvas>
    <canvas width="1000" height="1000"></canvas>
    <canvas width="1000" height="1000"></canvas>
    <canvas width="1000" height="1000"></canvas>
    <canvas width="1000" height="1000"></canvas>
    <canvas width="1000" height="1000"></canvas>
    <canvas width="1000" height="1000"></canvas>
    <canvas width="1000" height="1000"></canvas>
    <canvas width="1000" height="1000"></canvas>
    <canvas width="1000" height="1000"></canvas>
    <canvas width="1000" height="1000"></canvas>
  </div>
</div>
Each canvas element holds one frame of the shutter animation. The height of the .film div is set be large enough to display the canvas elements one above the other. By animating the film’s top property, we can skip through the frames and create the animation.
The .shutterAnimationHolder div is set to be the same height as the container in which it is inserted, and is displayed over the unordered list with the photos. With overflow:hidden it hides the rest of the film and only shows one frame at a time. You can think of the canvas elements as regular PNGs, so they supports complete transparency and displays the photo below them.
We will come back to this in the jQuery step of the tutorial.
CSS
The CSS that powers the demo is quite simple, as most of the work is done by generating the canvases images. However, they still have to be organized as a film and animated properly in order to achieve a smooth animation
read more
The article source:http://tutorialzine.com/2011/03/photography-portfolio-shutter-effect/
You might also like


Tags
accordion accordion menu animation navigation animation navigation menu carousel checkbox inputs css3 css3 menu css3 navigation date picker dialog drag drop drop down menu drop down navigation menu elastic navigation form form validation gallery glide navigation horizontal navigation menu hover effect image gallery image hover image lightbox image scroller image slideshow multi-level navigation menus rating select dependent select list slide image slider menu stylish form table tabs text effect text scroller tooltips tree menu vertical navigation menu