 Subscribe
 Follow Us
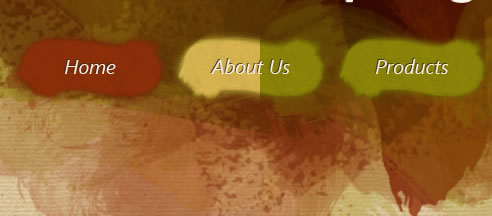
jQuery and html5 Brush Stroke Navigation
 12 years ago
 25837
25837 5723
5723
You can see the folder structure. It is quite simple. A folder for images, another for script files, one HTML file and a CSS file.
The Content – HTML5
We’ll be using some HTML5 elements to build our demo page. The code will be based on the techniques described in the excellent Smashing Magazine article: Designing a HTML5 Layout from Scratch.
Here’s the complete code and then we’ll go over each part of it.
<!DOCTYPE HTML>
<html lang="en-US">
<head>
    <title>jQuery Nav Demo</title>
    <meta charset="UTF-8">
    <link rel="stylesheet" type="text/css" href="style.css" media="all">
    <!--[if IE]><script src="http://html5shiv.googlecode.com/svn/trunk/html5.js"></script><![endif]-->
    <!--[if lt IE 8]><script src="http://ie7-js.googlecode.com/svn/version/2.0(beta3)/IE8.js" type="text/javascript"></script><![endif]-->
</head>
<body>
<header>
    <h1 id="logo">Fictive Company</h1>
    <nav class="clearfix"><ul>
        <li class="active fromLeft cssOnly"><a id="nHom" href="#"><span>Home</span></a></li>
        <li class="fromLeft cssOnly"><a id="nAbo" href="#"><span>About Us</span></a></li>
        <li class="fromTop cssOnly"><a id="nPro" href="#"><span>Products</span></a></li>
        <li class="fromBottom cssOnly"><a id="nNew" href="#"><span>News</span></a></li>
        <li class="fromRight cssOnly"><a id="nSer" href="#"><span>Services</span></a></li>
        <li class="inOut last cssOnly"><a id="nCon" href="#"><span>Contact Us</span></a></li>
    </ul></nav>
</header>

<script type="text/javascript" src="scripts/jquery-1.4.min.js"></script>
<script type="text/javascript" src="scripts/myScripts.js"></script>

</body>
</html>
First, let’s take a look at the HEAD element and you’ll notice that it’s preceded by very simple doctype and language declarations.
<!DOCTYPE HTML>
<html lang="en-US">
<head>
    <title>jQuery Nav Demo</title>
    <meta charset="UTF-8">
    <link rel="stylesheet" type="text/css" href="style.css" media="all">
    <!--[if IE]><script src="http://html5shiv.googlecode.com/svn/trunk/html5.js"></script><![endif]-->
    <!--[if lt IE 8]><script src="http://ie7-js.googlecode.com/svn/version/2.0(beta3)/IE8.js" type="text/javascript"></script><![endif]-->
</head>
Now, inside the head tag, we have some standard tags; the title, a meta tag setting the character set, a link to our style sheet and a couple of JavaScript files inside of conditional comments. The first JS file is added to ensure proper HTML5 support in Internet Explorer (IE).
This script forces IE to properly style the elements it doesn’t recognize (like header, nav and other new HTML5 elements). The second script (IE8.js) adds advanced CSS features to older versions of Internet Explorer.
We move onto the body element and our unordered list:
<body>
<header>
    <h1 id="logo">Fictive Company</h1>
    <nav class="clearfix"><ul>
        <li class="active fromLeft cssOnly"><a id="nHom" href="#"><span>Home</span></a></li>
        <li class="fromLeft cssOnly"><a id="nAbo" href="#"><span>About Us</span></a></li>
        <li class="fromTop cssOnly"><a id="nPro" href="#"><span>Products</span></a></li>
        <li class="fromBottom cssOnly"><a id="nNew" href="#"><span>News</span></a></li>
        <li class="fromRight cssOnly"><a id="nSer" href="#"><span>Services</span></a></li>
        <li class="inOut last cssOnly"><a id="nCon" href="#"><span>Contact Us</span></a></li>
    </ul></nav>
</header>
After the body tag, we insert the header element. Our page only has the header in it, containing the logo and the navigation, but if it had more content, that content would go below the header element. First we have a H1 tag containing the logo. Following the logo is the nav element containing our navigation.
The navigation itself is coded as an unordered list. Each list item has a different class assigned to it so that we can easily target each one with jQuery. The idea is to show off a different effect for each list item. Each list item is also wrapped within span tags; more on this in the following CSS section.
The Content – CSS
As always, I start my CSS files with an edited version of Eric Meyer’s CSS Reset. After that, I’ve added the Clearfix hack, the new Jeff Star version.
/* Clearfix */
.clearfix:after {
    visibility: hidden;
    display: block;
    font-size: 0;
    content: " ";
    clear: both;
    height: 0;
}
* html .clearfix             { zoom: 1 } /* IE6 */
*:first-child+html .clearfix { zoom: 1 } /* IE7 */

header, nav { display: block } /* HTML5 tags */
The Clearfix hack is a really handy way of clearing floats; you can read more about it on Jeff’s site. The last line in the code above is added to improve HTML5 support, it tells the browsers to treat the header and nav elements as block level elements.
Moving on, we set the styles for the basic layout elements.
/* L A Y O U T */
html { background: #d5bd89 url(images/bgHtml.jpg) repeat }
body { background: url(images/bgBody.png) no-repeat top center }

/* HEADER */
header {
    width: 960px;
    margin: 0 auto;
    padding-top: 30px;
}

#logo {
    background: url(images/logo.png) no-repeat;
    width: 460px;
    height: 66px;
    text-indent: -9999px;
    display: block;
    margin: 0 0 25px 8px;
}
First, we set the background for the html element (our canvas pattern that repeats across the entire page). The background for the body element is our watercolor “artwork” that we’ve centered by background positioning. The header element is centered by setting the left and right margins to auto. This way we ensure that our content (in this case, our logo and navigation) is centered horizontally.
Normally, I would use a container class (although you may name it differently) to center my content and limit to the standard 960 pixels. But to keep things simple and short for the sake of this tutorial, I’ve styled the header element directly.
Finally, we use CSS image replacement to style our logo. We’re using the text-indent method. We set the background image for the element and push the HTML text within the h1 tags out of browser frame by setting a high negative text-indent value. This way we ensure that we only see the nice text in the image we’ve created in Photoshop.
Now comes the last part of our style sheet where we set the styles for the navigation unordered list.
/* Navigation */
ul li {
    display: inline-block;
    position: relative;
    float: left;
    margin: 0 6px 20px 0;
}
ul li a {
    background: url(images/bgNav.png) no-repeat;
    text-indent: -9999px;
    height: 80px;
    width: 155px;
    text-align: center;
    display: block;
    position: relative;
    float: left;
}
.last { margin-right: 0 }
We begin by floating all list items to the left and setting the margins. Next we style the links within the list items. We’re giving them a common background image because we’ve exported the entire navigation graphics from Photoshop as a single slice. We have to set the links as block level elements to be able to set their exact sizes and to be able to use the CSS image replacement method we’ve used for the logo.
I’ve added the last class to the last link (Contact Us) to make sure it doesn’t have a right margin of 6 pixels. Those 6 extra pixels would make the row 966 pixels wide and it would have to wrap to the next row because we’ve set our header element to be 960 pixels wide. Normally, we would use the last-child pseudo-class to set the last element’s margin to zero.
We would write something like this:
ul li:last-child { margin-right: 0 }
Unfortunately, some browsers don’t register this pseudo-class. It works in Google Chrome, Opera, Firefox and Internet Explorer 7, but IE8 and Safari wrap the last element to the next row. I believe that the HTML5 doctype is causing the problem. If anyone knows more regarding this problem, please share your knowledge in the comments.
We move on to positioning the background image for each of the navigation items:
#nHom { background-position: 0 0 }
#nAbo { background-position: -155px 0px }
#nPro { background-position: -310px 0px }
#nNew { background-position: -465px -80px }
#nSer { background-position: -620px -80px }
#nCon { background-position: -775px 0px }
Each of the items has an id set in the HTML markup and here we position our image containing all the graphics. The first value sets the horizontal starting position of the image; the second value sets the vertical. As we move through the items, we push the image to the left. The different vertical background position for the News and Services links will be explained in the next section when we start writing the jQuery code.
Below is the bit of CSS which styles the span elements which we’ll animate using jQuery.
ul li a span {
    background: url(images/bgNav.png) no-repeat;
    display: none;
    position: absolute;
    left: 0;
    top: 0;
    height: 80px;
    width: 155px;
}

#nHom span { background-position: 0 -80px }
#nAbo span { background-position: -155px -80px }
#nPro span { background-position: -310px -80px }
#nNew span { background-position: -465px 0px; display: block }
#nSer span { background-position: -620px 0px; display: block }
#nCon span { background-position: -775px -80px }
We have set the position of the span elements to absolute because we want them to appear directly on top of our links. That’s why we’ve set the left and top attributes to zero. We’ve also set the display attribute to none because we’ll animate them in with jQuery. The background position of the span elements differs from the corresponding links’ background position only in the vertical direction.
The last part of the CSS code below covers hover and active states of the links:
/* Hover States */
.cssOnly #nHom:hover { background-position: 0 -80px; }
.cssOnly #nAbo:hover { background-position: -155px -80px; }
.cssOnly #nPro:hover { background-position: -310px -80px; }
.cssOnly #nNew span:hover { background-position: -465px -80px; }
.cssOnly #nSer span:hover { background-position: -620px -80px; }
.cssOnly #nCon:hover { background-position: -775px -80px; }

/* Active State */
.active #nHom { background-position: 0 -160px; }
The cssOnly class that we’ve added to all li elements ensures that the background changes when we hover over the link, even if JavaScript is disabled in the browser.
The Code – jQuery
We’ve come to the main part of the tutorial. You were probably familiar with the techniques discussed in the HTML and CSS sections, but hopefully, this part will be new to you. At the end of our index.html file we call the myScripts.js script file located in the scripts folder. The first thing we’re going to do is to remove the cssOnly class from all list elements.
// If JS is disabled, CSS menu will still work
$(function() {
    $("li").removeClass("cssOnly");
});
This will remove the hover effect we’ve set in the CSS so that we’ll only see the effects animated with jQuery.
The first effect will be animating a brush stroke from left to right. All of the elements that have the fromLeft class will be animated with the code below:
//From the left
$(function() {
    $(".fromLeft a").hover(
        function(){
            $(this).find("span").stop(true, true).animate({ width: 'show' }, 1000);
        },
        function(){
            $(this).find("span").fadeOut(800);
    });
})
The first thing that we do here is to find the anchor tags that are nested within the elements that have the fromLeft class. When we hover over those, the function is executed:
$(this).find("span").stop(true, true).animate({ width: 'show' }, 1000);
The function finds the span element, which is the child element of the link we’re hovering over, and animates it. Before we start the animation, the stop tells the browser to stop other animations that may be in the queue. (Thanks to Liam and Diego for reminding me in the comments to add the stop function.)
The animate function has two arguments here. One is the width property which we’ll animate by setting it to show. We’ve set the display attribute of the span element to none in our CSS so the function sets it to block by animating its width over one thousand milliseconds (the second argument of the animate function), i.e. one second. Because we’re animating the width, the animation goes from left to right and we’ve achieved the illusion that the new color is painted on.
After closing the parenthesis, we enter a comma. Then we write a second function that animates the span when we mouse out from the link:
$(this).find("span").fadeOut(800);
This time it finds the span element and makes it fade out over 800 milliseconds. The next effect is a simple variation of the first one. We’re going to animate the span element so that it appears to be painted from the top down. The script looks for the links nested within elements having the fromTop class.
//From the top
$(function() {
    $(".fromTop a").hover(
        function(){
            $(this).find("span").stop(true, true).animate({ height: 'show' }, 1000);
        },
        function(){
            $(this).find("span").fadeOut(800);
    });
})
This function differs from the first one only in the property being animated; we’re now displaying the span element by animating its height. On mouse out, we fade out the span element.
For this next effect to be achieved, we have to make some changes in our styles. You’ll remember that the span elements nested within News and Services links had their display properties set to block. We’ve done that because the next two effects are basically the same as the first two effects, only reversed.
//From the right
$(function() {
    $(".fromRight a").hover(
        function(){
            $(this).find("span").stop(true, true).animate({ width: 'hide' }, 1000);
        },
        function(){
            $(this).find("span").fadeIn(800);
    });
})
For the brush stroke to be “applied” from right to left, we’re animating its width and setting it to hide. We’ve switched the backgrounds for the link and the span element in our CSS. The default state green-colored background is applied to the span, and the hover state yellow-colored background is applied to the link element. To show the default state on mouse out, we have to fade in the span element.
The next effect (from the bottom up) is similar to the previous one. This is basically a reversed version of the top down effect.
//From the bottom
$(function() {
    $(".fromBottom a").hover(
        function(){
            $(this).find("span").stop(true, true).animate({ height: 'hide' }, 1000);
        },
        function(){
            $(this).find("span").fadeIn(800);
    });
})
Because we have reversed backgrounds for the link and the span element, we animate the height by setting it to hide. This gives us the effect of an upward brush stroke. On mouse out, we fade in the span element.
This last effect is similar to the first one but it has a different mouse out effect:
//Slide IN-OUT
$(function() {
    $(".inOut a").hover(
        function(){
            $(this).find("span").stop(true, true).animate({ width: 'show' }, 1000);
        },
        function(){
            $(this).find("span").animate({ width: 'hide' }, 1000);
    });
})
On hover, the span is animated and we have a brush stroke from the left. By using hide to animate the width on mouse out, we achieve the effect of the original background color being painted on from the right.
As you can see, there are many combinations for this type of effects, and with different graphics, the number of possibilities is multiplied. Try creating your own graphics and experiment with the jQuery code; you’ll surely end up with some cool results. As always, if you run into any problems, you can post a comment here and I’ll try to help if I can.
You might also like

Tags
accordion accordion menu animation navigation animation navigation menu carousel checkbox inputs css3 css3 menu css3 navigation date picker dialog drag drop drop down menu drop down navigation menu elastic navigation form form validation gallery glide navigation horizontal navigation menu hover effect image gallery image hover image lightbox image scroller image slideshow multi-level navigation menus rating select dependent select list slide image slider menu stylish form table tabs text effect text scroller tooltips tree menu vertical navigation menu