 Subscribe
 Follow Us
Nice Dropdown Menu With jQuery
 13 years ago
 12301
12301 2525
2525
Web designers and developers find themselves creating dropdown menus over and over. I’ve drilled dropdown menu production to a science. Seriously. Here’s the benefits of Brian Cray’s basic dropdown menu code:
- Can be put anywhere on site in a matter of seconds
- Forces no styling on the menu, but adapts to ANY styling
- Can handle multiple dropdown levels gracefully
- Covers variable-width tabs and dropdown menus
- Semantic – only two classes needed on an otherwise plain UL
Let’s go over my dropdown menu code first as it provides the basis for the fanciest dropdown menu you ever saw.
The basic HTML
You’ve seen this kind of thing a million times. But take notice of the two UL classes: tabs and dropdown.
<ul class=”tabs”>
<li><a href=”#”>Dropdown 1</a>
<ul class=”dropdown”>
<li><a href=”#”>Menu item 1</a>
<ul class=”dropdown”>
<li><a href=”#”>Submenu item 1</a></li>
<li><a href=”#”>Submenu item 1</a></li>
<li><a href=”#”>Submenu item 1</a></li>
</ul>
</li>
<li><a href=”#”>Menu item 2</a></li>
<li><a href=”#”>Menu item 3</a></li>
<li><a href=”#”>Menu item 4</a></li>
<li><a href=”#”>Menu item 5</a></li>
<li><a href=”#”>Menu item 6</a></li>
</ul>
</li>
<li><a href=”#”>Dropdown 2</a>
<ul class=”dropdown”>
<li><a href=”#”>Menu item 1</a></li>
<li><a href=”#”>Menu item 2</a></li>
<li><a href=”#”>Menu item 3</a></li>
<li><a href=”#”>Menu item 4</a></li>
<li><a href=”#”>Menu item 5</a></li>
<li><a href=”#”>Menu item 6</a></li>
</ul>
</li>
<li><a href=”#”>Dropdown 3</a>
<ul class=”dropdown”>
<li><a href=”#”>Menu item 1</a></li>
<li><a href=”#”>Menu item 2</a></li>
<li><a href=”#”>Menu item 3</a></li>
<li><a href=”#”>Menu item 4</a></li>
<li><a href=”#”>Menu item 5</a></li>
<li><a href=”#”>Menu item 6</a></li>
</ul>
</li>
</ul>
The tabs class makes the first UL a horizontal tab bar. The dropdown class makes the other UL dropdown menus. Simple, right?
The basic CSS
This CSS sets and resets the necessary styles so you don’t have to worry about your menu inheriting a bunch of crap that will make the menu look unexpected.
/* tabs
*************************/

ul.tabs
{
display: table;
margin: 0;
padding: 0;
list-style: none;
position: relative;
}

ul.tabs li
{
margin: 0;
padding: 0;
list-style: none;
display: table-cell;
float: left;
position: relative;
}

ul.tabs a
{
position: relative;
display: block;
}

/* dropdowns
*************************/

ul.dropdown
{
margin: 0;
padding: 0;
display: block;
position: absolute;
z-index: 999;
top: 100%;
width: 250px;
display: none;
left: 0;
}

ul.dropdown ul.dropdown
{
top: 0;
left: 95%;
}

ul.dropdown li
{
margin: 0;
padding: 0;
float: none;
position: relative;
list-style: none;
display: block;
}

ul.dropdown li a
{
display: block;
}
The basic jQuery
The jQuery behind this is genius. It will pick up ANY dropdown class on the page and turn it into a working dropdown menu.
$(function () {
$(‘.dropdown’).each(function () {
$(this).parent().eq(0).hover(function () {
$(‘.dropdown:eq(0)’, this).show();
}, function () {
$(‘.dropdown:eq(0)’, this).hide();
});
});
});
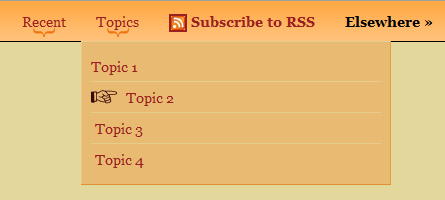
And that’s all you need to add to each project to create dropdown menus in a flash! Now lets take this concept a step farther and REALLY light up the show.
The fancy HTML: what we’ve changed
- Wrapped everything in a #menu div
- Added h4 elements to add another layer to the menu’s organization
- Added a “hasmore” class to the menu items containing dropdown menus
- Added a “last” class to the last menu item in dropdown menus
- Added a
<span>element around the main menu items
<div id=”menu”>
<ul class=”tabs”>
<li><h4><a href=”#”>In the blog »</a></h4></li>
<li class=”hasmore”><a href=”#”><span>Recent</span></a>
<ul class=”dropdown”>
<li><a href=”#”>Menu item 1</a></li>
<li><a href=”#”>Menu item 2</a></li>
<li><a href=”#”>Menu item 3</a></li>
<li><a href=”#”>Menu item 4</a></li>
<li><a href=”#”>Menu item 5</a></li>
<li class=”last”><a href=”#”>Menu item 6</a></li>
</ul>
</li>
<li class=”hasmore”><a href=”#”><span>Topics</span></a>
<ul class=”dropdown”>
<li><a href=”#”>Topic 1</a></li>
<li><a href=”#”>Topic 2</a></li>
<li><a href=”#”>Topic 3</a></li>
<li class=”last”><a href=”#”>Topic 4</a></li>
</ul>
</li>
<li><a href=”#”><span><strong><img src=”images/feed-icon-14×14.png” width=”14″ height=”14″ alt=”RSS”> Subscribe to RSS</strong></span></a></li>
<li><h4><a href=”#”>Elsewhere »</a></h4></li>
<li><a href=”#”><span>About</span></a></li>
<li class=”hasmore”><a href=”/about/#networks”><span>Networks</span></a>
<ul class=”dropdown”>
<li><a href=”#”>Twitter</a></li>
<li><a href=”#”>posterous</a></li>
<li><a href=”#”>SpeakerSite</a></li>
<li><a href=”#”>LinkedIn</a></li>
<li class=”last”><a href=”#”>See more…</a></li>
</ul>
</li>
<li><a href=”#”><span>Bookmarks</span></a></li>
</ul>
</div>
The fancy CSS: what we’ve added
- Added the
* {margin:0; padding:0}simple reset hack (I know, there are better resets) - Styled to body
- Removed underline from links
- Styled the menu heavily
/* hack reset (for production, use Yahoo! reset CSS)
*************************/

*
{
margin: 0;
padding: 0;
}

/* body
*************************/

body
{
font: 14px/21px Georgia, serif;
color: #370707;
background: #e3d79b url(images/mainbg.jpg) left 40px repeat-x;
}

/* links
*************************/

a:link, a:visited, a:hover, a:active
{
text-decoration: none;
}

/* inline elements
*************************/

strong
{
font-weight: bold;
}

/* menu-specifc
*************************/

#menu
{
position: fixed;
z-index: 5;
top: 0;
left: 0;
width: 100%;
height: 40px;
line-height: 40px;
background: #ffb35a url(images/topbg.gif) repeat-x;
border-bottom: 1px solid #000;
}

#menu ul
{
margin: 0 auto;
}

#menu ul li.hasmore
{
background: url(images/drophighlight.png) no-repeat center 27px;
}

#menu ul li h4
{
margin: 0;
}

#menu ul li h4 a
{
font-size: 14px;
color: #000;
font-weight: bold;
padding: 0 15px;
}

#menu ul li a
{
color: #9b2021;
padding-left: 4px;
}

#menu ul li a img
{
vertical-align: middle;
}

#menu ul li a:hover
{
background: url(images/topselectionleft.png) top left no-repeat;
}

#menu ul li a span
{
display: block;
padding: 0 15px 0 11px;
}

#menu ul li a:hover span
{
background: url(images/topselectionright.png) top right;
}

#menu ul.dropdown
{
padding: 10px;
background-image: url(images/dropdown.png);
overflow:hidden;
border-bottom: 1px solid #dc902f;
width: 290px;
}

#menu ul.dropdown li a
{
border-bottom: 1px solid #e5cd8e;
line-height: 30px;
overflow: hidden;
height: 30px;
}

#menu ul.dropdown li.last a
{
border-bottom-width: 0;
}

#menu ul.dropdown li a:hover
{
background: url(images/menuarrow.png) no-repeat left center;
}

#menu ul li h4 a:hover
{
background-image: none;
}
The fancy jQuery: what we’ve changed
- Used the hoverIntent jQuery plugin by Brian Cherne instead of jQuery’s default hover to prevent unintended dropdown menus
- Used the easing jQuery plugin by GSGD to add a visual effect to dropdown menu items
- Changed the default dropdown menu show() and hide() functions to slideDown() and fadeOut() to add some pizzazz (without being annoying)
- Preloaded the images necessary to make the menu happen
$(function () {

$(‘.dropdown’).each(function () {
$(this).parent().eq(0).hoverIntent({
timeout: 100,
over: function () {
var current = $(‘.dropdown:eq(0)’, this);
current.slideDown(100);
},
out: function () {
var current = $(‘.dropdown:eq(0)’, this);
current.fadeOut(200);
}
});
});

$(‘.dropdown a’).hover(function () {
$(this).stop(true).animate({paddingLeft: ’35px’}, {speed: 100, easing: ‘easeOutBack’});
}, function () {
$(this).stop(true).animate({paddingLeft: ’0′}, {speed: 100, easing: ‘easeOutBounce’});
});

pic1 = new Image(310, 672);
pic1.src = “images/dropdown.png”;

pic2 = new Image(4, 40);
pic2.src = “images/dropselectionleft.png”;

pic3 = new Image(394, 40);
pic3.src = “images/dropselectionright.png”;

});
that's all,hope you like it.
You might also like


Tags
accordion accordion menu animation navigation animation navigation menu carousel checkbox inputs css3 css3 menu css3 navigation date picker dialog drag drop drop down menu drop down navigation menu elastic navigation form form validation gallery glide navigation horizontal navigation menu hover effect image gallery image hover image lightbox image scroller image slideshow multi-level navigation menus rating select dependent select list slide image slider menu stylish form table tabs text effect text scroller tooltips tree menu vertical navigation menu