Images Or Banner Rotator With jQuery

How To Use It?
Step 1 – XHTML
The XHTML code of the banners is generated on the fly by PHP after a database query, and outputted to the page. Here is how the markup for a sample banner looks like:
demo.html
<div class="banner">
 <a href="#">
  <img src="img/banners.png" alt="Rapid HTML"
  width="125" height="125" />
 </a>
 <p class="companyInfo">Visit Rapid HTML</p>
 <div class="cornerTL"></div>
 <div class="cornerTR"></div>
 <div class="cornerBL"></div>
 <div class="cornerBR"></div>
</div>
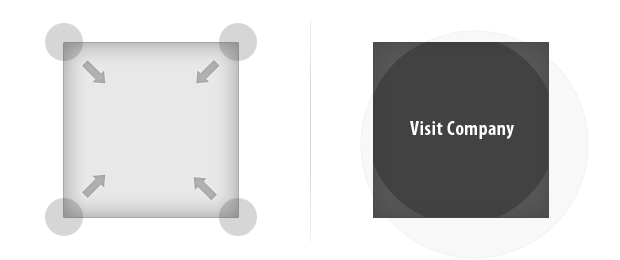
Inside each banner div, we have a hyperlink to the company’s site, a standard 125 by 125 px banner, a paragraph with the company name, and four corner divs.
The paragraph and the corner divs are hidden by default and are shown when the user moves their mouse over the main .banner div. This ensures that the banners are perfectly functional even with JavaScript disabled, albeit without the fancy transition.

Step 2 – CSS
Lets move to styling the page. To ensure cross-browser compatibility, we first have to reset the default styles that browsers apply to page elements. This is simple to do with a universal page reset:
styles.css – Part 1
*{
 /* A universal page reset */
 margin:0;
 padding:0;
}

body{
 /* Setting default text color, background and a font stack */
 font-size:0.825em;
 color:#666;
 background-color:#fff;
 font-family:Arial, Helvetica, sans-serif;
}

.bannerHolder{
 /* The main banner unordered list */

 height:270px;
 width:270px;

 float:left;
 margin:20px 15px;
 padding:10px;
 background:#f7f7f7;
 border:1px solid #eee;

 /* CSS3 rounded corners */

 -moz-border-radius:12px;
 -webkit-border-radius:12px;
 border-radius:12px;
}

.bannerHolder li{
 /* Hiding the bullets of the li elements: */
 list-style:none;
 display:inline;
}

.banner{
 /* The banner divs */
 position:relative;
 width:125px;
 height:125px;
 overflow:hidden;
 float:left;
 margin:5px;
}

.banner img{
 /* The banner divs */
 display:block;
 border:none;
}
As the banners are organized in an unordered list, we first style the list itself (which is assigned the bannerHolder class), then the li elements inside it and lastly the banner divs.
As we have two groups of banners on the page, we have to stick to class names to target the elements in the CSS, as IDs must be unique and don’t allow for more than one element with the same ID.
styles.css – Part 2
.banner div{
 /* The dark animated divs */

 position:absolute;
 z-index:100;
 background-color:#222;
 width:60px;
 height:60px;
 cursor:pointer;

 /* Setting a really big value for border-radius
  will make the divs perfect circles */

 -moz-border-radius:100px;
 -webkit-border-radius:100px;
 border-radius:100px;
}

/* Positioning the animated divs outside the
 corners of the visible banner area: */

.banner .cornerTL{ left:-63px;top:-63px; }
.banner .cornerTR{ right:-63px;top:-63px; }
.banner .cornerBL{ left:-63px;bottom:-63px; }
.banner .cornerBR{ right:-63px;bottom:-63px; }

.banner p{
 /* The "Visit Company" text */

 display:none; /* hidden by default */

 left:0;
 top:57px;
 width:100%;
 z-index:200;
 position:absolute;

 font-family:Tahoma, Arial, Helvetica, sans-serif;
 color:white;
 font-size:11px;
 text-align:center;

 cursor:pointer;
}
In the second part of the code we style the animated rounded divs that slide into view on mouseenter. We are using the border-radius CSS3 property and by giving it a 100px value, we turn the divs into perfect circles. We also position each of the four divs just outside its parent div.
Step 3 – Javascript
After including the jQuery library to the page, we can start writing our own JavaScript code in script.js.
script.js
$(document).ready(function(){

 // Lowering the opacity of all slide in divs
 $('.banner div').css('opacity',0.4);

 // Using the hover method
 $('.banner').hover(function(){

  // Executed on mouseenter

  var el = $(this);

  // Find all the divs inside the banner div,
  // and animate them with the new size

  el.find('div').stop().animate({width:200,height:200},'slow',function(){
   // Show the "Visit Company" text:
   el.find('p').fadeIn('fast');
  });

 },function(){

  // Executed on moseleave

  var el = $(this);

  // Hiding the text
  el.find('p').stop(true,true).hide();

  // Animating the divs
  el.find('div').stop().animate({width:60,height:60},'fast');

 }).click(function(){

  // When clicked, open a tab with the address of the hyperlink

  window.open($(this).find('a').attr('href'));

 });
});
Using the hover method, we bind two functions to the mouseenter and the mouseleave events. These respectively show and hide the four rounded divs and the paragraph tag.
Notice the use of the stop() function, which, as it name suggests, stops a running animation. Remember that if you need to stop a build-in effect like fadeOut(), you should pass two additional true parameters to the function.
Stopping animations is important, as firing a new animation before the old one has completed, will make them pile up, which is definitely not desired.
Finally, because the hyperlink is hidden below the divs and is thus unclickable, we listen to the click event on the main banner div, and open a new tab to the appropriate URL when the event occurs.
With this our simple banner rotating script is complete!
You might also like
Tags
accordion accordion menu animation navigation animation navigation menu carousel checkbox inputs css3 css3 menu css3 navigation date picker dialog drag drop drop down menu drop down navigation menu elastic navigation form form validation gallery glide navigation horizontal navigation menu hover effect image gallery image hover image lightbox image scroller image slideshow multi-level navigation menus rating select dependent select list slide image slider menu stylish form table tabs text effect text scroller tooltips tree menu vertical navigation menu

 Subscribe
 Follow Us
 14 years ago
 29684
29684 3168
3168


