 Subscribe
 Follow Us
Auto-Scrolling Slideshow Tabs (jQuery )
 14 years ago
  20446
20446  4224
4224
 n/a
n/a
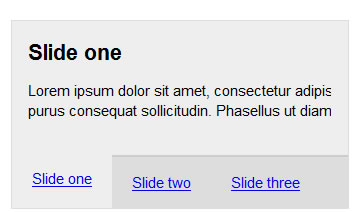
Create a jQuery slideshow that enables you to click through each slide when JavaScript is disabled, without having to display all slides one under the other.
Step 1: Writing the markup
First things first, we need to write the markup that our slideshow will use. So let’s jump straight
in and code it up:
<!DOCTYPE html PUBLIC "-//W3C//DTD XHTML 1.0 Strict//EN"
    "http://www.w3.org/TR/xhtml1/DTD/xhtml1-strict.dtd">
<html xmlns="http://www.w3.org/1999/xhtml">
    <head>
        <meta http-equiv="content-type" content="text/html; charset=utf-8" />
        <title>Tabbed jQuery slideshow</title>

        <link rel="stylesheet" href="css/slideshow.css" type="text/css" media="screen" />
        <script type="text/javascript" src="http://ajax.googleapis.com/ajax/libs/jquery/1.2.6/jquery.min.js"></script>
    </head>
    <body>
        <div id="slideshow">
            <div class="slides">
                <ul>
                    <li>
                        <h2>Slide one</h2>
                        <p>
                            Lorem ipsum dolor sit amet, consectetur adipiscing elit.
                            Donec pretium arcu non velit. Phasellus adipiscing auctor
                            lorem. Curabitur in urna ut purus consequat sollicitudin.
                            Phasellus ut diam. Cras magna libero, tempor id, venenatis
                            sit amet, venenatis et, dui.
                        </p>
                    </li>
                    <li>
                        <h2>Slide two</h2>
                        <p>
                            Nam ac nibh sit amet augue ultricies sagittis. Donec sit
                            amet nunc. Vivamus lacinia, nisi ac tincidunt commodo, purus
                            nisi condimentum urna, sit amet molestie odio dolor non lectus.
                            Cum sociis natoque penatibus et magnis dis parturient montes,
                            nascetur ridiculus mus.
                        </p>
                    </li>
                    <li>
                        <h2>Slide three</h2>
                        <p>
                            Lorem ipsum dolor sit amet, consectetur adipiscing elit.
                            Suspendisse adipiscing dui a nibh. Integer tristique lorem
                            vitae massa. Etiam dapibus, eros sit amet euismod semper,
                            felis erat congue lacus, sed aliquam metus libero sed elit.
                        </p>
                    </li>
                </ul>
            </div>
            <ul class="slides-nav">
                <li><a href="#">Slide one</a></li>
                <li><a href="#">Slide two</a></li>
                <li><a href="#">Slide three</a></li>
            </ul>
        </div>
    </body>
</html>
Step 2: Add some CSS
We’re not going to be creating the most beautiful slideshow today as I
just want to demonstrate the functionality more than anything. The
following styles will set up our slideshow ready for action:
/* ---------------------------------------------------- */
/* GLOBAL
/* ---------------------------------------------------- */
html {
font-size: 76%;}

body {
font-family: arial, helvetica, sans-serif;
line-height: 1.4em;
font-size: 1.2em;
padding: 5%;}

/* ---------------------------------------------------- */
/* SLIDESHOW
/* ---------------------------------------------------- */
#slideshow {
width: 960px;
background-color: #eee;
border: 1px solid #ddd;}

#slideshow ul {
margin: 0;
padding: 0;
list-style-type: none;
height: 1%; /* IE fix */}

#slideshow ul:after {
content: ".";
clear: both;
display: block;
height: 0;
visibility: hidden;}

/* ---------------------------------------------------- */
/* SLIDESHOW > SLIDES
/* ---------------------------------------------------- */
#slideshow .slides {
overflow: hidden;
width: 960px;}

#slideshow .slides ul {
/* total width of all slides -
960px multiplied by 3 in this case */
width: 2880px;}

#slideshow .slides li {
width: 920px;
float: left;
padding: 20px;}

#slideshow .slides h2 {
margin-top: 0;}

/* ---------------------------------------------------- */
/* SLIDESHOW > NAVIGATION
/* ---------------------------------------------------- */
#slideshow .slides-nav {
background-color: #ddd;
border-top: 2px solid #ccc;}

#slideshow .slides-nav li {
float: left;}

#slideshow .slides-nav li a {
display: block;
padding: 15px 20px;
outline: none;}
Step 3: Making it function without JavaScript
Some of you are probably wondering how on earth this is going to work
by now so I won’t make you wait any longer.
All we need to do is give each of our slides an ID and reference that
ID in the href attribute of the appropriate navigation item. It’s that
simple.
Your new markup should look as follows:
<!DOCTYPE html PUBLIC "-//W3C//DTD XHTML 1.0 Strict//EN"
    "http://www.w3.org/TR/xhtml1/DTD/xhtml1-strict.dtd">
<html xmlns="http://www.w3.org/1999/xhtml">
    <head>
        <meta http-equiv="content-type" content="text/html; charset=utf-8" />
        <title>Tabbed jQuery slideshow</title>

        <link rel="stylesheet" href="css/slideshow.css" type="text/css" media="screen" />
        <script type="text/javascript" src="http://ajax.googleapis.com/ajax/libs/jquery/1.2.6/jquery.min.js"></script>
    </head>
    <body>
        <div id="slideshow">
            <div class="slides">
                <ul>
                    <li id="slide-one">
                        <h2>Slide one</h2>
                        <p>
                            Lorem ipsum dolor sit amet, consectetur adipiscing elit.
                            Donec pretium arcu non velit. Phasellus adipiscing auctor
                            lorem. Curabitur in urna ut purus consequat sollicitudin.
                            Phasellus ut diam. Cras magna libero, tempor id, venenatis
                            sit amet, venenatis et, dui.
                        </p>
                    </li>
                    <li id="slide-two">
                        <h2>Slide two</h2>
                        <p>
                            Nam ac nibh sit amet augue ultricies sagittis. Donec sit
                            amet nunc. Vivamus lacinia, nisi ac tincidunt commodo, purus
                            nisi condimentum urna, sit amet molestie odio dolor non lectus.
                            Cum sociis natoque penatibus et magnis dis parturient montes,
                            nascetur ridiculus mus.
                        </p>
                    </li>
                    <li id="slide-three">
                        <h2>Slide three</h2>
                        <p>
                            Lorem ipsum dolor sit amet, consectetur adipiscing elit.
                            Suspendisse adipiscing dui a nibh. Integer tristique lorem
                            vitae massa. Etiam dapibus, eros sit amet euismod semper,
                            felis erat congue lacus, sed aliquam metus libero sed elit.
                        </p>
                    </li>
                </ul>
            </div>
            <ul class="slides-nav">
                <li><a href="#slide-one">Slide one</a></li>
                <li><a href="#slide-two">Slide two</a></li>
                <li><a href="#slide-three">Slide three</a></li>
            </ul>
        </div>
    </body>
</html>
Step 4: Adding Some Animation
Right well, that was fun! Now it’s time to add some funky sliding animations
to our slideshow.
You’ll need to download the
minified
jQuery Cycle plugin that includes all transitions and save it as jquery.cycle.js
within a ‘js’ directory in your project root. Then add the following to your
<head> below the jquery library script tag.
<script type="text/javascript" src="js/jquery.cycle.js"></script>
<script type="text/javascript" src="js/slideshow.js"></script>
We’ll now create the slideshow.js file mentioned above and save it in the
‘js’ directory with the following code:
$slideshow = {
    context: false,
    tabs: false,
    timeout: 1000,      // time before next slide appears (in ms)
    slideSpeed: 1000,   // time it takes to slide in each slide (in ms)
    tabSpeed: 300,      // time it takes to slide in each slide (in ms) when clicking through tabs
    fx: 'scrollLeft',   // the slide effect to use

    init: function() {
        // set the context to help speed up selectors/improve performance
        this.context = $('#slideshow');

        // set tabs to current hard coded navigation items
        this.tabs = $('ul.slides-nav li', this.context);

        // remove hard coded navigation items from DOM
        // because they aren't hooked up to jQuery cycle
        this.tabs.remove();

        // prepare slideshow and jQuery cycle tabs
        this.prepareSlideshow();
    },

    prepareSlideshow: function() {
        // initialise the jquery cycle plugin -
        // for information on the options set below go to:
        // http://malsup.com/jquery/cycle/options.html
        $("div.slides > ul", $slideshow.context).cycle({
            fx: $slideshow.fx,
            timeout: $slideshow.timeout,
            speed: $slideshow.slideSpeed,
            fastOnEvent: $slideshow.tabSpeed,
            pager: $("ul.slides-nav", $slideshow.context),
            pagerAnchorBuilder: $slideshow.prepareTabs,
            before: $slideshow.activateTab,
            pauseOnPagerHover: true,
            pause: true
        });
    },

    prepareTabs: function(i, slide) {
        // return markup from hardcoded tabs for use as jQuery cycle tabs
        // (attaches necessary jQuery cycle events to tabs)
        return $slideshow.tabs.eq(i);
    },

    activateTab: function(currentSlide, nextSlide) {
        // get the active tab
        var activeTab = $('a[href="#' + nextSlide.id + '"]', $slideshow.context);

        // if there is an active tab
        if(activeTab.length) {
            // remove active styling from all other tabs
            $slideshow.tabs.removeClass('on');

            // add active styling to active button
            activeTab.parent().addClass('on');
        }
    }
};

$(function() {
    // initialise the slideshow when the DOM is ready
    $slideshow.init();
});
Step 5: Highlighting the active tab
So, we’ve got it working but what’s this $slideshow.activateTab()
method that we added? Well it isn’t entirely necessary since the jQuery Cycle
plugin already adds an .activeSlide class to the active navigation
link for you, however, I like to give a little more control over my navigations so
this method just adds an .on class to the parent <li>
of the active link.
With this in place, you can add the following CSS to the end of our
slideshow.css stylesheet to highlight the active tab:
#slideshow .slides-nav li.on,
#slideshow .slides-nav li.on a {
background-color: #eee;}

#slideshow .slides-nav li.on a {
position: relative;
top: -4px;}
When you preview, you’ll probably notice that the first tab isn’t highlighted on
page load…this is easy to fix…just use jQuery to add a .js
class to the <body> tag as shown below:
$(function() {
    // add a 'js' class to the body
    $('body').addClass('js');

    // initialise the slideshow when the DOM is ready
    $slideshow.init();
});
Then prepend the CSS we just added with the new .js class:
.js #slideshow .slides-nav li.on,
.js #slideshow .slides-nav li.on a {
background-color: #eee;}

.js #slideshow .slides-nav li.on a {
position: relative;
top: -4px;}
This means the highlighted buttons will only be styled if the user has javascript
enabled and then we hard code the .on class for the first tab in
the slideshow navigation:
<ul class="slides-nav">
    <li class="on"><a href="#slide-one">Slide one</a></li>
    <li><a href="#slide-two">Slide two</a></li>
    <li><a href="#slide-three">Slide three</a></li>
</ul>
You might also like


Tags
accordion accordion menu animation navigation animation navigation menu carousel checkbox inputs css3 css3 menu css3 navigation date picker dialog drag drop drop down menu drop down navigation menu elastic navigation form form validation gallery glide navigation horizontal navigation menu hover effect image gallery image hover image lightbox image scroller image slideshow multi-level navigation menus rating select dependent select list slide image slider menu stylish form table tabs text effect text scroller tooltips tree menu vertical navigation menu