 Subscribe
 Follow Us
A Better Blogroll Slideshow Tabs (jQuery )
 13 years ago
  21173
21173  3993
3993
 n/a
n/a
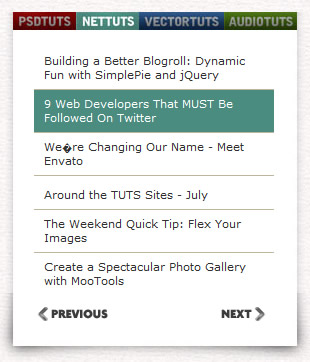
A traditional blogroll is a simple list of other sites, often in the sidebar, that are related, owned by, or otherwise friendly to the home site. Blogrolls are a great idea and on-point with the spirit of blogging, but how is a casual reader to know if any of these sites are truly of interest? Let’s improve upon the concept of a blogroll by not just listing sites, but dynamically pulling recent headlines from them, and using some fun jQuery animation.
Step 1 – Downloading the Files
Normally we might start by coding the XHTML/CSS we need for the widget first. That is usually the best way to go so you can ensure clean and semantic markup. However, for this example, I believe it will be easiest for us to download all the components we need to make this thing work, and then code around that. This is because the jQuery plugin “Coda Slider” we are using has a specific HTML structure it likes.
You’ll need a home directory for this project, so go ahead and create a new folder. Then create an index.php file, a style.css file, and we’ll need folders for images, inc, and js. More organization! Then download the following things:
- Download the latest jQuery to your js folder and include in your head section.
- Download the Coda Slider plugin and include the plugin file, as well as the easing and easing compatibility JavaScript files in your head section.
- Download SimplePie. Put the simplepie.inc file in your inc folder. You don’t need to include anything on the page for this just yet, we’ll get into this later.
When you are through, the top of your index.php file should be like this:
<!DOCTYPE html PUBLIC "-//W3C//DTD XHTML 1.0 Transitional//EN" "http://www.w3.org/TR/xhtml1/DTD/xhtml1-transitional.dtd">
<html xmlns="http://www.w3.org/1999/xhtml">

<head>
 <meta http-equiv="Content-Type" content="text/html; charset=UTF-8" />

 <title>A Better Blogroll</title>

 <link rel="stylesheet" type="text/css" href="style.css" />

 <script src='js/jquery-1.2.6.min.js' type='text/javascript'></script>
 <script src="js/jquery-easing.1.2.js" type='text/javascript'></script>
 <script src="js/jquery-easing-compatibility.1.2.js" type='text/javascript'></script>
 <script src="js/coda-slider.1.1.1.js" type='text/javascript'></script>
</head>
Step 2 – The Markup
If you pop open the code for the demo that comes with the Coda Slider, you’ll see there is quite a few “wrapping” DIVs going on. The whole slider is wrapped in one then all of the panels are wrapped in one, then each panel is wrapped and there is even an inner wrapper inside each panel. Looks a bit like “DIVitis” (The plague of amateur coders using way more DIVs than necessary). Fret not, however. While I can’t argue that there is a lot of DIVs going on here, each of them serves a purpose unique to the slider and is necessary for its form and function. In fact, our unique design complicates things even more and requires the use of a few more DIVs here and there.
Here is the markup for the rest of the page, sans the actual content for each of the panels:
<body>

 <div id="blogSliderWrap">
  <div id="blogSlider">
   <div class="innerWrap">
    <div class="panelContainer">

     <div class="panel" title="PSDTUTS">
      <div class="wrapper">

       <!-- content for panel -->

      </div>
     </div>

     <div class="panel" title="NETTUTS">
      <div class="wrapper">

       <!-- content for panel -->

      </div>
     </div>

     <div class="panel" title="VECTORTUTS">
      <div class="wrapper">

       <!-- content for panel -->

      </div>
     </div>

     <div class="panel" title="AUDIOTUTS">
      <div class="wrapper">

       <!-- content for panel -->

      </div>
     </div>
    </div>
   </div>
  </div>

  <div id="push"></div>
 </div>

</body>

</html>
Step 3– The CSS
Now that we have the markup squared away, we can set about to styling. Again, rather than go through every single selector here, I’ll just show you the entire CSS file and then below I’ll go over some of the important points. There is also some commenting within the CSS you may find of interest.
/*
 GENERIC RESET & BASIC STRUCTURE
*/
*          { margin: 0; padding: 0; }
body         { font-family: Verdana, Arial, Helvetica, sans-serif;
              background: url(images/body-bg.jpg); font-size: 11px; }
a          { /* remove the dotted outlines when clicking tabs */
                outline: none; text-decoration: none; }
ul          { list-style: none; }

/*
 WIDGET STRUCTURE
*/
#blogSliderWrap      { width: 320px; margin: 50px auto;
           background: url(images/widget-bottom-bg.jpg) 7px bottom no-repeat;
           padding-bottom: 50px; position: relative; }
#blogSlider       { margin-left: 15px; padding: 25px 18px 0px 18px; width: 263px;
           background: url(images/widget-middle-bg.jpg) center center repeat-y; }
.stripViewer       { position: relative; overflow: hidden; clear: both; }
.stripViewer .panelContainer   { position: relative; left: 0px; top: 0px; }
.stripViewer .panelContainer .panel { float: left; position: relative; width: 280px; }
.wrapper        { padding: 10px; }
.innerWrap        { width: 273px; overflow: hidden; }
#push         { height: 35px; }

/*
 MAIN TABBED NAVIGATION
*/
.stripNav        { margin-left: 22px; position: relative; top: 18px; z-index: 99;
           width: 285px; }
.stripNav ul li      { float: left; }

.stripNav li a       { /* Generic "CSS image replacement" */
           display: block; height: 18px; text-indent: -9999px; }
/* The below class names are auto-generated by the JavaScript */
.stripNav li.tab1 a { background: url(images/tab-psdtuts.jpg) top center no-repeat; width: 63px; }
.stripNav li.tab2 a { background: url(images/tab-nettuts.jpg) top center no-repeat; width: 63px; }
.stripNav li.tab3 a { background: url(images/tab-vectortuts.jpg) top center no-repeat; width: 85px; }
.stripNav li.tab4 a { background: url(images/tab-audiotuts.jpg) top center no-repeat; width: 73px; }

.stripNav li a:hover,
.stripNav li a:active,
.stripNav li a:focus     { /* Restore focus styling that we removed when we removed outlines */
           background-position: top center; }

/* It is neccessary to repeat the image paths here */
.stripNav li.tab1 a.current { background: url(images/tab-psdtuts.jpg) bottom center no-repeat; }
.stripNav li.tab2 a.current { background: url(images/tab-nettuts.jpg) bottom center no-repeat; }
.stripNav li.tab3 a.current { background: url(images/tab-vectortuts.jpg) bottom center no-repeat; }
.stripNav li.tab4 a.current { background: url(images/tab-audiotuts.jpg) bottom center no-repeat; }

/*
 SUB NAVIGATION
*/
.stripNavL a, .stripNavR a    { display: block; position: absolute; width: 75px;
            height: 22px; text-indent: -9999px; }
.stripNavL a      { bottom: 35px; left: 45px; background: url(images/previous.png); }
.stripNavR a       { bottom: 35px; right: 45px; background: url(images/next.png);
}

/*
 HEADLINES STYLING
*/
.panel ul        { width: 240px; }
.panel ul li a       { border-bottom: 1px solid #C1B599; color: #303030;
               display: block; padding: 7px 10px; }
.panel ul li:last-child a    { /* Remove bottom border on last list item
                Hooray for pseudo selectors! */
             border: none; }
             /* Unique rollover colors for each list */
.panel ul#psd-list li a:hover   { background: #b20202; color: white; }
.panel ul#net-list li a:hover   { background: #4a8c7f; color: white; }
.panel ul#vector-list li a:hover  { background: #1f5293; color: white; }
.panel ul#audio-list li a:hover  { background: #4f7c11; color: white; }
Step4 – Activating the Slider
Now with the images, markup, and CSS all in place, we can kick off the slider. Include the following JavaScript at the bottom of your head section.
<script type='text/javascript'>
 $(function () {
  $("#blogSlider").codaSlider();
 });
</script>
Step 5– Fixing up IE
Despite being fully valid code, both IE6 and IE7 were showing some quirks with the background images. Oh well, our super-cool drop shadow isn’t in any way necessary. We can leave it in place as “progressive enhancement” for folks with quality modern browsers and pull it out for IE, leaving just a simple white box.
Include an IE-Only Stylesheet in your head section like so:
<!--[if IE]>
 <link rel="stylesheet" type="text/css" href="style-ie.css" />
<![endif]-->
Then create the style-ie.css file in your home directory and include the following:
#blogSliderWrap {
 background: white;
 width: 285px;
 position: relative;
 overflow: hidden;
}

#blogSlider {
 background: white;
 width: 285px;
 padding: 0;
 margin: 0;
}

.stripNav {
 margin: 0;
 top: 0px;
}
And we’re done!
You might also like

Tags
accordion accordion menu animation navigation animation navigation menu carousel checkbox inputs css3 css3 menu css3 navigation date picker dialog drag drop drop down menu drop down navigation menu elastic navigation form form validation gallery glide navigation horizontal navigation menu hover effect image gallery image hover image lightbox image scroller image slideshow multi-level navigation menus rating select dependent select list slide image slider menu stylish form table tabs text effect text scroller tooltips tree menu vertical navigation menu