 Subscribe
 Follow Us
A jQuery tile shifting image viewer plugin
 14 years ago
  9888
9888  1548
1548
 n/a
n/a
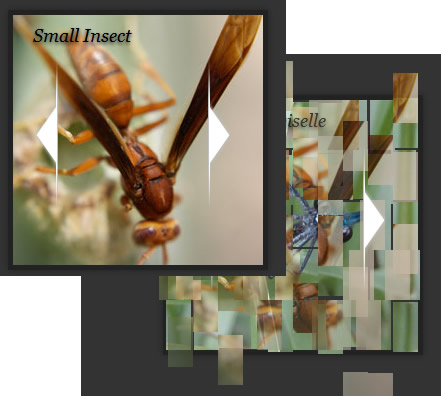
This jQuery plugin called jFancyTile is a tile shifting image viewer. It allows you to tranform any list with images to a beautiful tile shifting photo presenter.
Take note this plugin is pretty CPU intense and works best when a low rowCount and columnCount is used on relatively small images.
How to use
Make sure your HTML looks like the following:
<div id="selector">
   <ul>
      <li><img src="images/img01.jpg" alt="Title 01" /></li>
      <li><img src="images/img02.jpg" alt="Title 02" /></li>
      <!-- More images -->
   </ul>
</div>
The alt attribute from each image will be used to display as the title on top.
Next, include the needed CSS and jQuery files to your HTML head:
<head>
   <link rel="stylesheet" type="text/css" href="css/jfancytile.css"/>
   <script type="text/javascript" src="js/jquery.jfancytile.js"></script>

</head>
Now you're ready to use the plugin! Feel free to change the CSS file to your needs. To use the default options, simply call the plugin on the selector:
$("#selector").jfancytile();
For more customization, you can change the following input variables (shown are the defaults):
$("#selector").jfancytile({
    inEasing: "swing",    // Easing animation of tiles flying IN
    outEasing: "swing",   // Easing animation of tiles flying OUT
    inSpeed: 1000,        // Animation speed of tiles flying IN
    outSpeed: 1000,       // Animation speed of tiles flying OUT
    rowCount: 8,          // Total number of rows
    columnCount: 13,      // Total number of columns
    maxTileShift: 3       // Max amount of positions a tile can shift
});
That's all there is to it! You can use the jQuery Easing Plugin for more variations of inEasing and outEasing.
How it works
Now for the most interesting part: How does this plugin actually work?
- Step 1 - Analyze all the images, get their
altattribute, dimensions andsrc. - Step 2 - Create a container by using the biggest image dimensions.
- Step 3 - Remove the list from the HTML.
- Step 4 - Create the navigation buttons and apply them to the container.
- Step 5 - Calculate the number of tiles we need to create based on the
rowCountandcolumnCount. - Step 6 - Create the tiles by creating a
divfor each tile. - Step 7 - Set the
background-imagefor each tile using the image supplied. Usebackground-positionto shift the image to the correct position. - Step 8 - Append the title to the collection of tiles.
- Step 9 - Add functionality to animate the tiles to a random position and fade out.
- Step 10 - Add functionality to animate the tiles to their desired position and fade in.
You might also like


Tags
accordion accordion menu animation navigation animation navigation menu carousel checkbox inputs css3 css3 menu css3 navigation date picker dialog drag drop drop down menu drop down navigation menu elastic navigation form form validation gallery glide navigation horizontal navigation menu hover effect image gallery image hover image lightbox image scroller image slideshow multi-level navigation menus rating select dependent select list slide image slider menu stylish form table tabs text effect text scroller tooltips tree menu vertical navigation menu