 Subscribe
 Follow Us
Slide Thumbs
 14 years ago
 13701
13701 2690
2690
Step 1: Create the Mark-up
First we add container elements for output. The outer-most container is used to decorate the output with a background image and padding. The next container is the element that will be used to view the images through. The images and their captions are placed inside the inner-most container and wrapped with div elements.
The images are all a uniform size, and the preview_inner container will be sized to accommodate them. The image size will be used in the script that we'll add later.
<div id="preview_wrap">
<div id="preview_outer">
<div id="preview_inner">
<div>
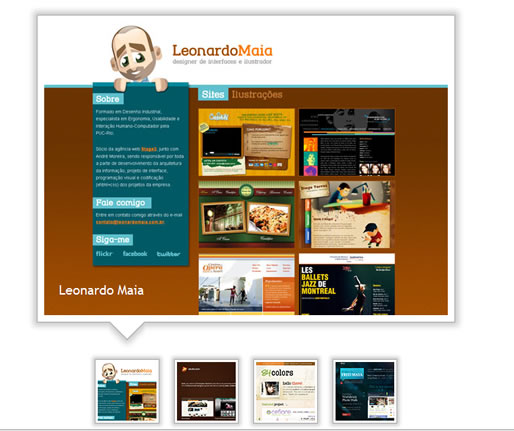
<img src="1_b.jpg" alt="Leonardo Maia" />
<a target="_blank" href="http://www.leonardomaia.com.br/">Leonardo Maia</a>
</div>
<div>
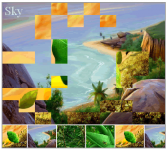
<img src="2_b.jpg" alt="skillicorn" />
<a target="_blank" href="http://skillicorn.org/">skillicorn</a>
</div>
<div>
<img src="3_b.jpg" alt="theenergycell" />
<a target="_blank" href="http://www.energycell.co.uk/">theenergycell</a>
</div>
<div>
<img src="4_b.jpg" alt="Fred Maya" />
<a target="_blank" href="http://fredmaya.com/">Fred Maya</a>
</div>
</div>
</div>
</div>
Within the thumbnails container element, we add list of thumbnails linking to the image slides and an arrow indicating current position.
<div id="thumbs">
 <div id="arrow"></div>
 <span><img src="1_s.gif" alt="Leonardo Maia" /></span>
 <span><img src="2_s.gif" alt="skillicorn" /></span>
 <span><img src="3_s.gif" alt="theenergycell" /></span>
 <span><img src="4_s.gif" alt="Fred Maya" /></span>
</div>
Step 2: CSS
The CSS is pretty simple but it sets up everything that is happening. Since overflow is hidden on the preview_outer container what part of the image slide were showing is just a matter of setting a scrollLeft value.
#preview_wrap {
 margin: 0 auto;
 padding: 22px;
 width: 550px;
 height: 400px;
 background: url('bg_preview.gif') top left no-repeat;
}

#preview_outer {
 overflow: hidden;
 width: 550px;
 height: 400px;
 position: relative;
}

#preview_inner {
 text-align: left;
 height: 100%;
 position: relative;
}

#preview_inner div {
 float: left;
 width: 550px;
 height: 400px;
 position: relative;
}

#preview_inner div a {
 position: absolute;
 bottom: 0;
 left: 0;
 display: block;
 width: 100%;
 text-indent: 20px;
 padding: 20px 0;
 color: #fff;
 background: url(bg_trans.png);
 text-decoration: none;
 font-size: 18px;
}

#thumbs {
 padding-top: 30px;
 position: relative;
 width: 750px;
 text-align: center;
}

#thumbs span {
 padding: 12px;
 width: 80px;
 height: 80px;
 cursor: pointer;
 background: url('bg_thumb.gif') top left no-repeat;
 display: inline-block;
}

#arrow {
 position: absolute;
 top: -13px;
 background: url('bg_arrow.gif') top center no-repeat;
 width: 104px;
 height: 39px;
 display: none;
}
Step 3: jQuery
Now, let’s add the JavaScript. The code is commented to explain what we’re doing.
$(document).ready(function() {
 // Save  the jQuery objects for later use.
 var outer = $("#preview_outer");
 var arrow = $("#arrow");
 var thumbs = $("#thumbs span");

 var preview_pos;
 var preview_els = $("#preview_inner div");
 var image_width = preview_els.eq(0).width(); // Get width of imaages

 // Hook up the click event
 thumbs.click(function() {
  // Get position of current image
  preview_pos = preview_els.eq( thumbs.index( this) ).position();

  // Animate them!
  outer.stop().animate( {'scrollLeft' : preview_pos.left}, 500 );
  arrow.stop().animate( {'left' : $(this).position().left }, 500 );
 });

 // Reset positions on load
 arrow.css( {'left' : thumbs.eq(0).position().left } ).show();
 outer.animate( {'scrollLeft' : 0}, 0 );

 // Set initial width
 $("#preview_inner").css('width', preview_els.length * image_width);
});
You might also like

Tags
accordion accordion menu animation navigation animation navigation menu carousel checkbox inputs css3 css3 menu css3 navigation date picker dialog drag drop drop down menu drop down navigation menu elastic navigation form form validation gallery glide navigation horizontal navigation menu hover effect image gallery image hover image lightbox image scroller image slideshow multi-level navigation menus rating select dependent select list slide image slider menu stylish form table tabs text effect text scroller tooltips tree menu vertical navigation menu