 Subscribe
 Follow Us
JQuery Carousel Tabber
 13 years ago
 32474
32474 4724
4724
Out of the box, billy is a basic scrolling carousel which can be implemented very easily. A person with little knowledge of either html or javascript can get billy working on a page within a few minutes.
Billy was created to rely on html rather than javascript. Once its been called on the page, it configures its self based on the html it can find. An example being; if you add an empty unlined list (<ul>) to your page with the id #billy_indicators, billy is smart enough to find the empty list and use it to display slide indicators for the carousel.
This passive configuration means it only takes one line of javascript to implement a basic carousel on any webpage, and as much html as you feel necessary. Billy also has many configurable features built in which allow for many different applications... See the examples for more info.
The Problem with Carousels
I started writing the plugin when I noticed how long it was taking me to implement other peoples carousels into my designs. The html required for most carousel plugins is just too precise, and if you don’t have the exact markup required, the carousel will refuse to work.
Billy is Different
This is where Billy comes in. The carousel has several different stages of functionality, and it will adjust it’s self depending on the html you decide use in your page. For example if I just wanted to use a basic scrolling carousel, the html I would use is:
<div id="clip">
<ul id="billy_scroller">
<li>A Slide</li>
<li>A Slide</li>
</ul>
</div>
As long as I’ve called the carousel in the Javascript, the <ul> “billy_scroller” will be magically transformed into a carousel. That literally took 2 – 3 minutes to get working! The “clip” div is just there to prevent the hidden area of the carousel from showing (see the demo for an example).
What if I want Extra Features?
Well good question, it’s becoming more common practice these days to give users as much interactivity as possible on our websites. This keeps users engaged, and therefore on our site for longer. So what if you want to add some interactivity to Billy, like slide indicators, and navigation arrows?
Well it’s easier than it sounds. To add indicators to your carousel, just include a second <ul> anywhere on your page, with the id “billy_indicators”:
<ul id="billy_indicators"></ul>
Billy will then do it’s thing and add in a <li> for each slide in your carousel (it will even give it an active class when the corresponding slide is in view).
And the navigation arrows? Just as simple; again, you can put these anywhere on your page:
<a href="#" id="billy_prev">Prev</a>
<a href="#" id="billy_next">Next</a>
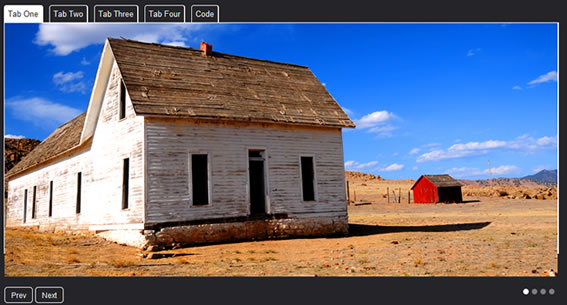
With a few settings tweaked. The carousel becomes a solid tab area
Code for this example
javascript
$('#tabber').billy({
  slidePause: 5000,
  indicators: $('ul#tabber_tabs'),
  customIndicators: true,
  autoAnimate: false,
  noAnimation: true
});
xhtml
<!-- The Tabs -->
<ul id="tabber_tabs">
  <li><a href="#0">Tab One</a></li>
  <li><a href="#1">Tab Two</a></li>
  <li><a href="#2">Tab Three</a></li>
  <li><a href="#3">Tab Four</a></li>
  <li><a href="#4">Code</a></li>
</ul>

<!-- Tabbed Area -->
<div id="tabber_clip">
<ul id="tabber">
  <li><img src="demo_images/desert.jpg" width="900" height="400" alt="Desert"></li>
  <li><img src="demo_images/lady.jpg" width="900" height="400" alt="Lady"></li>
  <li><img src="demo_images/wood.jpg" width="900" height="400" alt="Wood"></li>
  <li><img src="demo_images/pond.jpg" width="900" height="400" alt="Pond"></li>
</ul>
You might also like

Tags
accordion accordion menu animation navigation animation navigation menu carousel checkbox inputs css3 css3 menu css3 navigation date picker dialog drag drop drop down menu drop down navigation menu elastic navigation form form validation gallery glide navigation horizontal navigation menu hover effect image gallery image hover image lightbox image scroller image slideshow multi-level navigation menus rating select dependent select list slide image slider menu stylish form table tabs text effect text scroller tooltips tree menu vertical navigation menu