 Subscribe
 Follow Us
Highlight source code with jQuery and Chili
 14 years ago
  5905
5905  1269
1269
 n/a
n/a
we highlight source code with the jQuery plugin Chili. We go further and tweak Chili to our liking and increase the readability and usability of code-boxes with our own custom functions.
Our starting point
The xHTML
We use this really simple layout with a content area and a sidebar. Nothing fancy. The site has two code-boxes, one with a horizontal scrollbar and one without. Here is the complete markup:
<!DOCTYPE html PUBLIC "-//W3C//DTD XHTML 1.0 Strict//EN" "http://www.w3.org/TR/xhtml1/DTD/xhtml1-strict.dtd">

<html xmlns="http://www.w3.org/1999/xhtml" xml:lang="en" lang="en">
  <head>
    <meta http-equiv="Content-Type" content="text/html; charset=utf-8"/>

    <title>Demo for - 'Highlight your source code with jQuery and Chili'</title>

    <link rel="stylesheet" type="text/css" media="screen" href="css/reset.css" />
    <link rel="stylesheet" type="text/css" media="screen" href="css/960.css" />
    <link rel="stylesheet" type="text/css" media="screen" href="css/main.css" />
  </head>

  <body>
    <div class="container_12" id="wrapper">
      <div class="grid_8" id="content">
        <h1>Demo for '<a href="#">Highlight your source code with jQuery and Chili</a>'</h1>

        <p>
          In the first example we want to show some jQuery code. Note that the code-box has no horizontal
          scrollbar because the content fits.
        </p>

        <!-- relevant for the tutorial! - start -->
<pre><code>$(document).ready(function() {
  $('div:first').text('DOM Ready!')
});</code></pre>
        <!-- relevant for the tutorial! - end -->

        <p>
          In the second example we have some CSS. Note that we now have a horizontal scrollbar because
          the long lines does not fit in the code-box.
        </p>

        <!-- relevant for the tutorial! - start -->
<pre><code>html { font-size: 16px; }
body { font-size: 62.5%; font-family: Verdana, Arial, sans-serif; color: #555555; background: #22384d url(../images/bg.jpg) repeat-x; }
a { color: #0F67A1; text-decoration: none; }
a:hover { text-decoration: underline; }</code></pre>
        <!-- relevant for the tutorial! - end -->

        <div id="footer">
          (c) 2009 - <a href="http://thisblog.usejquery.com/">This Blog Use jQuery</a>
        </div>
      </div>

      <div class="grid_4" id="sidebar">
        <ul>
          <li>
            <h2>What's that?</h2>
            <p>
              This is a Demo Page for a tutorial from <a href="http://thisblog.usejquery.com/">This Blog Use jQuery</a>.
              If you come from somewhere else feel free to find out how this Demo works!
            </p>
          </li>
        </ul>
      </div>
      <div class="clear"></div>
    </div>
  </body>
</html>
All very generic. We keep our eyes on the code-boxes:
      <!-- relevant for the tutorial! - start -->
<pre><code>$(document).ready(function() {
  $('div:first').text('DOM Ready!')
});</code></pre>
        <!-- relevant for the tutorial! - end -->
Beside including jQuery, Chili and our script in the header these are the only places where we must edit the source code.
The CSS
The Stylesheet is also very generic, nothing too special about it. The relevant bits for this tutorial have been marked.
html { font-size: 16px; }
body { font-size: 62.5%; font-family: Verdana, Arial, sans-serif; color: #555555; background: #22384d url(../images/bg.jpg) repeat-x; }
a { color: #0F67A1; text-decoration: none; }
a:hover { text-decoration: underline; }

#wrapper { background: white url(../images/sidebar_bg.jpg) repeat-y top right; }

#content { }
  #content h1 { font-size: 2.4em; font-weight: normal; line-height: 32px; margin: 30px 0 50px 0; }
  #content p { font-size: 1.4em; line-height: 22px; margin-bottom: 20px; }

  /* relevant for the tutorial! - start */
  #content pre {
    font-size: 12px;
    line-height: 20px;
    width: 620px;
    overflow: auto;
    overflow-y: hidden;
    background: url(../images/code_bg.jpg);
    margin: 10px 0 20px 0;
  }

  #content pre code { display: block; margin-left: 20px; }
  /* relevant for the tutorial! - end */

#footer { text-align: center; margin: 50px 0 20px 0; }

#sidebar { }
  #sidebar ul { margin-top: 20px; }
  #sidebar ul li { font-size: 1.2em; padding: 20px 0 20px 0; border-bottom: 1px solid #dddcdc; line-height: 18px; }
  #sidebar ul li h2 { font-size: 1.2em; margin-bottom: 8px; }
Download, include and activate Chili
Our example page is set-up, it’s time to bring some Chili in! First go ahead and download the latest version. In this tutorial we use the version 2.2.
Once extracted we copy the files jquery.chili-2.2.js, recipes.js and all languages (recipes) we need. In our example we only use JavaScript and CSS, so we need js.js and css.js. The file structure of the example now looks like that:
/js/
  jquery-1.3.2.min.js
  /chili/
    jquery.chili-2.2.js
    recipes.js
    js.js
    css.js
Next we have to include jQuery, Chili and the Recipes in our header:
<script type="text/javascript" src="js/jquery-1.3.2.min.js"></script>
<script type="text/javascript" src="js/chili/jquery.chili-2.2.js"></script>
<script type="text/javascript" src="js/chili/recipes.js"></script>
Now we activate Chili, this can be done by setting specific class attributes on the pre and code tags.
<pre class="ln-124"><code class="js">$(document).ready(function() {
  $('div:first').text('DOM Ready!')
});</code></pre>
The class ln-124 tells Chili to start the ordered list (line numbers) at 124. Use ln- to start at line 1. The class js tells Chili which language we want to highlight.
That’s almost it. One small last thing is to bring back numbers to ordered lists, because the reset.css set list-style to none. We do this with one tiny line in our main.css:
#content ol { list-style: decimal; margin-left: 25px; }
Tweaking Chili to our liking
As you can see, Chili is great. Painless integration and it works instantly. The only feature I don’t like is the selection helper. It is a good idea but the implemention isn’t that good.
So we tweak the source of Chili a little bit so this selection helper doesn’t show up when a user selects source code. We replace this feature later on with our own functions.
The selection helper function is located at line 504 in the file jquery.chili-2.2.js:
function enableSelectionHelper( el ) {
  var element = null;
  $( el )
  //...
To disable this function we simple return to the caller before doing anything:
function enableSelectionHelper( el ) {
  return false; //disable the selection helper
  var element = null;
  $( el )
  //...
That’s it, the Chili selection helper is disabled and ready to get replaced with our custom jQuery functions.
Increase readability for long code lines
In our example the second code-box has a horizontal scrollbar because the code-box width is not enough for the content. We want to accomplish that the code-box increases it’s width when the user moves the mouser over. When the mouse move out again the code-box are reset to the original width. And we do this with style, a small animation… hey we are using jQuery. ;)
Befor we go any further make sure that we include our script in the header before Chili. With that we make sure that our script is working with the original DOM, Chili will modify it afterwards.
<script type="text/javascript" src="js/jquery-1.3.2.min.js"></script>
<script type="text/javascript" src="js/demo.js"></script>
<script type="text/javascript" src="js/chili/jquery.chili-2.2.js"></script>
<script type="text/javascript" src="js/chili/recipes.js"></script>
The problem
How do we determine if a code-box has a horizontal scrollbar? Of course the first thing that come to mind is to get the width() of the <code> block. If that width is greater than the <pre> it must have a scrollbar. Good thinking, but it does not work because we cannot read the correct width of the code block. Here is a quick example and the output:
$(document).ready(function() { //perform actions when DOM is ready
  var codeBox = $('#content pre code:last'); //get the second code-box with scrollbar

  //show the width of the parent <pre> and the width of the <code>
  alert('<pre> width: ' + codeBox.parent().width() + "\n" + '<code> width: ' + codeBox.width());
});
The solution
The secret to determine if a pre block has a horizontal scrollbar is not the width but the height of the pre and code block! Let’s try out this example:
$(document).ready(function() { //perform actions when DOM is ready
  //get the first and the second (last) code-box element to compare it
  var codeBoxOne = $('#content pre code:first');
  var codeBoxTwo = $('#content pre code:last');

  //show the heights
  alert(
    "Code-Box 1:\n<pre> height - " + codeBoxOne.parent().height() + "\n<code> height - " + codeBoxOne.height() + "\n\n" +
    "Code-Box 2:\n<pre> height - " + codeBoxTwo.parent().height() + "\n<code> height - " + codeBoxTwo.height()
  );
});
And the output shows us that the second code-box, the one with the scrollbar, has different heights! The extra height of the pre block is the scrollbar itself. So there we have it, our condition: if the <pre> height is greater than the <code> height expand the code-box.
The code
$(document).ready(function() { //perform actions when DOM is ready
  var initialWidth = $('#content pre:first').width(); //store the initial width of code-boxes for the reset on mouse out

  $('pre').hover(function() { //on mouse over
    if($(this).height() > $(this).children().height()) { //if <pre> is higher than <code>
      var openSpace = Math.round(($('body').width() - initialWidth) / 2 - 10); //calculate the space to the right with a margin-right of 10px

      if($(this).width() == initialWidth) { //start animation only when we are at starting point (initial width)
        $(this).animate({ width : initialWidth + openSpace }, 'fast'); //increase the width with animation
      }
    }
  }, function() { //on mouse out
    $(this).animate({ width : initialWidth }, 'fast'); //reset to initial width with animation
  });
});
Now let’s break this little script in parts that are interesting.
var initialWidth = $('#content pre:first').width(); //store the initial width of code-boxes for the reset on mouse out
First of all we store the initial width of code-boxes so we don’t have any static value to handle. The advantage is that we can redesign our page, change the width of code-boxes, without touching this script again.
var openSpace = Math.round(($('body').width() - initialWidth) / 2 - 10); //calculate the space to the right with a margin-right of 10px
Here we calculate how much space we have to expand the code-box to the right.
if($(this).width() == initialWidth) { //start animation only when we are at starting point (initial width)
We only start the animation if we are still at the starting point of the initial width. If we are in the animation we don’t start it again.
And that’s it, the code-boxes now expand if needed on mouse over. One little snag is that this function does not work in IE because the scrollbars does not produce extra height. But I think people interested in source-code, whatsoever, does not activly browse the web with IE. And if so they have to scroll manually, your site will not break.
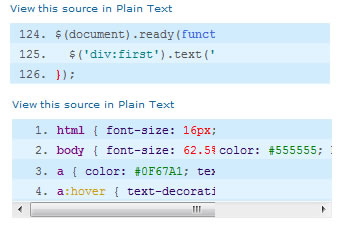
Increase usability with a Plain Text option
Since we disabled the selection helper of Chili it is hard for the user to select and copy our source code. In some browsers it works, but in some the line numbers are copied too. Short, it’s a mess and we need a function to allow a more friendly way.
We want to have a textarea containing the source code that appears when requested, indeed switching with the code-box. That’s realized with the following code:
$(document).ready(function() { //perform actions when DOM is ready
  $('#content pre').each(function() { //on each code box do
    $(this)
      .before('<a href="#" class="codeswitch">View this source in Plain Text</a>') //write a code right before the code-box
      .after('<textarea rows="' + ($(this).children().html().split("\n").length-1) + '" cols="50">' + $(this).children().html() + '</textarea>'); //write a textarea with the content of the code-box after it
  });

  $('.codeswitch').toggle(function() { //hide code-box and show textarea
    $(this)
      .text('View this source as Highlighted Code') //change text of the link
      .next().hide().next().show(); //first next is code-box, second is textarea
  }, function() { //hide textarea and show code box
    $(this)
      .text('View this source in Plain Text')
      .next().show().next().hide();
  });
});
Let’s split that code block into the interesting parts again.
$('#content pre').each(function() { //on each code box do
  $(this)
    .before('<a href="#" class="codeswitch">View this source in Plain Text</a>') //write a code right before the code-box
    .after('<textarea rows="' + ($(this).children().html().split("\n").length-1) + '" cols="50">' + $(this).children().html() + '</textarea>'); //write a textarea with the content of the code-box after it
});
Here we loop through all pre’s (code-boxes). Before the pre block we write a link, with that the user is able to toggle between code-box and textarea. We bind a click to it in the next piece of code. After the pre block we write the actual textarea with the source code inside of it. We calculate the rows attribute of the textarea by counting the line breaks in the source code (\n).
$('.codeswitch').toggle(function() { //hide code-box and show textarea
  $(this)
    .text('View this source as Highlighted Code') //change text of the link
    .next().hide().next().show(); //first next is code-box, second is textarea
}, function() { //hide textarea and show code box
  $(this)
    .text('View this source in Plain Text')
    .next().show().next().hide();
});
With this toggle interaction helper we switch between the code-box and the textarea. We travel from the link postition, the first next() is representing the code-box and the second next() represents the textarea. If the code-box is visible we hide it and show the textarea, and vice versa. Also we change the text of the link each time, so the user have a clue what happens when he click on the link.
Of course we can and should style the textarea with CSS:
#content textarea { width: 620px; line-height: 20px; margin: 10px 0 20px 0; font-size: 12px; display: none; }
Textarea’s are now hidden by default and have the same width, line-height and margin like the code-boxes.
You might also like

Tags
accordion accordion menu animation navigation animation navigation menu carousel checkbox inputs css3 css3 menu css3 navigation date picker dialog drag drop drop down menu drop down navigation menu elastic navigation form form validation gallery glide navigation horizontal navigation menu hover effect image gallery image hover image lightbox image scroller image slideshow multi-level navigation menus rating select dependent select list slide image slider menu stylish form table tabs text effect text scroller tooltips tree menu vertical navigation menu