 Subscribe
 Follow Us
Horizontal Subnav w/ CSS & jQuery
 13 years ago
  75768
75768  19060
19060
 n/a
n/a
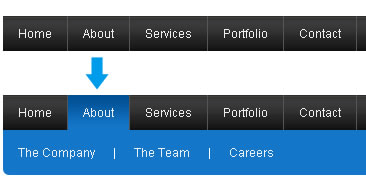
This is a simple navigation with a horizontal subnav.In most cases we can achieve this effect purely with CSS, but since we have to attend to our red headed step child aka IE6, we will use a few lines of jQuery to cover all grounds.
Wireframe – HTML
Nest a set of links wrapped within the <span> tag, this is how the sub navigation will be positioned.
<ul id="topnav">
    <li><a href="#">Link</a></li>
    <li>
        <a href="#">Link</a>
        <!--Subnav Starts Here-->
        <span>
            <a href="#">Subnav Link</a> |
            <a href="#">Subnav Link</a> |
            <a href="#">Subnav Link</a>
        </span>
        <!--Subnav Ends Here-->
    </li>
    <li><a href="#">Link</a></li>
</ul>
Styling – CSS
Unlike a regular drop down menu where the subnav appears directly underneath the hovered/clicked list item, in this case all the subnav sets will start at the same location (left aligned – underneath the navigation).
ul#topnav {
 margin: 0; padding: 0;
 float: left;
 width: 970px;
 list-style: none;
 position: relative; /*--Set relative positioning on the unordered list itself - not on the list item--*/
 font-size: 1.2em;
 background: url(topnav_stretch.gif) repeat-x;
}
ul#topnav li {
 float: left;
 margin: 0; padding: 0;
 border-right: 1px solid #555; /*--Divider for each parent level links--*/
}
ul#topnav li a {
 padding: 10px 15px;
 display: block;
 color: #f0f0f0;
 text-decoration: none;
}
ul#topnav li:hover { background: #1376c9 url(topnav_active.gif) repeat-x; }
/*--Notice the hover color is on the list item itself, not on the link. This is so it
Now set the absolute positioning on the <span> tag 35px from the top. I added some rounded corners on the bottom for style (this will not work in IE).
ul#topnav li span {
 float: left;
 padding: 15px 0;
 position: absolute;
 left: 0; top:35px;
 display: none; /*--Hide by default--*/
 width: 970px;
 background: #1376c9;
 color: #fff;
 /*--Bottom right rounded corner--*/
 -moz-border-radius-bottomright: 5px;
 -khtml-border-radius-bottomright: 5px;
 -webkit-border-bottom-right-radius: 5px;
 /*--Bottom left rounded corner--*/
 -moz-border-radius-bottomleft: 5px;
 -khtml-border-radius-bottomleft: 5px;
 -webkit-border-bottom-left-radius: 5px;
}
ul#topnav li:hover span { display: block; } /*--Show subnav on hover--*/
ul#topnav li span a { display: inline; } /*--Since we declared a link style on the parent list link, we will correct it back to its original state--*/
ul#topnav li span a:hover {text-decoration: underline;}
IE6 Fix – jQuery
Since IE6 does not understand li:hover (basically it only understands a hover event on a <a> tag), use jQuery to go around the issue.
For those who are not familiar with jQuery, do check out their site first and get an overview of how it works. I’ve shared a few tricks that I have picked up along the way, you can check those out as well.
Initial Step – Call the jQuery file
You can choose to download the file from the jQuery site, or you can use this one hosted on Google.
<script type="text/javascript"
src="http://ajax.googleapis.com/ajax/libs/jquery/1.3/jquery.min.js"></script>
The following script contains comments explaining which jQuery actions are being performed.
<script type="text/javascript">
$(document).ready(function() {

 $("ul#topnav li").hover(function() { //Hover over event on list item
  $(this).css({ 'background' : '#1376c9 url(topnav_active.gif) repeat-x'}); //Add background color and image on hovered list item
  $(this).find("span").show(); //Show the subnav
 } , function() { //on hover out...
  $(this).css({ 'background' : 'none'}); //Ditch the background
  $(this).find("span").hide(); //Hide the subnav
 });

});
</script>
Nice and simple! Hope this will come in handy in your future projects.
You might also like

Tags
accordion accordion menu animation navigation animation navigation menu carousel checkbox inputs css3 css3 menu css3 navigation date picker dialog drag drop drop down menu drop down navigation menu elastic navigation form form validation gallery glide navigation horizontal navigation menu hover effect image gallery image hover image lightbox image scroller image slideshow multi-level navigation menus rating select dependent select list slide image slider menu stylish form table tabs text effect text scroller tooltips tree menu vertical navigation menu