 Subscribe
 Follow Us
CSS3 and jQuery Horizontal images Scrolling Menu
 13 years ago
 30919
30919 3654
3654
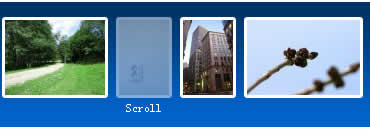
There are a lot of cool flash scrolling menus out there, but I decided to make a similarly looking menu with just CSS and jQuery. I couldn't achieve the same smoothness in animation, but anyway I'm really satisfied with the result. My menu works fine in all major browsers and degrades gracefully when Javascript is turned off.
Creating markup
Let's begin by creating the necessary HTML structure. We will use an unordered list with each list item containing an image and a caption. We will also add an additional wrapper element.
<div class="sc_menu">
  <ul class="sc_menu">
    <li><a href="#">
      <img src="img/1.jpg" alt="Menu"/><span>Menu</span>
    </a></li>
    <li><a href="#">
      <img src="img/2.jpg" alt="Navigation"/><span>Navigation</span>
    </a></li>
    <li><a href="#">
      <img src="img/3.jpg" alt="Scrolling"/><span>Scrolling</span>
    </a></li>
    <li><a href="#">
      <img src="img/4.jpg" alt="jQuery"/><span>jQuery</span>
    </a></li>
  </ul>
</div>
Adding basic styling
Now we need to add some some CSS rules.
div.sc_menu {
  /* Set it so we could calculate the offsetLeft */
  position: relative;
  height: 145px;
  width: 500px;
  /* Add scroll-bars */
  overflow: auto;
}
ul.sc_menu {
  display: block;
  height: 110px;
  /* Max width here, for users without Javascript */
  width: 1500px;
  padding: 15px 0 0 15px;
  /* Remove default margin */
  margin: 0;
  background: url('navigation.png');
  list-style: none;
}
.sc_menu li {
  display: block;
  float: left;
  padding: 0 4px;
}
.sc_menu a {
  display: block;
  text-decoration: none;
}
.sc_menu span {
  /* We want a caption to display on the next line */
  display: block;
  margin-top: 3px;
  text-align: center;
  font-size: 12px;
  color: #fff;
}
The "width" and "overflow" properties are used to add a scroll-bar to the wrapper div. We set the "position" property for easier offset calculation with Javascipt. Don't forget that offset is always calculated relative to the positioned parent.
Adding hover effects and borders
The "display: none" property hides captions, and we will add "display:block" to ":hover" rule to show them when the mouse is above images.
The "-webkit-border-radius" and "-moz-border-radius" properties add a rounded corners for Firefox, Safari and Chrome. Unfortunately, Internet Explorer doesn't support it and will display regular corners instead.
.sc_menu span {
  display: none;
  margin-top: 3px;
  text-align: center;
  font-size: 12px;
  color: #fff;
}
.sc_menu a:hover span {
  display: block;
}
.sc_menu img {
  border: 3px #fff solid;
  -webkit-border-radius: 3px;
  -moz-border-radius: 3px;
}
.sc_menu a:hover img {
  filter:alpha(opacity=50);
  opacity: 0.5;
}
jQuery
We will need to add a jQuery to our document first. I use version hosted on Google API, because it is often already saved in the browser cache which noticeably reduces page load time.
<script src="http://ajax.googleapis.com/ajax/libs/jquery/1.3.1/jquery.min.js" type="text/javascript"></script>
Here is what you should know to understand the code:
$() is a shorthand for $(document).ready(), the most commonly used jQuery function. It allows you to bind a function to be executed when the DOM document has finished loading.
$(function(){
  // Your code here
});
We will use the "mousemove" event to bind a function to be fired when the mouse is moved over menu.
The "ul.width()" doesn't return real width of all images, because we have set an unordered list's width with CSS to make all images display in 1 line. We can get the real width adding last list item's width to it's left offset.
We will use "lastLi[0]" to get the DOM element from the jQuery collection and "offsetLeft" to get the position of the upper left edge of the list item relatively to wrapper div.
The event's "pageX" attribute returns the horizontal coordinate of the mouse relative to the whole document, but we need position relative to the wrapper div, so we will subtract "div.offset().left" from it.
List must scroll faster than the mouse is moved to make that we use "(ulWidth-divWidth) / divWidth" proportion.
Here is the [removed]
$(function(){
    //Get our elements for faster access and set overlay width
    var div = $('div.sc_menu'),
                 ul = $('ul.sc_menu'),
                 // unordered list's left margin
                 ulPadding = 15;

    //Get menu width
    var divWidth = div.width();

    //Remove scrollbars
    div.css({overflow: 'hidden'});

    //Find last image container
    var lastLi = ul.find('li:last-child');

    //When user move mouse over menu
    div.mousemove(function(e){

      //As images are loaded ul width increases,
      //so we recalculate it each time
      var ulWidth = lastLi[0].offsetLeft + lastLi.outerWidth() + ulPadding;

      var left = (e.pageX - div.offset().left) * (ulWidth-divWidth) / divWidth;
      div.scrollLeft(left);
    });
});
We are done!
You might also like
Tags
accordion accordion menu animation navigation animation navigation menu carousel checkbox inputs css3 css3 menu css3 navigation date picker dialog drag drop drop down menu drop down navigation menu elastic navigation form form validation gallery glide navigation horizontal navigation menu hover effect image gallery image hover image lightbox image scroller image slideshow multi-level navigation menus rating select dependent select list slide image slider menu stylish form table tabs text effect text scroller tooltips tree menu vertical navigation menu