 Subscribe
 Follow Us
Take Control of Your Table View jQuery
 14 years ago
 11633
11633 1789
1789
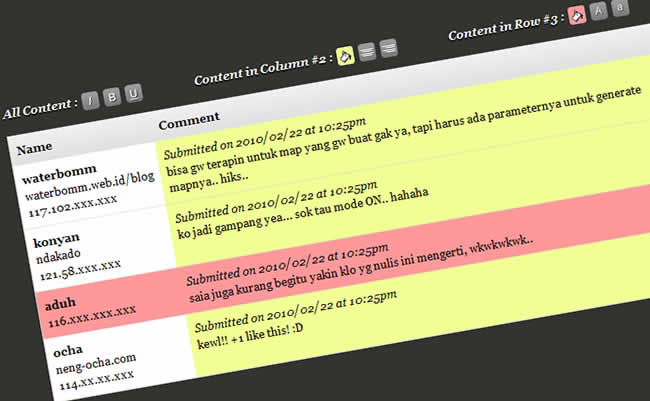
The Case
Each user has a different tastes in viewing our content, including data in a table. I, for example, always enjoy seeing the font in a smaller size but my friend didn’t. It just a font size, how about font style, text alignment, text color or the background color? I don’t think we need to create a user interface for each user, create a tool to stylize our table instead.
The tool will have a function similar to a toolbar on a text editor, it will make a font size bigger or smaller, make it bold or italic, change its alignment, adding a background color and etc. User also can choose any content they want to modify by clicking its element and modify it using the tool in the toolbar.
The Technique
So the case we want to make a simple toolbar for stylize our table. As we know before we can traversing our every object element by jQuery pseudo-selector and jQuery tarversing function but we will use only :nth-child, parents() and children() function. The :nth-child selector we will use for choosing pointed object, parents() for choosing the selected object’s parent and children() for choosing the selected object’s children.
The only main task is we need to create a button and its function that can automatically adding and removing class name to the selected object. That class which contains css properties will handle the styling of an object, so if we have a button to make the font bolder it means the button represent some css properties that will make the object bolder, and so forth.
The selected object we divide into two section, pre-defined and user-defined selected object. In this implementation, the pre-defined selected object are “All Content” which represent all contents in the table, “Content in Column #2″ which represent each contents in column number 2 and “Content in Row #2″ which represent each contents in row number 3.
User-defined selected object will represent any contents of the table selected by the user. The user will choose the object by clicking and the script will automatically save its information, row and column indexes. That informations are needed when the user want to modify the object, by these information we can locate the selected object and modify it.
CSS and jQuery
We prepare the HTML and CSS first, the button and the style for styling the object.
<span class="trigger-italic">italic</span>
<span class="trigger-strong">strong</span>
<span class="trigger-underline">underline</span>
span {
 display: inline-block;
 width: 23px;
 height: 23px;
 text-indent: -9999%;
 cursor: pointer
}

span:hover {
 background-position: bottom left;
}

.trigger-strong {
 background: url('images/bold.png') top left;
}

.trigger-italic {
 background: url('images/italic.png') top left;
}

.trigger-underline {
 background: url('images/underline.png') top left;
}

.trigger-background-selected{
 background: url('images/background.png') top left;
}

.trigger-italic-selected {
 background: url('images/italic.png') top left;
}

.trigger-center-selected {
 background: url('images/center.png') top left;
}
The script above will create a button and some style (*-style) we will add or remove from the object. Now we add a function to the button.
$('.trigger-italic, .trigger-strong, .trigger-underline').toggle(function() {

 className = $(this).attr('class')+'-style';

 $('td').addClass(className);
 $(this).addClass('selected');

},function() {

 $(this).removeClass('selected');

 className = $(this).attr('class')+'-style';

 $('td').removeClass(className);

});
First we add a toggle function to the button, this will make a button can be selected and unselected. If the button being selected, we will create a class name based on the button class (we just adding ‘-style’ text for the class name). So, if the button have class name ‘trigger-italic’ the script will generate a new class name ‘trigger-italic-style’. We add that class name to every ‘td’ we have (this represent ‘All content’), and then add ’selected’ class to the button to make it look selected.
If the button being unselected, we just need to remove all the classes we add before. For the ‘Content in Column #2′ we must change $(’td’) to $(’tr td:nth-child(2)’), this will select the ‘td’ (column) that have index number 2. For ‘Content in Row #3′ we must change $(’td’) to $(’tr:nth-child(4)’), this will select the ‘tr’ (row) that have index number 3. I put index number 4 because we start counting from the row header.
$('.trigger-background-2, .trigger-right-2, .trigger-center-2').toggle(function() {

 className = $(this).attr('class')+'-style';

 $('tr td:nth-child(2)').addClass(className);
 $(this).addClass('selected');

},function() {

 $(this).removeClass('selected');

 className = $(this).attr('class')+'-style';

 $('tr td:nth-child(2)').removeClass(className);

});

$('.trigger-background-23, .trigger-small-23, .trigger-big-23').toggle(function() {

 className = $(this).attr('class')+'-style';

 $('tr:nth-child(4)').children('td').addClass(className);
 $(this).addClass('selected');

},function() {

 $(this).removeClass('selected');

 className = $(this).attr('class')+'-style';

 $('tr:nth-child(4)').children('td').removeClass(className);

});
And the last is reading user-defined selected object.
$('td').click(function() {

 thisIndex  = $(this).index() + 1;
 parentIndex = $(this).parents('tr').index() + 1;

 $.cookie('thisIndex', thisIndex);
 $.cookie('parentIndex', parentIndex);

 $(this).append('
<div class="td-selected">Content Was Selected</div>
');
 $('.td-selected').fadeOut(1000);

});
The script will locate the object by reading its index and its parent index then save it in the cookies, tell the user that they have select an object. We will add a function to the button so it can locate the selected object.
$('.trigger-background-selected, .trigger-italic-selected, .trigger-center-selected').toggle(function() {

 className = $(this).attr('class')+'-style';
 cookieTR  = $.cookie('parentIndex');
 cookieTD  = $.cookie('thisIndex');

 if(cookieTD != null && cookieTR != null)  {
  $('tr:nth-child('+cookieTR+')').children('td:nth-child('+cookieTD+')').addClass(className);
  $(this).addClass('selected');
 } else {
  alert('Choose a content on a table first');
 }

},function() {

 $(this).removeClass('selected');

 className = $(this).attr('class')+'-style';
 cookieTR  = $.cookie('parentIndex');
 cookieTD  = $.cookie('thisIndex');

 $('tr:nth-child('+cookieTR+')').children('td:nth-child('+cookieTD+')').removeClass(className);

});
By reading the cookies that contains the object’s index informations we can locate the object and modify them.
You might also like

Tags
accordion accordion menu animation navigation animation navigation menu carousel checkbox inputs css3 css3 menu css3 navigation date picker dialog drag drop drop down menu drop down navigation menu elastic navigation form form validation gallery glide navigation horizontal navigation menu hover effect image gallery image hover image lightbox image scroller image slideshow multi-level navigation menus rating select dependent select list slide image slider menu stylish form table tabs text effect text scroller tooltips tree menu vertical navigation menu