Cool jQuery Site Collapsing vertical Navigation

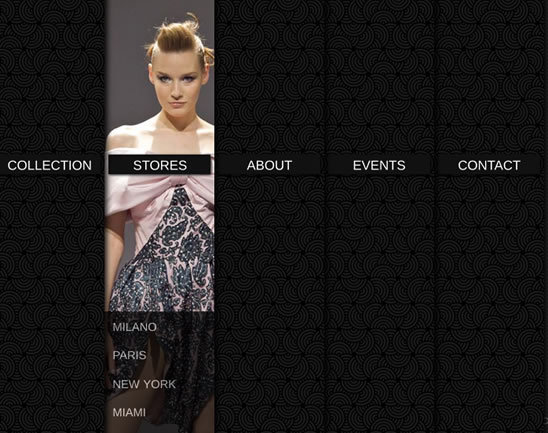
we will create a collapsing menu that contains vertical navigation bars and a slide out content area. When hovering over a menu item, an image slides down from the top and a submenu slides up from the bottom. Clicking on one of the submenu items will make the whole menu collapse like a card deck and the respective content area will slide out.
The Markup
Our HTML will consist of a main container with the class and id “cc_menu”. Here we will place all our vertical menu items and the main content div:
<div id="cc_menu" class="cc_menu">
 <div class="cc_item" style="z-index:5;">
  <img src="images/1.jpg" alt="image" />
  <span class="cc_title">Collection</span>
  <div class="cc_submenu">
   <ul>
    <li class="cc_content_1">Winter 2010</li>
    <li class="cc_content_2">Spring 2011</li>
   </ul>
  </div>
 </div>
 <div class="cc_item" style="z-index:4;">
  <img src="images/2.jpg" alt="image" />
  <span class="cc_title">Stores</span>
  <div class="cc_submenu">
   <ul>
    <li class="cc_content_3">Milano</li>
    <li class="cc_content_4">Paris</li>
   </ul>
  </div>
 </div>
 ...
 <div id="cc_content" class="cc_content">
  <span id="cc_back" class="cc_back"><< Go back</span>
  <div class="cc_content_1">
   <h1>Winter 2010</h1>
   <p>Some content</p>
  </div>
  <div class="cc_content_2">
   <h1>Spring 2011</h1>
   <p>Some content</p>
  </div>
  ...
 </div>
</div>
The first item will get a z-index of 5 and then we will decrease the z-index for the next items. This will make the last item be in the lowest layer. We do this in order to create the card deck collapsing effect.
Each submenu item will share its class with the respective content div. Like that we can make the right content div appear whenever we click on a submenu item.
Let’s take a look at the styling.
The CSS
Our main div that surrounds everything will have the following style:
.cc_menu{
 width:700px; /*140px * 5*/
 height:600px;
 position:relative;
 font-size:14px;
 text-transform:uppercase;
 color:#fff;
}
The width of this container is the sum of all the item widths which is 5 times 140 pixels.
The style of each navigation item will be the following:
.cc_item{
 text-align:center;
 width:140px;
 height:600px;
 float:left;
 border-bottom:1px solid #000;
 background:#444 url(../images/bg.png) repeat top left;
 position:relative;
 -moz-box-shadow:3px -3px 10px #000;
 -webkit-box-shadow:3px -3px 10px #000;
 box-shadow:3px -3px 10px #000;
}
We will give each item a box shadow so that the layering becomes visible. (That does not work in IE yet, so you will have to add a border or some other background image that enhances this.)
The title in each menu element will have a dark background with a subtle shadow around:
span.cc_title{
 color:#fff;
 font-size:16px;
 top:200px;
 left:5px;
 position:absolute;
 padding:3px 0px;
 background:#111;
 width:130px;
 display:block;
 z-index:11;
 -moz-box-shadow:1px 1px 4px #000;
 -webkit-box-shadow:1px 1px 4px #000;
 box-shadow:1px 1px 4px #000;
}
The submenu list will be styled as follows:
.cc_submenu ul{
 list-style:none;
 width:140px;
 margin:0;
 padding:0;
 height:0px; /*increase to 200px to slide up*/
 overflow:hidden;
 text-align:left;
 background:#000;
 position:absolute;
 left:0px;
 bottom:0px;
 opacity:0.7;
 z-index:13;
}
We will position the list at the bottom of the item and give it a height of 0 pixel. We will then increase the height to 200 pixels for it to slide up from the bottom.
The list elements of the submenu list will have the following style:
.cc_submenu ul li{
 color:#ddd;
 cursor:pointer;
 padding:10px;
}
The image that will slide in from the top will be positioned negatively, meaning that we will hide it at the top of the item and the page:
.cc_item img{
 position:absolute;
 width:140px;
 height:600px;
 top:-600px;
 left:0px;
}
In our JavaScript function we will make it slide down from the top by animating the top value to 0px.
The div that surrounds all the contents will also be hidden to the left of the page by setting the left value to -700 pixels:
.cc_content{
 width:600px;
 height:600px;
 border-bottom:1px solid #000;
 position:absolute;
 left:-700px;
 background:#444 url(../images/bg.png) repeat top left;
 overflow:hidden;
 -moz-box-shadow:4px 0 7px #000;
 -webkit-box-shadow:4px 0 7px #000;
 box-shadow:4px 0 7px #000;
}
The single content divs will have the following style:
.cc_content div{
 display:none;
 margin:20px;
}
We will give each paragraph the following style:
.cc_content p{
 background:#000;
 padding:20px;
 opacity:0.7;
}
And finally, we will position the back span at the bottom right of the content container:
span.cc_back{
 position:absolute;
 bottom:10px;
 right:10px;
 cursor:pointer;
 color:#ddd;
}
And that was the style. Now, let’s take a look at the JavaScript magic.
The JavaScript
We will have several function taking care of the behavior of our navigation. Whenever we hover a menu item, we want the image to slide in from the top and the submenu to slide in from the bottom. And, of course, when we leave an item, we want the reverse to happen. The functions m_enter and m_leave take care of that behavior.
The function fold will make the menu collapse once a submenu item is clicked. The initial position is recovered by the function unfold.
The two functions showContent and hideContent take care of the respective content appearing and disappearing.
In our main jQuery function we will start by defining some variables:
//all the menu items
var $items   = $('#cc_menu .cc_item');
//number of menu items
var cnt_items = $items.length;
//if menu is expanded then folded is true
var folded  = false;
//timeout to trigger the mouseenter event on the menu items
var menu_time;
Now we will bind the mouseenter and the mouseleave to each item. We will also bind the click event to list elements in the submenu:
$items.unbind('mouseenter')
   .bind('mouseenter',m_enter)
   .unbind('mouseleave')
   .bind('mouseleave',m_leave)
   .find('.cc_submenu > ul > li')
   .bind('click',function(){
 var $li_e = $(this);
    //if the menu is already folded,
    //just replace the content
 if(folded){
  hideContent();
  showContent($li_e.attr('class'));
 }
    else //fold and show the content
  fold($li_e);
});
In the following we will define the m_enter function:
function m_enter(){
 var $this  = $(this);
 clearTimeout(menu_time);
 menu_time  = setTimeout(function(){
 //img
 $this.find('img').stop().animate({'top':'0px'},400);
 //cc_submenu ul
 $this.find('.cc_submenu > ul').stop().animate({'height':'200px'},400);
 },200);
}
The timeout is used to prevent this event to trigger if the user moves the mouse with a considerable speed through the menu items.
The m_leave function is defined as follows:
function m_leave(){
 var $this = $(this);
 clearTimeout(menu_time);
 //img
 $this.find('img').stop().animate({'top':'-600px'},400);
 //cc_submenu ul
 $this.find('.cc_submenu > ul').stop().animate({'height':'0px'},400);
}
When clicking on the back span, we want the unfold function to trigger:
$('#cc_back').bind('click',unfold);
The fold function will show only the menu column of the chosen submenu and make all the other items animate to the left by setting the margin to -140 pixels:
function fold($li_e){
 var $item  = $li_e.closest('.cc_item');

 var d = 100;
 var step = 0;
 $items.unbind('mouseenter mouseleave');
 $items.not($item).each(function(){
  var $item = $(this);
  $item.stop().animate({
   'marginLeft':'-140px'
  },d += 200,function(){
   ++step;
   if(step == cnt_items-1){
    folded = true;
    showContent($li_e.attr('class'));
   }
  });
 });
}
The unfold function shows all the menu items and also hides any item’s image and submenu that might be displayed:
function unfold(){
 $('#cc_content').stop().animate({'left':'-700px'},600,function(){
  var d = 100;
  var step = 0;
 $items.each(function(){
   var $item = $(this);

   $item.find('img')
     .stop()
     .animate({'top':'-600px'},200)
     .andSelf()
     .find('.cc_submenu > ul')
     .stop()
     .animate({'height':'0px'},200);

   $item.stop().animate({
   'marginLeft':'0px'
   },d += 200,function(){
    ++step;
    if(step == cnt_items-1){
     folded = false;
     $items.unbind('mouseenter')
        .bind('mouseenter',m_enter)
        .unbind('mouseleave')
        .bind('mouseleave',m_leave);

     hideContent();
    }
   });
  });
 });
}
The function to show the content will animate our content container to the right by setting the left value to 140 pixels. It will also fade in the respective content:
function showContent(idx){
 $('#cc_content').stop().animate({'left':'140px'},200,function(){
  $(this).find('.'+idx).fadeIn();
 });
}
And finally, the function to hide the content:
function hideContent(){
 $('#cc_content').find('div').hide();
}
To cufonize the font in our menu, we will simply add these lines to the head of our HTML:
<script src="js/cufon-yui.js" type="text/javascript"></script>
<script src="js/Liberation_Sans.font.js" type="text/javascript"></script>
<script type="text/javascript">
 Cufon.replace('span');
 Cufon.replace('li');
 Cufon.replace('h1');
 Cufon.replace('p');
</script>
And that’s all! We hope you enjoyed and find it useful
You might also like
Tags
accordion accordion menu animation navigation animation navigation menu carousel checkbox inputs css3 css3 menu css3 navigation date picker dialog drag drop drop down menu drop down navigation menu elastic navigation form form validation gallery glide navigation horizontal navigation menu hover effect image gallery image hover image lightbox image scroller image slideshow multi-level navigation menus rating select dependent select list slide image slider menu stylish form table tabs text effect text scroller tooltips tree menu vertical navigation menu

 Subscribe
 Follow Us
 13 years ago
 24641
24641 5000
5000


