 Subscribe
 Follow Us
Simple HTML5 Progress bar
 13 years ago
 22232
22232 5894
5894
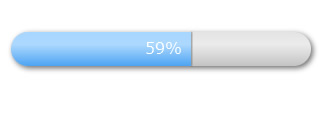
There is a great amount of articles about Canvas on the internet, but I would like to show the example of how you can use Canvas on practice, namely the creation of animated progress bar.'
The progress bar has turned out pretty simple, but at the same time, in the style of Web 2.0 – round (of course!), with elements of depth and volume: that is, shadows and gradients.
Substrate
Let’s start with a substrate, which will be filled with progress. We are going to round the angles of the rectangle with the help of arc () function, so in this case the rectangle will always be rounded at the angles in a way of semicircles. To create an arbitrary rounding (as when using a border-radius) it is sufficient to use two Bezier curves (Bezier and quadratic curves) and direct interval between them (degenerating to a point in a semicircle, as in our case). Thus, the function of creation of the substrate’s filled outline will look in the following way:
function roundRect(ctx, x, y, width, height, radius) {
    ctx.beginPath();
    ctx.moveTo(x + radius, y);
    ctx.lineTo(x + width - radius, y);
    ctx.arc(x+width-radius, y+radius, radius, -Math.PI/2, Math.PI/2, false);
    ctx.lineTo(x + radius, y + height);
    ctx.arc(x+radius, y+radius, radius, Math.PI/2, 3*Math.PI/2, false);
    ctx.closePath();
    ctx.fill();
}
Then we add shadows and volume to the substrate. Create volume using a linear gradient with three stops, the shadows – with the standard properties of the context:
function progressLayerRect(ctx, x, y, width, height, radius) {
    ctx.save();
    // Define the shadows
    ctx.shadowOffsetX = 2;
    ctx.shadowOffsetY = 2;
    ctx.shadowBlur = 5;
    ctx.shadowColor = '#666';

     // first grey layer
    ctx.fillStyle = 'rgba(189,189,189,1)';
    roundRect(ctx, x, y, width, height, radius);

    // second layer with gradient
    // remove the shadow
    ctx.shadowColor = 'rgba(0,0,0,0)';
    var lingrad = ctx.createLinearGradient(0,y+height,0,0);
    lingrad.addColorStop(0, 'rgba(255,255,255, 0.1)');
    lingrad.addColorStop(0.4, 'rgba(255,255,255, 0.7)');
    lingrad.addColorStop(1, 'rgba(255,255,255,0.4)');
    ctx.fillStyle = lingrad;
    roundRect(ctx, x, y, width, height, radius);

    ctx.restore();
}
Two layers are being used here – the lower solid gray and the top white with gradients of transparency. In my opinion it provides more precise boundaries of the substrate and looks more realistic, in any case you can always experiment with all the color settings.
Progress bar
Now let’s move to the creation of progress that will fill the substrate. Progress – it’s the same rectangle with rounded angles, it only has a different color.
But it has a special feature that differs it from the substrate and which should be taken into account in drawing – when the width of the progress is less than the radius of rounding and when the width is greater than the length of the substrate minus radius. In this case it is necessary to determine the angles of rounding’s drawing and the position of chord of circle, all the calculations can be made with the help of geometry course,
Plus we add the shadow on the right angle of the progress to attach the volume effect.
At the end we get the following drawing code of the progress:
function progressBarRect(ctx, x, y, width, height, radius, max) {
    // deplacement for chord drawing
    var offset = 0;
    ctx.beginPath();
    if (width<radius) {
        offset = radius - Math.sqrt(Math.pow(radius,2)-Math.pow((radius-width),2));
        // Left angle
        var left_angle = Math.acos((radius - width) / radius);
        ctx.moveTo(x + width, y+offset);
        ctx.lineTo(x + width, y+height-offset);
        ctx.arc(x + radius, y + radius, radius, Math.PI - left_angle, Math.PI + left_angle, false);
    }
    else if (width+radius>max) {
        offset = radius - Math.sqrt(Math.pow(radius,2)-Math.pow((radius - (max-width)),2));
        // Right angle
        var right_angle = Math.acos((radius - (max-width)) / radius);
        ctx.moveTo(x + radius, y);
        ctx.lineTo(x + width, y);
        ctx.arc(x+max-radius, y + radius, radius, -Math.PI/2, -right_angle, false);
        ctx.lineTo(x + width, y+height-offset);
        ctx.arc(x+max-radius, y + radius, radius, right_angle, Math.PI/2, false);
        ctx.lineTo(x + radius, y + height);
        ctx.arc(x+radius, y+radius, radius, Math.PI/2, 3*Math.PI/2, false);
    }
    else {
        ctx.moveTo(x + radius, y);
        ctx.lineTo(x + width, y);
        ctx.lineTo(x + width, y + height);
        ctx.lineTo(x + radius, y + height);
        ctx.arc(x+radius, y+radius, radius, Math.PI/2, 3*Math.PI/2, false);
    }
    ctx.closePath();
    ctx.fill();

    // shadow on the right
    if (width<max-1) {
        ctx.save();
        ctx.shadowOffsetX = 1;
        ctx.shadowBlur = 1;
        ctx.shadowColor = '#666';
        if (width+radius>max)
            offset = offset+1;
        ctx.fillRect(x+width,y+offset,1,total_height-offset*2);
        ctx.restore();
    }
}
Here, unlike the previous function, we don’t save and renew the context as in case with the substrate, because we are going to define context’s global attributes for the progress.
Text of the progress
Now we add the text that will display the state of progress in per cent. If the length of the text is less than the length of the progress, text will be placed directly at the right angle of the progress, otherwise it will be on the left angle of the progress. To measure the text length we use measureText() function:
function progressText(ctx, x, y, width, height, radius, max) {
    ctx.save();
    ctx.fillStyle = 'white';
    var text = Math.floor(width/max*100)+"%";
    var text_width = ctx.measureText(text).width;
    var text_x = x+width-text_width-radius/2;
    if (width<=radius+text_width) {
        text_x = x+radius/2;
    }
    ctx.fillText(text, text_x, y+22);
    ctx.restore();
}
Full-fledged progress indicator
Now we need to unite all the parts together and define the animation that will fill the progress from 0 to 100%. To create the animation we use sеtInterval() and clearInterval() functions:
// Define the size and position of indicator
var i = 0;
var res = 0;
var context = null;
var total_width = 300;
var total_height = 34;
var initial_x = 20;
var initial_y = 20;
var radius = total_height/2;

window.onload = function() {
    // Get the canvas element
    var elem = document.getElementById('myCanvas');
    // Check the canvas support with the help of browser
    if (!elem || !elem.getContext) {
        return;
    }

    context = elem.getContext('2d');
    if (!context) {
        return;
    }

    // Text’s font of the progress
    context.font = "16px Verdana";

    // Gradient of the progress
    var progress_lingrad = context.createLinearGradient(0,initial_y+total_height,0,0);
    progress_lingrad.addColorStop(0, '#4DA4F3');
    progress_lingrad.addColorStop(0.4, '#ADD9FF');
    progress_lingrad.addColorStop(1, '#9ED1FF');
    context.fillStyle = progress_lingrad;

    // Create the animation
    res = setInterval(draw, 50);
}

function draw() {
    // augment the length on 1 for every iteration
    i+=1;

    // Clear the layer
    context.clearRect(initial_x-5,initial_y-5,total_width+15,total_height+15);
    progressLayerRect(context, initial_x, initial_y, total_width, total_height, radius);
    progressBarRect(context, initial_x, initial_y, i, total_height, radius, total_width);
    progressText(context, initial_x, initial_y, i, total_height, radius, total_width );
    // stop the animation when it reaches 100%
    if (i>=total_width) {
        clearInterval(res);
    }
}
That’s all, now all we need is to put javascript code in script tag, and in body document we should add:
<canvas id="myCanvas" width="500" height="150">Your browser does not have support for canvas.</canvas>
Inset Shadow
The thing is that there is no such tools for creation of the inset shadow in canvas as easy as in CSS, and the essence of the method described above is in using the «Opposite winding» technique that also can be used in canvas.
And finally, I prepared another style of the substrate that can be created with the help of inset shadow, in this case the substrate will be sunken inside. The original idea was taken here: http://weblog.bocoup.com/can-i-draw-an-inset-shadow-with-the-html5-canvas-api
To reach the desirable effect first you need to draw an inset shadow, you will first need to punch the shape of your hole in a clockwise direction, onto a large square being drawn in an anti-clockwise direction. Once you have done this, it’s simply a matter of adding your shadow parameters to the Canvas context. To get the inset shadow effect we need to create a new function roundInsetRect() and to modify progressLayerRect() function in the following way:
function roundInsetRect(ctx, x, y, width, height, radius) {
    ctx.beginPath();

    // draw the outward rectangle in an anti-clockwise direction
    ctx.moveTo(1000, 1000);
    ctx.lineTo(1000, -1000);
    ctx.lineTo(-1000, -1000);
    ctx.lineTo(-1000, 1000);
    ctx.lineTo(1000, 1000);

    ctx.moveTo(x + radius, y);
    ctx.lineTo(x + width - radius, y);
    ctx.arc(x+width-radius, y+radius, radius, -Math.PI/2, Math.PI/2, false);
    ctx.lineTo(x + radius, y + height);
    ctx.arc(x+radius, y+radius, radius, Math.PI/2, 3*Math.PI/2, false);
    ctx.closePath();
    ctx.fill();
}
function progressLayerRect(ctx, x, y, width, height, radius) {
    ctx.save();
    // define the shadows
    ctx.shadowOffsetX = 2;
    ctx.shadowOffsetY = 2;
    ctx.shadowBlur = 5;
    ctx.shadowColor = '#666';

     // first gray layer
    ctx.fillStyle = 'rgba(189,189,189,1)';
    roundRect(ctx, x, y, width, height, radius);

    ctx.fillStyle = 'white';
    roundInsetRect(ctx, x, y, width, height, radius);

    ctx.restore();
}
The article source:http://www.splashnology.com/article/how-to-create-a-progress-bar-with-html5-canvas/478/
You might also like

Tags
accordion accordion menu animation navigation animation navigation menu carousel checkbox inputs css3 css3 menu css3 navigation date picker dialog drag drop drop down menu drop down navigation menu elastic navigation form form validation gallery glide navigation horizontal navigation menu hover effect image gallery image hover image lightbox image scroller image slideshow multi-level navigation menus rating select dependent select list slide image slider menu stylish form table tabs text effect text scroller tooltips tree menu vertical navigation menu