 Subscribe
 Follow Us
Useful jQuery Parallax Animated Effect
 12 years ago
 17099
17099 3036
3036
we all agree that the parallax effect is pretty awesome and can get you that WOW factor when someone visits your website. So, I thought i would show you a live jQuery parallax example. In this tutorial i will explain in detail how to create your own parallax background effect using jQuery to manage the animation aspects of the banner which you could use for your header background.
Firstly, you will need the jparallax plugin and include this in your source code.
<script type="text/javascript" src="jquery-1.2.6.min.js"></script>
<script type="text/javascript" src="jquery.jparallax.0.9.1.js" ></script>
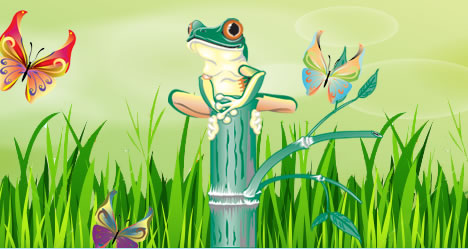
Next you will need the background images for the parallax banner. I have chosen to go with 4 images to keep it basic. I have chosen the following 4 images (note that images 2,3,4 are transparent png’s):
Note: To edit vector files you will need an editor such as Adobe Illustrator/Photoshop
Now we add the images to the html code.
<div id="parallax">
  <img src="grass.png" alt="" style="width:1200px; height:250px;"/>
  <img src="frog.png" alt="" style="width:500px; height:250px;"/>
  <img src="butterflies.png" alt="" style="width:1200px; height:300px;"/>
</div>
Then you add the jQuery code to initialise the parallax plugin:
jQuery(document).ready(function($) {
    jQuery('#parallax').jparallax();
});
Also add the css style required for the parallax:
#parallax {
   position:relative; overflow:hidden; width:950px; height:250px;
   background-image:url('background.jpg');
}
Children of a parallaxed element become layers, and are automatically given position:absolute; in order to start moving them around, but the parallaxed element itself needs position:relative; or position:absolute; or the layers will move relative to the document rather than the viewport. overflow:hidden; stops layers displaying outside of the bounds of the viewport, and width and height should be set to prevent the viewport collapsing.
Tip: play around with the layer image dimensions to get the animation speeds that you want. The smaller the image compared to the background layer the faster it will move when the mouse hovers. The frog only moves left and right, this is achieved by having the same height as the window (background element) but a smaller width. The butterflies is the opposite effect and move when the mouse goes up and down.
That’s pretty much it. Hope you have fun creating your own jQuery animated parallax banners!
The article source:http://www.jquery4u.com/animation/jquery-parallax-tutorial/
You might also like
Tags
accordion accordion menu animation navigation animation navigation menu carousel checkbox inputs css3 css3 menu css3 navigation date picker dialog drag drop drop down menu drop down navigation menu elastic navigation form form validation gallery glide navigation horizontal navigation menu hover effect image gallery image hover image lightbox image scroller image slideshow multi-level navigation menus rating select dependent select list slide image slider menu stylish form table tabs text effect text scroller tooltips tree menu vertical navigation menu