 Subscribe
 Follow Us
Nice CSS3 Tabbed horizontal menu
 12 years ago
 17471
17471 5139
5139
Support for IE7 & 8 is there but limited in that the functionality works perfectly but some of the overlay styles aren’t treated properly. If not for the wonderful and awesome CSSPIE and Dean Edwards fix, there would be no support for any version other than IE9.
The Head
For our first bit of markup, we’re going to create our head using HTML5 doctype, inserting our stylesheets and telling IE 7 & 8 that’s it’s ok to use CSS3.
<meta charset="utf-8">

<!-- Styles !-->
<link rel="stylesheet" href="styles/themes/jean/darkwash.css" media="screen">

<!--[if lt IE 9]>
<link rel="stylesheet" href="styles/ie.css" media="screen" />
<script src="http://ie7-js.googlecode.com/svn/version/2.1(beta4)/IE9.js"></script>
<![endif]-->
Building the Containers
After you’ve added the head, in-between the body tags we need to create some containers for the tabbed navigation. Let’s break it down…
As you can see, the first container is id=”container”. This is used to create a full width of the tabbed navigation and to position it however you like.
Last is the class=”tab-container” which is the wrapper for the actual tabs themselves as well as it helps contain the content block. This is a very important class and there’s no need to edit it, although I’ll explain the styling later on in this tutorial.
<!-- Start Tab Area. Use the container for positioning and to increase the tab content width !-->
<div id="container">

<!-- Start Tabs !-->
<div class="tab-container">

Tabs will go here
</div>

<!-- Tab Container !-->
</div>

<!-- Container !-->

<!-- End Tab Area !-->
Creating your first Tab
The last markup we’ll want to write is for our actual tabs and the content inside them.
First of all we want to create a div with an id so that we can know which content to show when clicking on the corresponding tab. That looks like this…
<div id="c1">
//Next markup will go here
</div>
Then we will create the tab for that content id and tell it to show the div with an id of c1 by using a hash with c1 after it in the link. So now your markup should look like this…
<div id="c1">
        <a href="#" title="First">First</a> <!-- This is your actual tab and the content is below it !-->
        //Next Markup will go here
</div>
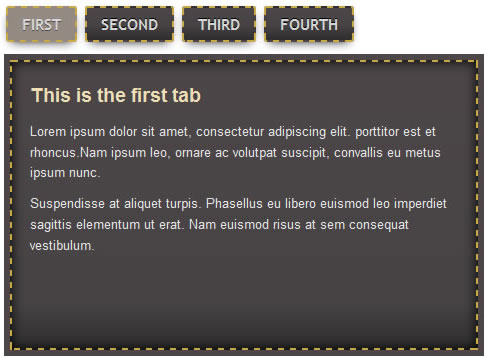
Now let’s create a place to put our content. To do this we’ll simply create a div with a class of .tab-content and insert some dummy text, making your markup now look like this…
<div id="c1">
		<a href="#" title="First">First</a> <!-- This is your actual tab and the content is below it !-->
<div class="tab-content">  <!-- tab-container > div > div in the CSS !-->
<h3>This is the first tab</h3>

Lorem ipsum dolor sit amet, consectetur adipiscing elit. porttitor est et rhoncus.Nam ipsum leo, ornare ac volutpat suscipit, convallis eu metus ipsum nunc.

Suspendisse at aliquet turpis. Phasellus eu libero euismod leo imperdiet sagittis elementum ut erat. Nam euismod risus at sem consequat vestibulum.
</div>
</div>
Finish the Markup
And that’s it. Very little markup for an awesome tabbed navigation. Here’s the rest of the tabs which all follow suit with the markup you just created! Just add the following below your first tab (ie: c1)…
Note: The last tab you add will always be a hidden tab and the content will show up first so make it something like an introduction.
Read more:http://webdesign.tutsplus.com/videos/how-to-create-a-css3-tabbed-navigation/
You might also like
Tags
accordion accordion menu animation navigation animation navigation menu carousel checkbox inputs css3 css3 menu css3 navigation date picker dialog drag drop drop down menu drop down navigation menu elastic navigation form form validation gallery glide navigation horizontal navigation menu hover effect image gallery image hover image lightbox image scroller image slideshow multi-level navigation menus rating select dependent select list slide image slider menu stylish form table tabs text effect text scroller tooltips tree menu vertical navigation menu