 Subscribe
 Follow Us
jQuery Stylish Background Image Sliding effect
 13 years ago
 25767
25767 4037
4037
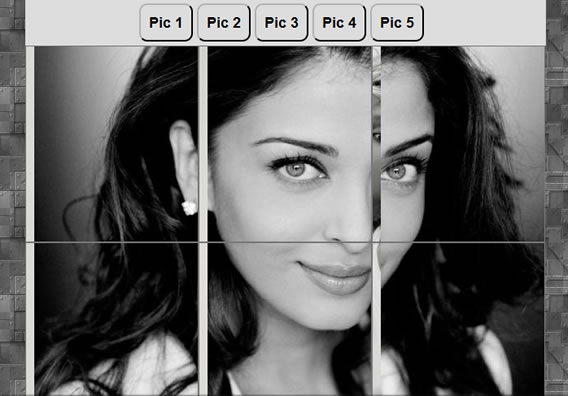
we'll show you how to create sliding image cell effect. This is will something like small photo gallery.
Step 1. HTML
Here are full html code of our result. For our demonstration I use 5 photos – same amount of ‘navigation’ elements you can see here too.
index.html
<!DOCTYPE html>
<html lang="en" >
    <head>
        <meta charset="utf-8" />
        <title>Cool Background Image Sliding effect with jQuery | Script Tutorials</title>
        <link href="css/main.css" rel="stylesheet" type="text/css" />

        <!--[if lt IE 9]>
          <script src="http://html5shiv.googlecode.com/svn/trunk/html5.js"></script>
        <![endif]-->
        <script src="http://code.jquery.com/jquery-latest.min.js"></script>
        <script src="js/main.js"></script>
    </head>
    <body>
        <div class="container" id="container">
            <ul class="nav">
                <li id="m1">Pic 1</li>
                <li id="m2">Pic 2</li>
                <li id="m3">Pic 3</li>
                <li id="m4">Pic 4</li>
                <li id="m5">Pic 5</li>
            </ul>

            <ul class="grid">
                <li id="g1">
                    <div class="d1"></div>
                    <div class="d2"></div>
                    <div class="d3"></div>
                    <div class="d4"></div>
                    <div class="d5"></div>
                </li>
                <li id="g2">
                    <div class="d1"></div>
                    <div class="d2"></div>
                    <div class="d3"></div>
                    <div class="d4"></div>
                    <div class="d5"></div>
                </li>
                <li id="g3">
                    <div class="d1"></div>
                    <div class="d2"></div>
                    <div class="d3"></div>
                    <div class="d4"></div>
                    <div class="d5"></div>
                </li>
                <li id="g4">
                    <div class="d1"></div>
                    <div class="d2"></div>
                    <div class="d3"></div>
                    <div class="d4"></div>
                    <div class="d5"></div>
                </li>
                <li id="g5">
                    <div class="d1"></div>
                    <div class="d2"></div>
                    <div class="d3"></div>
                    <div class="d4"></div>
                    <div class="d5"></div>
                </li>
                <li id="g6">
                    <div class="d1"></div>
                    <div class="d2"></div>
                    <div class="d3"></div>
                    <div class="d4"></div>
                    <div class="d5"></div>
                </li>
            </ul>
            <ul class="demos">
                <li><a href="index.html">Demo 1</a></li>
                <li><a href="index2.html">Demo 2</a></li>
                <li><a href="index3.html">Demo 3</a></li>
            </ul>
        </div>
        <footer>
            <h2>Cool Background Image Sliding effect with jQuery</h2>
            <a href="http://www.script-tutorials.com/cool-background-image-sliding-effect-with-jquery/" class="stuts">Back to original tutorial on <span>Script Tutorials</span></a>
        </footer>
    </body>
</html>
Step 2. CSS
Now – our CSS styles. I will omit unnecessary styles of page layout, but will show you most important
css/main.css
.nav {
    background-color:#DDD;
    list-style:none outside none;
    overflow:hidden;
    padding:5px 140px;
}
.nav li {
    border-radius:10px;
    -moz-border-radius:10px;
    -webkit-border-radius:10px;

    border:2px outset #000000;
    color:#000;
    cursor:pointer;
    float:left;
    font-size:18px;
    font-weight:bold;
    margin-right:5px;
    padding:10px;
}

.demos {
    background-color:#DDD;
    list-style:none outside none;
    overflow:hidden;
    padding:5px 165px;
}
.demos li {
    border-radius:10px;
    -moz-border-radius:10px;
    -webkit-border-radius:10px;

    border:2px outset #000000;
    color:#000;
    float:left;
    font-size:18px;
    font-weight:bold;
    margin-right:5px;
    padding:10px;
}
.demos li a {
    color:#000;
    cursor:pointer;
    display:block;
    font-size:20px;
    font-weight:bold;
    height:30px;
    line-height:30px;
    text-decoration:none;
}

.grid {
    background-color:#DDD;
    list-style:none outside none;
    width:100%;
}
.grid li {
    border:1px solid #777777;
    float:left;
    height:240px;
    width:211px;

    transition:all 0.5s linear;
    -moz-transition:all 0.5s linear;
    -o-transition:all 0.5s linear;
    -webkit-transition:all 0.5s linear;
}
.grid li div {
    transition:all 0.5s ease-in-out;
    -moz-transition:all 0.5s ease-in-out;
    -o-transition:all 0.5s ease-in-out;
    -webkit-transition:all 0.5s ease-in-out;

    float:left;
}
.grid li .d1 {
    background:transparent url(../images/grid1.jpg) no-repeat top left;
    height:100%;
    width:211px;
}
.grid li .d2 {
    background:transparent url(../images/grid2.jpg) no-repeat top left;
    height:100%;
    width:0;
}
.grid li .d3 {
    background:transparent url(../images/grid3.jpg) no-repeat top left;
    height:100%;
    width:0;
}
.grid li .d4 {
    background:transparent url(../images/grid4.jpg) no-repeat top left;
    height:100%;
    width:0;
}
.grid li .d5 {
    background:transparent url(../images/grid5.jpg) no-repeat top left;
    height:100%;
    width:0;
}
.grid li#g2 div {
    background-position:-211px 0;
}
.grid li#g3 div {
    background-position:-422px 0;
}
.grid li#g4 div {
    background-position:0 -240px;
}
.grid li#g5 div {
    background-position:-211px -240px;
}
.grid li#g6 div {
    background-position:-422px -240px;
}
As you can see – each grid cell element (LI) have some defined background, but with own background positions. And, I will use jQuery ‘animate’ to shift these positions when we will switch our images (through navigation)
Step 3. jQuery
js/main.js
$(function(){
    $(".nav li").hover(
      function () {
        $('.grid li div').stop().animate({width:"0"},0);

        var ind = $(".nav li").index(this);
        $($('.grid li#g1 div')[ind]).stop().animate({width:"211px"},0);
        $($('.grid li#g2 div')[ind]).stop().animate({width:"211px"},50);
        $($('.grid li#g3 div')[ind]).stop().animate({width:"211px"},100);
        $($('.grid li#g4 div')[ind]).stop().animate({width:"211px"},150);
        $($('.grid li#g5 div')[ind]).stop().animate({width:"211px"},200);
        $($('.grid li#g6 div')[ind]).stop().animate({width:"211px"},250);
      }
    );
});
The article source:http://www.script-tutorials.com/cool-background-image-sliding-effect-with-jquery/
You might also like

Tags
accordion accordion menu animation navigation animation navigation menu carousel checkbox inputs css3 css3 menu css3 navigation date picker dialog drag drop drop down menu drop down navigation menu elastic navigation form form validation gallery glide navigation horizontal navigation menu hover effect image gallery image hover image lightbox image scroller image slideshow multi-level navigation menus rating select dependent select list slide image slider menu stylish form table tabs text effect text scroller tooltips tree menu vertical navigation menu