 Subscribe
 Follow Us
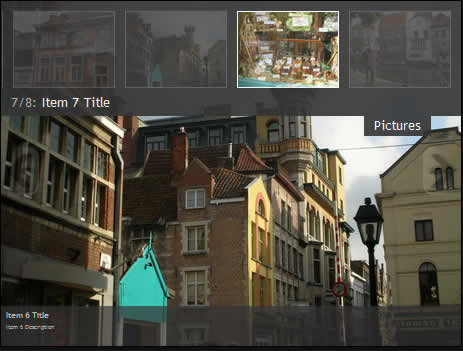
SmoothGallery 2.1
 13 years ago
  13253
13253  2259
2259
 n/a
n/a
First step: Install it.
Just insert those lines of code in the header of your html files:
1.Include those lines in your header:
<script src="scripts/mootools.v1.11.js" type="text/javascript"></script>
<script src="scripts/jd.gallery.js" type="text/javascript"></script>
2.Then, include the css:
<link rel="stylesheet" href="css/jd.gallery.css" type="text/css" media="screen" />
Second step: Prepare the meal.
Unlike it's ancestor Smooth Slideshow, JonDesign's Smooth Gallery uses a standard compliant (and search engine friendly) way to define the slideshow items.
So, add a code similar to this one (here I added 2 elements) to define the slideshow elements:
<div id="myGallery">
<div class="imageElement">
<h3>Item 1 Title</h3>
<p>Item 1 Description</p>
<a href="mypage1.html" title="open image" class="open"></a>
<img src="images/brugges2006/1.jpg" class="full" />
<img src="images/brugges2006/1-mini.jpg" class="thumbnail" />
</div>
<div class="imageElement">
<h3>Item 2 Title</h3>
<p>Item 2 Description</p>
<a href="mypage2.html" title="open image" class="open"></a>
<img src="images/brugges2006/2.jpg" class="full" />
<img src="images/brugges2006/2-mini.jpg" class="thumbnail" />
</div>
</div>
As you see, everything is contained in a container of id "myGallery" that contains several "imageElement" items.
Each item is composed of four values:
- The first value is enclosed in an h3 tag and defines the title,
- The second one is the current element's description and is enclosed in a paragraph tag,
- The third is the image link (url in the "href" part of the tag and title in the "title" part). (Only specify it if you have decided to show links in your gallery)
- The fourth one is the full size image file,
- And last but not least, there is finally the thumbnailed image file (Only specify it if you have decided to show the carousel in your gallery. By default, thumbnails are 100px wide and 75px tall).
Please note that the order of the values inside an element is not important, but their classes and type are. You can fully customize how the values are fetched by setting some options.
Third step: Call it and feed it.
Now that we prepared the content, let's call our gallery (or slideshow) for lunch time.
There are several options, but let's try the most used patterns (insert the code in your page):
To obtain a non-timed gallery:
<script type="text/javascript">
function startGallery() {
var myGallery = new gallery($('myGallery'), {
timed: false
});
}
window.addEvent('domready', startGallery);
</script>
To obtain a timed gallery:
<script type="text/javascript">
function startGallery() {
var myGallery = new gallery($('myGallery'), {
timed: true
});
}
window.addEvent('domready', startGallery);
</script>
To obtain a simple timed slideshow with links:
<script type="text/javascript">
function startGallery() {
var myGallery = new gallery($('myGallery'), {
timed: true,
showArrows: false,
showCarousel: false
});
}
window.addEvent('domready', startGallery);
</script>
To obtain a simple showcase slideshow without links (aka "manually rotated" slideshow):
<script type="text/javascript">
function startGallery() {
var myGallery = new gallery($('myGallery'), {
timed: false,
showArrows: true,
showCarousel: false,
embedLinks: false
});
}
window.addEvent('domready', startGallery);
</script>
As you've seen, the first argument to the gallery creator is the element on which you want to apply the gallery. The second argument (optional) is the option dictionary containing all the gallery options.
Fourth step: Set its size.
The final step, set the slideshow size in your stylesheets like this (the default size is 460x345):
#myGallery
{
width: 400px !important;
height: 200px !important;
}
Fifth step: Taking care of thumbnails.
Unless you deactivate the carousel, you will need working thumbnails.
To generate the thumbnails, you have different options:
Using the included php script to resize the pictures. To do that, use the option:
useThumbGenerator: true
- If you use it:
- Don't forget to make a "cache/" folder that is world writeable, so the script can cache your images.
- Remove the images with class "thumbnail" from your element.
- Making your own generator or using manually resized images.
To do so, use the way described above in the second step to give the thumbnail urls to SmoothGallery.
Optional step: Adding the History Manager plugin.
To enable urls that include the current slideshow position you have to do some simple things :
Include this line in your header:
<script src="scripts/HistoryManager.js" type="text/javascript"></script>
Then, call your gallery like this (you may change the options according to your needs):
<script type="text/javascript">
function startGallery() {
var myGallery = new gallery($('myGallery'), {
timed: false,
useHistoryManager: true
});
HistoryManager.start();
}
window.addEvent('domready', startGallery);
</script>
You might also like


Tags
accordion accordion menu animation navigation animation navigation menu carousel checkbox inputs css3 css3 menu css3 navigation date picker dialog drag drop drop down menu drop down navigation menu elastic navigation form form validation gallery glide navigation horizontal navigation menu hover effect image gallery image hover image lightbox image scroller image slideshow multi-level navigation menus rating select dependent select list slide image slider menu stylish form table tabs text effect text scroller tooltips tree menu vertical navigation menu