 Subscribe
 Follow Us
Awesome jQuery and CSS3 Shiny Knob Control
 12 years ago
 24661
24661 3301
3301
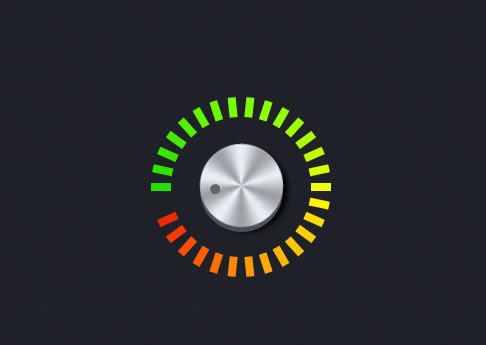
In this tutorial we will be writing a jQuery plugin for creating a shiny knob control. Aptly named knobKnob, this plugin will use CSS3 transformations and jQuery’s new event handling methods to give visitors of your website a new way of interactively choosing a value from a range.
The HTML
The HTML markup for the page is rather straightforward. We are only going to need a placeholder element for the control – the rest is going to be dynamically generated by the plugin. Just in case, here is the complete markup of the page:
index.html
<!DOCTYPE html>
<html>
<head>
<meta charset="utf-8" />
<title>Shiny Switches with CSS3 & jQuery | Tutorialzine Demo</title>
<!-- CSS stylesheets -->
<link rel="stylesheet" href="assets/css/styles.css" />
<link rel="stylesheet" href="assets/knobKnob/knobKnob.css" />
<!--[if lt IE 9]>
<script src="http://html5shiv.googlecode.com/svn/trunk/html5.js"></script>
<![endif]-->
</head>
<body>
<section id="main">
<div id="bars">
<div id="control">
<!-- The knob markup will go here -->
</div>
<!-- The colorful dividers will go here -->
</div>
</section>
<!-- JavaScript includes -->
<script src="http://code.jquery.com/jquery-1.7.1.min.js"></script>
<script src="assets/knobKnob/transform.js"></script>
<script src="assets/knobKnob/knobKnob.jquery.js"></script>
<script src="assets/js/script.js"></script>
</body>
</html>
First we include the latest version of jQuery, transform.js which levels cross-browser support of the CSS3 transform properties we will be using, the knobKnob plugin file and script.js, which pulls everything together.
The #control div is where the plugin markup will be generated. Below we will insert divs that will become the colorful bars around it. They are not part of the KnobKnob plugin, we will be showing them depending on the chosen value in the control. KnobKnob also comes with a stylesheet that determines the looks of the knob. You can see it included in the head section.
Now lets write this plugin!
The jQuery Code
You can find the plugin source files in the knobKnob folder. To use it in your project simply unzip it in your website’s assets folder and include the files you find inside. Here is the actual plugin file:
assets/knobKnob/knobKnob.jquery.js
/**
 * @name		jQuery KnobKnob plugin
 * @author		Martin Angelov
 * @version 	1.0
 * @url			http://tutorialzine.com/2011/11/pretty-switches-css3-jquery/
 * @license		MIT License
 */

(function($){

	$.fn.knobKnob = function(props){

		var options = $.extend({
			snap: 0,
			value: 0,
			turn: function(){}
		}, props || {});

		var tpl = '<div class="knob">\
				<div class="top"></div>\
				<div class="base"></div>\
			</div>';

		return this.each(function(){

			var el = $(this);
			el.append(tpl);

			var knob = $('.knob',el)
				knobTop = knob.find('.top'),
				startDeg = -1,
				currentDeg = 0,
				rotation = 0,
				lastDeg = 0,
				doc = $(document);

			if(options.value > 0 && options.value <= 359){
				rotation = currentDeg = options.value;
				knobTop.css('transform','rotate('+(currentDeg)+'deg)');
				options.turn(currentDeg/359);
			}

			knob.on('mousedown', function(e){

				e.preventDefault();

				var offset = knob.offset();
				var center = {
					y : offset.top + knob.height()/2,
					x: offset.left + knob.width()/2
				};

				var a, b, deg, tmp,
					rad2deg = 180/Math.PI;

				knob.on('mousemove.rem',function(e){

					a = center.y - e.pageY;
					b = center.x - e.pageX;
					deg = Math.atan2(a,b)*rad2deg;

					// we have to make sure that negative
					// angles are turned into positive:
					if(deg<0){
						deg = 360 + deg;
					}

					// Save the starting position of the drag
					if(startDeg == -1){
						startDeg = deg;
					}

					// Calculating the current rotation
					tmp = Math.floor((deg-startDeg) + rotation);

					// Making sure the current rotation
					// stays between 0 and 359
					if(tmp < 0){
						tmp = 360 + tmp;
					}
					else if(tmp > 359){
						tmp = tmp % 360;
					}

					// Snapping in the off position:
					if(options.snap && tmp < options.snap){
						tmp = 0;
					}

					// This would suggest we are at an end position;
					// we need to block further rotation.
					if(Math.abs(tmp - lastDeg) > 180){
						return false;
					}

					currentDeg = tmp;
					lastDeg = tmp;

					knobTop.css('transform','rotate('+(currentDeg)+'deg)');
					options.turn(currentDeg/359);
				});

				doc.on('mouseup.rem',function(){
					knob.off('.rem');
					doc.off('.rem');

					// Saving the current rotation
					rotation = currentDeg;

					// Marking the starting degree as invalid
					startDeg = -1;
				});

			});
		});
	};

})(jQuery);
Read more:http://tutorialzine.com/2011/11/pretty-switches-css3-jquery/
You might also like

Tags
accordion accordion menu animation navigation animation navigation menu carousel checkbox inputs css3 css3 menu css3 navigation date picker dialog drag drop drop down menu drop down navigation menu elastic navigation form form validation gallery glide navigation horizontal navigation menu hover effect image gallery image hover image lightbox image scroller image slideshow multi-level navigation menus rating select dependent select list slide image slider menu stylish form table tabs text effect text scroller tooltips tree menu vertical navigation menu