 Subscribe
 Follow Us
Sweet Pages: A jQuery Pagination Solution
 14 years ago
 18729
18729 3400
3400
We are making a jQuery plugin that will enable you to convert a regular unordered list of items into a SEO friendly set of easily navigatable pages. It can be used for comment threads, slideshows, or any kind of structured content.
Step 1 – XHTML
The first step of the tutorial is to set up the XHTML markup. The plugin only needs an unordered list, UL, with some li elements inside it. Here is the code from demo.html, which you can find in the download archive:
demo.html
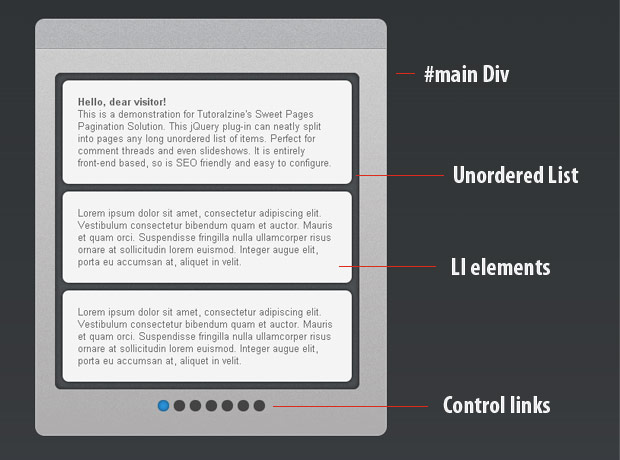
<div id="main">
 <ul id="holder">
  <li>Lorem ipsum dolor sit amet...</li>
  <li>Lorem ipsum dolor sit amet...</li>
  <li>Lorem ipsum dolor sit amet...</li>
  <li>Lorem ipsum dolor sit amet...</li>
 </ul>
</div>
The main div acts as a container for the paginated UL, and is styled with a nice light-gray background. The unordered list holds the list elements (hence the id).
In most practical situations, the markup above would probably be generated by a back-end script, freeing you from having to do it manually. You could have all sorts of content inside those LIs, as the height and size is dynamically calculated by jQuery (just a reminder – if you plan on using images, specify the width and the height).
Step 2 – CSS
After creating the XHTML markup, we can move on to styling it. If is a good idea to style your pages as if there were no navigation, as the plug-in is JavaScript dependent. This means that it is possible that some users will not be able to see nor use the pagination.
styles.css – Part 1
#main{
 /* The main container div */
 position:relative;
 margin:50px auto;
 width:410px;
 background:url('img/main_bg.jpg') repeat-x #aeadad;
 border:1px solid #CCCCCC;
 padding:70px 25px 60px;

 /* CSS3 rounded cornenrs */

 -moz-border-radius:12px;
 -webkit-border-radius:12px;
 border-radius:12px;
}

#holder{
 /* The unordered list that is to be split into pages */

 width:400px;
 overflow:hidden;
 position:relative;
 background:url('img/dark_bg.jpg') repeat #4e5355;
 padding-bottom:10px;

 /* CSS3 inner shadow (the webkit one is commeted, because Google Chrome
  does not like rounded corners combined with inset shadows): */

 -moz-box-shadow:0 0 10px #222 inset;
 /*-webkit-box-shadow:0 0 10px #222 inset;*/
 box-shadow:0 0 10px #222 inset;
}

.swControls{
 position:absolute;
 margin-top:10px;
}
First we style the main div and the unordered list (the latter is assigned the id of holder).
Notice how we use the CSS3 box shadow property with the inset attribute, to mimic an inner shadow. As with most CSS3 rules, we still have to provide vendor-specific prefixes for Mozilla (Firefox) and Webkit browsers (Safri and Chrome).
You can see that the webkit version of the property is commented out. This is because there is a bug in the rendering of box shadows in Chrome, when combined with the border-radius property (the shadows are rendered as if the div is square, ignoring the rounded corners and thus ruining the effect).
styles.css – Part 2
a.swShowPage{

 /* The links that initiate the page slide */

 background-color:#444444;
 float:left;
 height:15px;
 margin:4px 3px;
 text-indent:-9999px;
 width:15px;
 /*border:1px solid #ccc;*/

 /* CSS3 rounded corners */

 -moz-border-radius:7px;
 -webkit-border-radius:7px;
 border-radius:7px;
}

a.swShowPage:hover,
a.swShowPage.active{
 background-color:#2993dd;

 /* CSS3 inner shadow */

 -moz-box-shadow:0 0 7px #1e435d inset;
 /*-webkit-box-shadow:0 0 7px #1e435d inset;*/
 box-shadow:0 0 7px #1e435d inset;
}

#holder li{
 background-color:#F4F4F4;
 list-style:none outside none;
 margin:10px 10px 0;
 padding:20px;
 float:left;

 /* Regular CSS3 box shadows (not inset): */

 -moz-box-shadow:0 0 6px #111111;
 -webkit-box-shadow:0 0 6px #111111;
 box-shadow:0 0 6px #111111;
}

#holder,
#holder li{
 /* Applying rouded corners to both the holder and the holder lis */
 -moz-border-radius:8px;
 -webkit-border-radius:8px;
 border-radius:8px;
}

.clear{
 /* This class clears the floated elements */
 clear:both;
}
In the second part of the code, we style the page control links and the li elements. As you can see on line 46, we are applying rounded corners to both the unordered list and the li elements in one declaration, which saves us a from duplicating code.
Lastly is the clear class, which is used to clear the floats of the elements, also known as the clearfix technique.
Step 3 – jQuery
Moving to the last part of the tutorial, we need to include the latest version of the jQuery library in the page. Performance-wise, it is best to include all external JavaScript files just before the closing body tag, as scripts block he rendering of the page.
script.js – Part 1
(function($){

// Creating the sweetPages jQuery plugin:
$.fn.sweetPages = function(opts){

 // If no options were passed, create an empty opts object
 if(!opts) opts = {};

 var resultsPerPage = opts.perPage || 3;

 // The plugin works best for unordered lists,
 // although OLs would do just as well:
 var ul = this;
 var li = ul.find('li');

 li.each(function(){
  // Calculating the height of each li element,
  // and storing it with the data method:

  var el = $(this);
  el.data('height',el.outerHeight(true));
 });

 // Calculating the total number of pages:
 var pagesNumber = Math.ceil(li.length/resultsPerPage);

 // If the pages are less than two, do nothing:
 if(pagesNumber<2) return this;

 // Creating the controls div:
 var swControls = $('<div class="swControls">');

 for(var i=0;i<pagesNumber;i++)
 {
  // Slice a portion of the li elements, and wrap it in a swPage div:
  li.slice(i*resultsPerPage,(i+1)*resultsPerPage).wrapAll('<div class="swPage" />');

  // Adding a link to the swControls div:
  swControls.append('<a href="" class="swShowPage">'+(i+1)+'</a>');
 }

 ul.append(swControls);
Creating a jQuery plug-in is not as hard as you might think. We just need to create a new function as a property of jQuery.fn (or $.fn, as given here). The this of the function points to the original jQuery object that it was called on.
Moving from there, we check for the existence of the opts object and set resultsPerPage accordingly. This is the number of li elements that are going to be grouped as a page.
After this, we calculate the total number of pages with the Math.ceil() function. It rounds the result to the nearest greater integer, which gives the correct number of pages.
Now that we have the number of pages obtained, we can enter a for loop in which we split the li elements into portions and wrap them in a swPage div, forming a page. Keep in mind that calling the jQuery slice() method on line 36 creates a new set of elements and leaves the original set intact (thus in every iteration of the for loop we start with the original set of li elements).
script.js – Part 2
 var maxHeight = 0;
 var totalWidth = 0;

 var swPage = ul.find('.swPage');
 swPage.each(function(){

  // Looping through all the newly created pages:

  var elem = $(this);

  var tmpHeight = 0;
  elem.find('li').each(function(){tmpHeight+=$(this).data('height');});

  if(tmpHeight>maxHeight)
   maxHeight = tmpHeight;

  totalWidth+=elem.outerWidth();

  elem.css('float','left').width(ul.width());
 });

 swPage.wrapAll('<div class="swSlider" />');

 // Setting the height of the ul to the height of the tallest page:
 ul.height(maxHeight);

 var swSlider = ul.find('.swSlider');
 swSlider.append('<div class="clear" />').width(totalWidth);

 var hyperLinks = ul.find('a.swShowPage');

 hyperLinks.click(function(e){

  // If one of the control links is clicked, slide the swSlider div
  // (which contains all the pages) and mark it as active:

  $(this).addClass('active').siblings().removeClass('active');

  swSlider.stop().animate({'margin-left': -(parseInt($(this).text())-1)*ul.width()},'slow');
  e.preventDefault();
 });

 // Mark the first link as active the first time the code runs:
 hyperLinks.eq(0).addClass('active');

 // Center the control div:
 swControls.css({
  'left':'50%',
  'margin-left':-swControls.width()/2
 });

 return this;

}})(jQuery);
In the second part of the script, we loop through the newly created pages, set their sizes and float them to the left. In the process we also find the tallest page, and set the height of the ul accordingly.
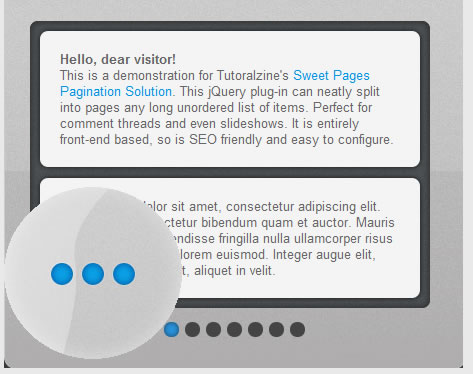
We also wrap the pages inside a swSlider div, which is wide enough to display them side by side. After this we listen for the click event on the control links, and slide the swSlider div with the animate method. This creates the slide effect that, observed in the demo.
script.js – Part 3
$(document).ready(function(){
 /* The following code is executed once the DOM is loaded */

 // Calling the jQuery plugin and splitting the
 // #holder UL into pages of 3 LIs each:

 $('#holder').sweetPages({perPage:3});

 // The default behaviour of the plugin is to insert the
 // page links in the ul, but we need them in the main container:

 var controls = $('.swControls').detach();
 controls.appendTo('#main');

});
In the last part of the code, we just a call to the plugin and passing the perPage setting . Also notice the use of the detach method, introduced in jQuery 1.4. It removes elements from the DOM, but leaves all the event listeners intact. It enables us to move the controls outside of the UL they were originally inserted in, keeping the click functionality in place.
With this our sweet pagination solution with jQuery and CSS3 is complete!
You might also like


Tags
accordion accordion menu animation navigation animation navigation menu carousel checkbox inputs css3 css3 menu css3 navigation date picker dialog drag drop drop down menu drop down navigation menu elastic navigation form form validation gallery glide navigation horizontal navigation menu hover effect image gallery image hover image lightbox image scroller image slideshow multi-level navigation menus rating select dependent select list slide image slider menu stylish form table tabs text effect text scroller tooltips tree menu vertical navigation menu