 Subscribe
 Follow Us
Add Form Validation using jQuery in 2 Easy Steps
 14 years ago
  10259
10259  2639
2639
 n/a
n/a
Sometimes you may find yourself working on projects that require some intelligent form field validation..but what’s the easiest way to achieve this? I’ve used everything from the popular Validate plugin to Spry components, but I found all of them a little too much to achieve something so simple. In this post I’m going to show you how to add sleek form validation to your input fields in just two easy steps.
you can include with jQuery as follows:
<script type="text/javascript" src="jquery.js"></script>
<script type="text/javascript" src="validation.js"></script>
To keep things simple our jQuery Plugin uses a template structure for each input field you would like to validate. For this post, I’m going to use the "username" field as an example of how to use it.
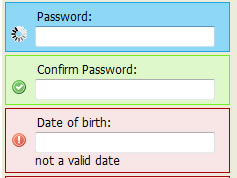
1. Here is our input field template you can use for anything like usernames, passwords, addresses and so forth. Notice that we have an image area to display a notification icon and a message area to display any validation messages.
<li class="validated" id="FIELDNAME_li">
                  <label for="r_FIELDNAME">Fieldname:</label>
                  <div id="FIELDNAME_img"></div>
                  <input class="validated" name="FIELDNAME" id="FIELDNAME" type="text" maxlength="20" value=""  />
                  <div id="FIELDNAME_msg"></div>
          </li>
Lets now replace FIELDNAME with username to setup an input field that validates.
  <li class="validated" id="username_li">
                  <label for="r_username">Username:</label>
                  <div id="username_img"></div>
                  <input class="validated" name="username" id="username" type="text" maxlength="20" value=""  />
                  <div id="username_msg"></div>
          </li>
2. The next stage of setting up a new text field for validation is adding our "username" field to our JavaScript. This takes the form of a check to see if the name of one of the input fields on the page is "username" and if so, what type of validation we would like to apply on it.
JavaScript >> Validator.js
$.fn.validate = {
        init: function(o) {
          //Here’s where I’m checking for my input field name
          if(o.name == ‘username’) { this.username(o) };
          if(o.name == ‘password’) { this.password(o) };
          if(o.name == ‘email’) { this.email(o) };
          if(o.name == ‘dob’) { this.dob(o) };
        },


//and here’s where I’m definining a validation method for it
//note the regex used to make sure that our username fits the
//expected pattern


        username: function(o) {
          var user = /[(\*\(\)\[\]\+\.\,\/\?\:\;\’\"\`\~\\#\$\%\^\&\<\>)+]/;
           if (!o.value.match(user)) {
             doValidate(o);
            } else {
             doError(o,’no special characters allowed’);
            };
        }
And that’s it!. You can define as many input fields as you would like and validate their content using any type of regular expression that your project requires the data to conform to.
You might also like

Tags
accordion accordion menu animation navigation animation navigation menu carousel checkbox inputs css3 css3 menu css3 navigation date picker dialog drag drop drop down menu drop down navigation menu elastic navigation form form validation gallery glide navigation horizontal navigation menu hover effect image gallery image hover image lightbox image scroller image slideshow multi-level navigation menus rating select dependent select list slide image slider menu stylish form table tabs text effect text scroller tooltips tree menu vertical navigation menu