 Subscribe
 Follow Us
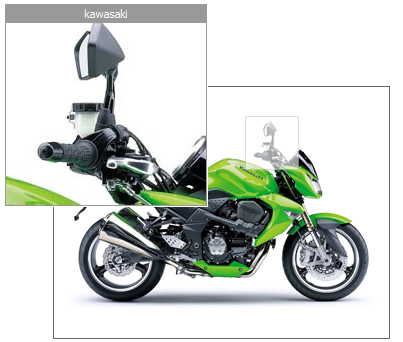
Standard zoom(jquery)
 14 years ago
  10444
10444  3170
3170
 n/a
n/a
Add first the last jQuery release, then the jQZoom script(don't forget this),the correct order is important.Look at the installation code below.
<script type='text/javascript' src='js/jquery-1.2.6.js'></script>
<script type='text/javascript' src='js/jquery.jqzoom-1.0.1.js'></script>
Add jqzoom.css to your header.
<link rel="stylesheet" type="text/css" href="css/jqzoom.css" />
Using jQZoom is easy,but you need to specify the HTML anchor element,that is going to generate the zoom revealing a portion of the enlarged image.
<a href="images/BIGIMAGE.JPG" class="MYCLASS"  title="MYTITLE">
<img src="images/SMALLIMAGE.JPG" title="IMAGE TITLE"  >
</a>
The anchor element wraps the small image you would like to zoom.Following this schema the necessary and base elements are:
SMALLIMAGE.JPG: Represents the small image you would like to zoom.
BIGIMAGE.JPG: Represents the big image that jQZoom will reveal.
MYCLASS: Represents the anchor class,that would be used to instantiate the jQZoom script to all the elements matching this class(you can use an ID as well).
MYTITLE/IMAGE TITLE: Anchor title and/or image title that will be used to show the zoom title close to the jQZoom Window.
Now load the plugin at window load.
$(document).ready(function(){
 $('.MYCLASS).jqzoom();
});
This would instantiate jQzoom in default(standard) mode.You can pass more options(Documentation section),to create special or custom effects as in the example below.
$(document).ready(function(){
 var options = {
     zoomWidth: 300,
     zoomHeight: 250,
            xOffset: 10,
            yOffset: 0,
            position: "right" //and MORE OPTIONS
};
 $('.MYCLASS).jqzoom(options);
});
You might also like


Tags
accordion accordion menu animation navigation animation navigation menu carousel checkbox inputs css3 css3 menu css3 navigation date picker dialog drag drop drop down menu drop down navigation menu elastic navigation form form validation gallery glide navigation horizontal navigation menu hover effect image gallery image hover image lightbox image scroller image slideshow multi-level navigation menus rating select dependent select list slide image slider menu stylish form table tabs text effect text scroller tooltips tree menu vertical navigation menu