 Subscribe
 Follow Us
jQuery awesome images Gallery lightbox
 13 years ago
 19047
19047 4683
4683
One of the main benefits of using a popular javascript library, such as jQuery, is the incredible number of available plug-ins that will kick-start any development project.
The XHTML
We start off with our XHTML front-end.
demo.php
<div id="container">

<div id="heading"> <!-- the heading -->
<h1>A cool jQuery gallery</h1>
</div>
<div id="gallery"> <!-- this is the containing div for the images -->

<?php
//our php code goes here
?>

<div class="clear"></div> <!-- using clearfix -->
</div>

<div id="footer"> <!-- some tutorial info -->
</div>

</div> <!-- closing the container div -->
And that is basically all there is to it. Note the highlighted area – this is where we put our PHP code, that will generate the gallery images. Now lets go through how this is done.
The PHP
The idea is simple – our PHP back-end is going to scan a folder that we’ve set up with our gallery images, and turn it into a fancy CSS & jQuery gallery. The great thing about this strategy is that it is incredibly easy to set up a gallery, and adding images to an existing one is a charm – just dump them in the gallery’s directory via FTP and it is ready to go.
demo.php
$directory = 'gallery'; //where the gallery images are located

$allowed_types=array('jpg','jpeg','gif','png'); //allowed image types

$file_parts=array();
$ext='';
$title='';
$i=0;

//try to open the directory
$dir_handle = @opendir($directory) or die("There is an error with your image directory!");

while ($file = readdir($dir_handle)) //traverse through the files
{
 if($file=='.' || $file == '..') continue; //skip links to the current and parent directories

 $file_parts = explode('.',$file); //split the file name and put each part in an array
 $ext = strtolower(array_pop($file_parts)); //the last element is the extension

 $title = implode('.',$file_parts); //once the extension has been popped out, all that is left is the file name
 $title = htmlspecialchars($title); //make the filename html-safe to prevent potential security issues

 $nomargin='';
 if(in_array($ext,$allowed_types)) //if the extension is an allowable type
 {
  if(($i+1)%4==0) $nomargin='nomargin'; //the last image on the row is assigned the CSS class "nomargin"
  echo '
  <div class="pic '.$nomargin.'" style="background:url('.$directory.'/'.$file.') no-repeat 50% 50%;">
  <a href="'.$directory.'/'.$file.'" title="'.$title.'" target="_blank">'.$title.'</a>
  </div>';

  $i++; //increment the image counter
 }
}

closedir($dir_handle); //close the directory
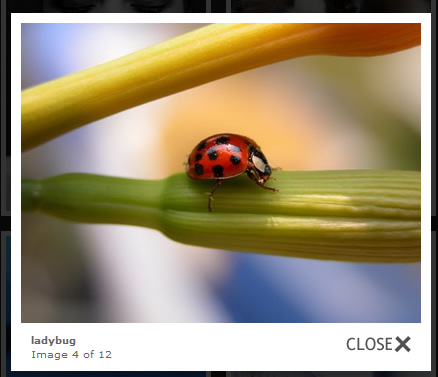
By traversing through the files in the directory and skipping the non-image files, we output some XHTML code for every image . This code (lines 28-39) consists of a div container, with a CSS class pic (and in some cases a nomargin, more on that later), and we set its background to the image file via the style attribute. We position the image in the center of the background by specifying its position to be 50% 50%. This centers it both horizontally and vertically and thus shows only the middle part, that fits into the div container’s size. This creates a nice thumbnail, with no need of actually resizing the image.
This works best with images with smaller resolutions, so you should consider resizing those 10 megapixel photos before uploading them.
The div contains a hyperlink which is linked to the image and has a title of the image filename. Both these attributes are used by the lightBox plugin to generate the lightbox gallery. So by renaming the file, you can change the caption that shows under it.
The CSS
Everything is set up, but we still have to give it that cool look.
demo.css
/* first reset some of the elements for browser compatibility */
body,h1,h2,h3,p,td,quote,small,form,input,ul,li,ol,label{
 margin:0px;
 padding:0px;
 font-family:Arial, Helvetica, sans-serif;
}

body{ /* style the body */
 margin-top:20px;
 color:white;
 font-size:13px;
 background-color:#222222;
}

.clear{ /* the clearfix class */
 clear:both;
}

a, a:visited { /* a:visited is needed so it works properly in IE6 */
 color:#00BBFF;
 text-decoration:none;
 outline:none;
}

a:hover{ /* the hover effect */
 text-decoration:underline;
}

#container{ /* the main container div */
 width:890px;
 margin:20px auto;
}

#heading,#footer{ /* the header and the footer share some of their style rules */
 background-color:#2A2A2A;
 border:1px solid #444444;
 height:20px;
 padding:6px 0 25px 15px;
 margin-bottom:30px;
 overflow:hidden;
}

#footer{ /* ..but not all */
 height:10px;
 margin:20px 0 20px 0;
 padding:6px 0 11px 15px;
}

div.nomargin{ /* our special nomargin class */
 margin-right:0px;
}

.pic{ /* divs that hold all the pictures in the gallery */
 float:left;
 margin:0 15px 15px 0;
 border:5px solid white;
 width:200px;
 height:250px;
}

.pic a{ /* in every .pic container there is a hyperlink exactly the size of the container */
 width:200px;
 height:250px;
 text-indent:-99999px;
 display:block; /* don't forget that widths and heights of hyperlinks are useless without display:block */
}

h1{ /* style the heading */
 font-size:28px;
 font-weight:bold;
 font-family:"Trebuchet MS",Arial, Helvetica, sans-serif;
}

h2{ /* the footer text */
 font-weight:normal;
 font-size:14px;
 color:white;
}
The jQuery
To make it all tick, we need to include the jQuery javascript library in our page, and add the lightBox plugin. The following code was taken from the head section of demo.php:
<link rel="stylesheet" type="text/css" href="lightbox/css/jquery.lightbox-0.5.css">
<link rel="stylesheet" type="text/css" href="demo.css" />

<script type="text/javascript" src="http://ajax.googleapis.com/ajax/libs/jquery/1.3.2/jquery.min.js"></script>
<script type="text/javascript" src="lightbox/js/jquery.lightbox-0.5.pack.js"></script>
<script type="text/javascript" src="script.js"></script>
On line 1 we include the lightbox plugin’s CSS file, which styles the lightbox that displays the images. On line 2 we include our own CSS file.
Line 4 is where we include the jQuery library from Google’s CDN. Later come the lightbox plugin itself and our own script.js file.
Now we are ready to put the finishing touch.
script.js
// after the page has finished loading
$(document).ready(function(){

 $('.pic a').lightBox({
 // we call the lightbox method, and convert all the hyperlinks in the .pic container into a lightbox gallery

  imageLoading: 'lightbox/images/loading.gif',
  imageBtnClose: 'lightbox/images/close.gif',
  imageBtnPrev: 'lightbox/images/prev.gif',
  imageBtnNext: 'lightbox/images/next.gif'

 });

});
The lighbox() method takes an object as an optional parameter. The only reason we provide any parameters is that I changed the default location of the plugin, putting it in a subfolder /lightbox which aids for a cleaner file structure. Unfortunately the images that the plug-in uses become inaccessible and have to be provided manually.
With this our gallery is complete.
You might also like

Tags
accordion accordion menu animation navigation animation navigation menu carousel checkbox inputs css3 css3 menu css3 navigation date picker dialog drag drop drop down menu drop down navigation menu elastic navigation form form validation gallery glide navigation horizontal navigation menu hover effect image gallery image hover image lightbox image scroller image slideshow multi-level navigation menus rating select dependent select list slide image slider menu stylish form table tabs text effect text scroller tooltips tree menu vertical navigation menu