 Subscribe
 Follow Us
A jQuery Plugin for Zoomable, Interactive Maps
 13 years ago
 12852
12852 2559
2559
Instructions
There are four main components required to make the plugin run: the background images, links to pages that contain html data in the correct format, some CSS for style and finally the plugin call. Below are instructions on each.
1. Background Images
There are very limited requirements on the background images:
- They must all be the same size. Sub-region background maps grow to fill the entire map area
- They should line up. Just prior to zooming, a sub-region map is placed over an area of the main map, if this doesn't line up properly, some of the zooms effect will be lost.
- The main map should highlight the zoomable regions. The plugin does not otherwise make these obvious. (Though the css could be edited to add a border or background image to the zoomable region.)
2. HTML Data
The plugin assumes a certain structure for the html data it loads via AJAX. As long as the basic structure is kept, a developer is free to add any type of content styled however they would like. Aside from the unavoidable requirements imposed by the animation, all style is isolated to CSS.
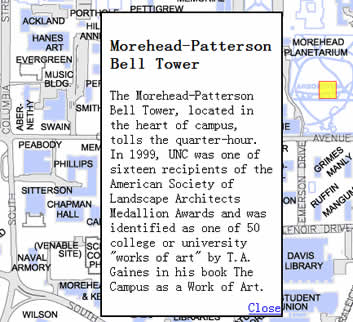
The HTML format contains information for the location and applied class of the bullets, a convention based link between the bullets and the pop-up content and the content itself. The html returned should just be a listing of the bullets and popups in the following format:
<a id="[POPUP-ID]" class="bullet" rel="[XPOS]-[YPOS]" href="[removed]void(0)"> </a>
<div id="[POPUP-ID]-box" class="popup">
 [ POPUP CONTENT ]
 <a class="close" href="[removed]void(0)">Close</a>
</div>
[POPUP-ID] should be unique for each bullet/popup. The jQuery uses this along with the "-box" convention to open the correct popup when a bullet is clicked.
3. CSS Style
As much as possible, the plugin is designed to operate exclusively on the DOM, leaving styling up to CSS. A basic css file is included with the demo zip. Here is some rough minimal css:
#map { position: relative; width: 700px; height: 470px; overflow: hidden; }
#returnlink { display: block; position: absolute; bottom: 0; right: 0; }
#map a.bullet { display: block; position: absolute; width: 10px; height: 10px; background: yellow; }
#map img.zoomable { }
#map div.popup{ display: none; position: absolute; width: 200px; height: 300px; }
#map div.popup a.close{ display: block; position: absolute; bottom: 0; right: 0; }
The code above will work just fine as a starting point. Obviously a lot of embellishment can be added to make the map look as good as the one's Liaison designed in the examples. Here are some things to note:
- The main '#map' container must be positioned absolute or relative.
- Popups must have 'display: none' set to make sure they don't flicker when they are loaded.
- Popups must be positioned using CSS. The jQuery only shows/hides them.
4. jQuery Plugin Call
The last piece that needs to be put in place is a call to the jQuery zoommap plugin that makes it all happen. In the call, we must pass the in some settings as well as a data structure that sets up the map and its different zoom levels. Here is a call for a simple two level map that contains all of the possible settings:
$('#map').zoommap({
 // Width and Height of the Map
 width: '500px',
 height: '580px',

 //Misc Settings
 blankImage: 'images/blank.gif',
 zoomDuration: 1000,
 bulletWidthOffset: '10px',
 bulletHeightOffset: '10px',

 //ids and classes
 zoomClass: 'zoomable',
 popupSelector: 'div.popup',
 popupCloseSelector: 'a.close',

 //Return to Parent Map Link
 showReturnLink: true,
 returnId: 'returnlink',
 returnText: 'return to previous map',

 //Initial map to be shown
 map: {
  id: 'campus',
  image: 'images/campus.jpg',
  data: 'popups/campus.html',
  maps: [
  {
   id: 'quads',
   parent: 'campus',
   image: 'images/quads.png',
   data: 'popups/quads.html',
   width: '200px',
   height: '232px',
   top: '18px',
   left: '176px'
  }
  ]
 }
});
Here is a breakdown/description of each of the settings:
- width/height - The width and height of the map container.
- blankImage - Path to an (transparent) image that will be used over the zoomable regions until their map is loaded.
- zoomDuration - Duration in milliseconds of the map zoom effect.
- bullet(Width/Height)Offset - Offsets that allow the coordinates of the bullets to be placed in the center of the target, rather than the corner.
- zoomClass - Class that should be applied to the zoomable region imgs.
- popupSelector - Selector the plugin should use to find the popups in the html
- showReturnLink - Whether a return link should be shown on child maps
- returnId - Id to use for the return link.
- returnText - Text to be placed in the return link.
- map - The top level map that should be shown.
Additionally each map has the following properties and can infinately nest more maps:
- id - Id that should be used for the zoomable region.
- image - Path to the image that should be used for the map. This image should be large enough to fill the entire map space.
- data - Path to the html data for the maps popups and bullets.
- width/height - Width and height of the zoomable region.
- top/left - Absolute position of the zoomable region
- maps - Children maps.
Here is a minimal call that relies on the default settings:
$('#map').zoommap({
 width: '500px',
 height: '580px',
 blankImage: 'images/blank.gif',
 map: {
  // Map structure
 }
});
And here are the default settings:
settings = $.extend({
 zoomDuration: 1000,
 zoomClass: 'zoomable',
 popupSelector: 'div.popup',
 popupCloseSelector: 'a.close',
 bulletWidthOffset: '10px',
 bulletHeightOffset: '10px',
 showReturnLink: true,
 returnId: 'returnlink',
 returnText: 'Return to Previous Map'
}, settings);
You might also like


Tags
accordion accordion menu animation navigation animation navigation menu carousel checkbox inputs css3 css3 menu css3 navigation date picker dialog drag drop drop down menu drop down navigation menu elastic navigation form form validation gallery glide navigation horizontal navigation menu hover effect image gallery image hover image lightbox image scroller image slideshow multi-level navigation menus rating select dependent select list slide image slider menu stylish form table tabs text effect text scroller tooltips tree menu vertical navigation menu