 Subscribe
 Follow Us
Sliding Image Gallery jQuery Plugin
 13 years ago
 13980
13980 2860
2860
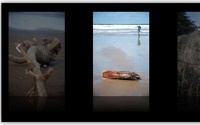
The idea behind this plug-in is to display a varying number of images in an attractive and easy to use manner. The inspiration for this plug-in this iTunes album viewer. The SlidingGallery plug-in will take a group of images and turn them into a cyclical gallery of images which the user can click through. One image will be centered on the screen, with two smaller images off to the sides. The user can click either of the smaller images to bring them to the center, or the center image to enlarge it. For optimal use, this plug-in should be applied to seven or more images, but can work with fewer (images will be duplicated in order to bring the total to seven).
You also have the option to allow users to view your image alt tags as captions on the zoomed in images. If you choose to enable this option, a small arrow will appear in the top right corner of zoomed in images. Users can click this to drop-down a caption box containing some text that you define as a parameter on your image. If you choose, you can specify that your alt tags should be used as the captions. When the user is done viewing the caption, they can either click an up arrow to hide the caption again, or simply click on the image to hide the caption and zoom out. You can also choose the images to use for the up and down arrows, and the styling of the caption boxes.
You can see from examining the source of the demos that this plug-in fairly simple to use. Throw your images onto the page however you like, and define a few parameters on them. The critical part of this is that one of the images MUST have the startClass assigned to it. By default this is "start" but you can set it to whatever you like using the options parameter. Here's how I put the images on the page for my demo:
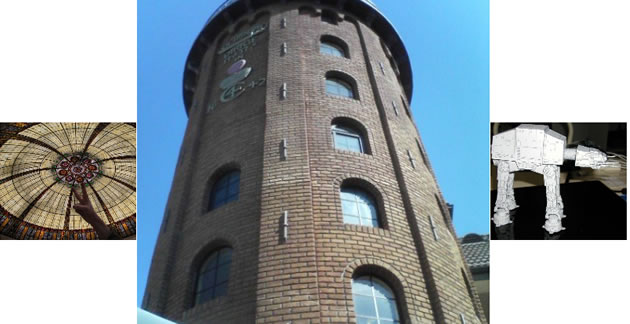
 <div class="gallery">
 <img src="Images/SlidingGallery/atat.jpg" />
 <img src="Images/SlidingGallery/babyLeia.jpg" />
 <img src="Images/SlidingGallery/cutout.jpg" />
 <img src="Images/SlidingGallery/gunslinger1.jpg" class="start" layout="portrait" />
 <img src="Images/SlidingGallery/gunslinger2.jpg" layout="portrait" />
 <img src="Images/SlidingGallery/lights.jpg" layout="portrait" />
 <img src="Images/SlidingGallery/lion.jpg" />
 <img src="Images/SlidingGallery/punisher.jpg" layout="portrait" />
 <img src="Images/SlidingGallery/royBatty.jpg" layout="portrait" />
 <img src="Images/SlidingGallery/stainedGlass.jpg" />
 <img src="Images/SlidingGallery/tower.jpg" layout="portrait" />
 </div>
You'll notice that some of the images have a parameter "layout" set to "portrait." I imagine the intent is pretty obvious, but I should explain. SlidingGallery allows you to set a default layout of either "portrait" or "landscape." Any images that you send to the gallery that DON'T have a layout parameter of either "portrait" or "landscape" will be set to this default layout. Because the default layout is automatically "landscape," we only have to set the layout parameter on those images that should be portrait. Once the images are on the page and parameterized to your satisfaction, simply select the ones you want in the gallery and call SlidingGallery like so:
 $(function() {
 $('div.gallery img').slidingGallery();
 });
Or you can do like I did in Demo #2, and change some of the options around:
 $(function() {
 var zoomFunc = function(dimension) {
 return dimension * 1.5;
 }
 var shrinkFunc = function(dimension) {
 return dimension * 0.5;
 }
 $('div.gallery img').slidingGallery({
 'slideSpeed':'slow',
 'Lzoom':zoomFunc,
 'Pzoom':zoomFunc,
 'Lshrink':shrinkFunc,
 'Pshrink':shrinkFunc
 });
 });
And that's all there is to it!
Positioning the Gallery
If you want to include a gallery on a page with other content, it will probably be important to position it. For this purpose, you can use a container to allow your gallery to positioned wherever you would like. All you need to do is place all of your images within a containing element (such as a <div> or <td>), and give this element a height and width. The height and width are important, as they allow the gallery to be correctly positioned within the container. See below for an example:
 <div class="gallery" style="top:300px; left:0px; width:1000px; height:500px;">
 <img src="Images/SlidingGallery/atat.jpg" />
 <img src="Images/SlidingGallery/babyLeia.jpg" />
 <img src="Images/SlidingGallery/cutout.jpg" />
 <img src="Images/SlidingGallery/gunslinger1.jpg" class="start" layout="portrait" />
 <img src="Images/SlidingGallery/gunslinger2.jpg" layout="portrait" />
 <img src="Images/SlidingGallery/lights.jpg" layout="portrait" />
 <img src="Images/SlidingGallery/lion.jpg" />
 <img src="Images/SlidingGallery/punisher.jpg" layout="portrait" />
 <img src="Images/SlidingGallery/royBatty.jpg" layout="portrait" />
 <img src="Images/SlidingGallery/stainedGlass.jpg" />
 <img src="Images/SlidingGallery/tower.jpg" layout="portrait" />
 </div>
Then, when you call the sliding gallery, pass your container through the options parameter:
 $(function() {
 $('div.gallery img').slidingGallery({
 container: $('div.gallery')
 });
 });
A word to the wise, in order for the positioning to work correctly, the container's css position attribute is set to relative.
A Brief Word On Captions
The caption feature was added separately, after the rest of the gallery was completed, so it only seems appropriate to give them some personal attention. The idea behind them is to provide an alternative to the standard browser alt tags. Because different browsers handle alt tags differently, I wanted to provide a standardized captioning ability that would be consistant across browsers. Additionally, this feature will allow you to provide more detailed descriptions than might traditionally go in an alt tag. The most important part of the captions is that you can style them however you choose. I've exposed both the style element and class name of the caption box, so you can customize as much as you like. By default they are simply a partially transparent white box that drops down over the top of the image.
Options
The following table has a listing of all the possible option settings, their default values, their valid values, and a brief description of each.
| Parameter | Default Value | Values | Description |
|---|---|---|---|
| container | null | A valid jQuery selector of a single container DOM object | The element in which the gallery should be contained. |
| Lheight | 300 | A pixel value | The height of a landscape image in the center position. |
| Lwidth | 400 | A pixel value | The width of a landscape image in the center position. |
| Lshrink | inputParameter * 0.75 | A function that accepts a single integer parameter and returns an integer. | This function is used to shrink landscape images in the left, right, leftStorage, and rightStorage positions. It is applied once to create the left and right images, twice to create the leftStorage and rightStorage (i.e. leftImage.Lwidth = Lshrink(centerImage.Lwidth) and leftImageStorage = Lshrink(leftImage.Lwidth)). |
| Lzoom | inputParameter * 2 | A function that accepts a single integer parameter and returns an integer. | This function is used to enlarge landscape images for zooming on the center image. |
| Pheight | 400 | A pixel value | The height of a portrait image in the center position. |
| Pwidth | 300 | A pixel value | The width of a portrait image in the center position. |
| Pshrink | inputParameter * 0.75 | A function that accepts a single integer parameter and returns an integer. | This function is used to shrink portrait images in the left, right, leftStorage, and rightStorage positions. It is applied once to create the left and right images, twice to create the leftStorage and rightStorage (i.e. leftImage.Pwidth = Pshrink(centerImage.Pwidth) and leftImageStorage = Pshrink(leftImage.Pwidth)). |
| Pzoom | inputParameter * 2 | A function that accepts a single integer parameter and returns an integer. | This function is used to enlarge portrait images for zooming on the center image. |
| defaultLayout | 'landscape' | 'landscape' or 'portrait' | The layout attribute to apply to any images whose layout is not specified. |
| startClass | 'start' | Any valid CSS class string. | The class to use when determining which image should be placed in the center position at the start of the gallery. |
| slideSpeed | 'normal' | 'slow'/'normal'/'fast' or a millisecond value | The speed of the slide animation. |
| zoomSpeed | 'fast' | 'slow'/'normal'/'fast' or a millisecond value | The speed of the zoom animation. |
| gutterWidth | 50 | A pixel value | The horizontal distance between images. |
| captionUpPath | "images/SlidingGallery captionUpArrow.png" | A virtual file path | The location of the image you want to use for the "caption up" icon. |
| captionUpWidth | 24 | A pixel value | The width of the "caption up" icon. |
| captionUpHeight | 17 | A pixel value | The height of the "caption up" icon. |
| captionUpID | "captionArrowUp" | A valid HTML ID string | The ID attribute to use for the "caption up" icon. |
| captionDownPath | "images/SlidingGallery captionDownArrow.png" | A virtual file path | The location of the image you want to use for the "caption down" icon. |
| captionDownWidth | 24 | A pixel value | The width of the "caption down" icon. |
| captionDownHeight | 17 | A pixel value | The height of the "caption down" icon. |
| captionDownID | "captionArrowDown" | A valid HTML ID string | The ID attribute to use for the "caption down" icon. |
| captionHeight | imageHeight * 0.1 | A function that takes in an integer value, and returns an integer value | The function to use to determine the height of a caption. Must accept the height of the image as a parameter (note that this doesn't mean you have to USE it in your function). |
| captionStyle | background-color: white; color: black; font-weight: bold;; opacity: 0.6; filter: alpha(opacity = 60); font-size: 16px; text-align: center; |
A valid CSS style attribute | The CSS styling to apply to caption boxes |
| captionClass | "captionBox" | A valid CSS class name | The CSS class to apply to captions |
| captionID | "activeCaption" | A valid HTML ID string | The ID attribute to use for the current caption box |
| captionTextAttribute | "caption" | A valid HTML attribute name | The attribute name to take caption text from. Use "alt" if you want your alt tags to be used as captions. |
| useCaptions | false | true/false | Allow captions to be shown |
You might also like


Tags
accordion accordion menu animation navigation animation navigation menu carousel checkbox inputs css3 css3 menu css3 navigation date picker dialog drag drop drop down menu drop down navigation menu elastic navigation form form validation gallery glide navigation horizontal navigation menu hover effect image gallery image hover image lightbox image scroller image slideshow multi-level navigation menus rating select dependent select list slide image slider menu stylish form table tabs text effect text scroller tooltips tree menu vertical navigation menu