 Subscribe
 Follow Us
Making a Photoshoot Effect With jQuery & CSS
 14 years ago
 20396
20396 2923
2923
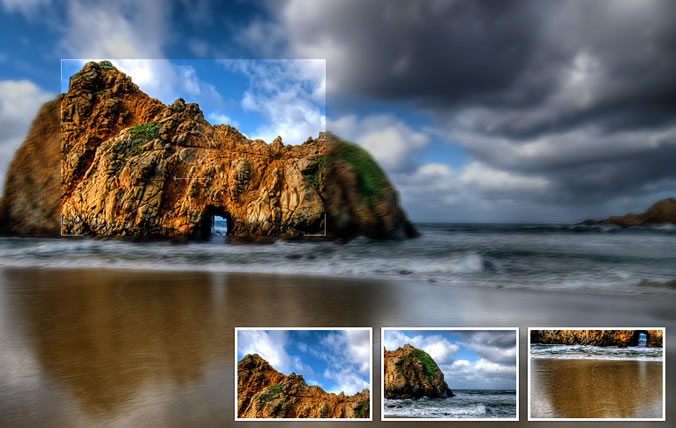
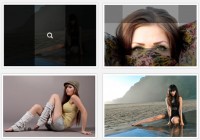
We are creating a photo shoot effect with our just-released PhotoShoot jQuery plug-in. With it you can convert a regular div on the page into a photo shooting stage simulating a camera-like feel. Using this plug-in, we give visitors the ability to take shots of the background image.
Step 1 – XHTML
As most of the work is handled by the PhotoShoot jQuery plug-in, our work is reduced to only provide a div that is going to be transformed into a photo shooting stage (we still have to pass a configuration object holding the image we want displayed, along with a few other options though).
demo.html
<div id="main">

<!-- The plugin automatically inserts the needed markup here -->

</div>
You can have this div anywhere on your page. You’ll need to specify a fixed width and height in the stylesheet in order for this to work properly. After the page loads and the plug-in is initialized, additional code is inserted into this div.
demo.html
<div id="main">

<div class="blur" style="......"></div>
<div class="blur" style="......"></div>
<!--  8 more blur divs -->

<div class="overlay" style="opacity: 0.2;"></div>

<div style="......" class="viewFinder">
<img src="photoShoot/viewfinder.png" width="300" height="200">
</div>

<!-- Additional html for the shots is inserted here. Not part of the plug-in.  -->

</div>
A whole lot has changed here. As mentioned earlier, the blur effect is achieved by stacking transparent divs on top of each other – the blur divs. After this is the overlay div, which darkens the layers below it, according to the opacity option passed to the plug-in.
Finally we have the viewfinder, which follows the mouse movements on the area and has the non-blurred version of the image as its background.
To ensure maximum flexibility, the plug-in provides a way to execute a user-defined function when a click occurs. This is exactly what we use to simulate a camera flash and to insert a new shot in the album div, which is not part of the plug-in.
Step 2 – CSS
The plug-in comes with its own stylesheet (photoShoot/jquery.photoShoot-1.0.css in the demo files) which defines the look of the photo shoot components, so we are only left with styling the rest of the page.
styles.css
#main{
 /* This div is converted to a photoShoot stage by the Photo Shoot plug-in */
 margin:0 auto;
 width:960px;
 height:600px;
}

.shot{
 /* These contain a scaled down version of the background image: */

 border:3px solid #FCFCFC;
 float:right;
 position:relative;
 margin-left:10px;
 overflow:hidden;

 /* Adding a CSS3 shadow below the shots: */

 -moz-box-shadow:0 0 2px black;
 -webkit-box-shadow:0 0 2px black;
 box-shadow:0 0 2px black;
}

.shot img{
 display:block;
}

.album{
 /* This div holds the shots */
 bottom:50px;
 height:110px;
 overflow:hidden;
 position:absolute;
 right:20px;
 width:490px;
}

.album .slide{
 /* The slide div is contained in album  */
 width:700px;
 height:110px;
 position:relative;
 left:-210px;
}
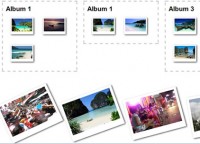
Each shot is dynamically inserted by our own custom shoot function when a click event occurs (as you will see in the next step of the tutorial). The shots are basically a scaled down version of the background image (this means that the image is downloaded once and used multiple times), which are offset to the top and bottom, according to the position of the viewfinder in the moment the event occurred.
The album and slide divs are added by our own jQuery script (not by the plug-in). The principle here is that the slide div is larger than its parent, the album div, and the shot is slid to the left when inserted, but more on that in a moment.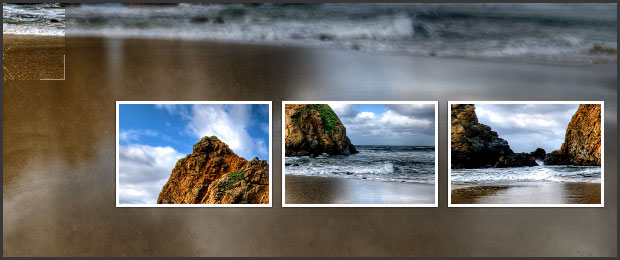
Step 3 – jQuery
The photoShoot plug-in itself will not be discussed here as you can read more about it on its official page. We do need, however, some additional jQuery code which:
- Inserts the .album to the #main div;
- Chooses a random flickr image from an array to be fed to the plug-in;
- Creates the options object;
- Defines a custom shot function which is called on mouse click by the plug-in;
- Calls the plug-in with the .photoshoot() method.
script.js
$(document).ready(function(){

 // This code is executed after the DOM has been completely loaded

 // Assigning the jQuery object to a variable for speed:
 var main = $('#main');

 // Setting the width of the photoshoot area to
 // 1024 px or the width of the document - whichever is smallest:

 main.width(Math.min(1024,$(document).width()));

 // Creating an array with four possible backgrounds and their sizes:
 var pics = new Array(
    { url:'http://farm4.static.flickr.com/3595/3405361333_77f2a5e731_b.jpg', size:{x:1024,y:677}},
    { url:'http://farm4.static.flickr.com/3028/2753126743_4249a4e948_b.jpg', size:{x:1024,y:768}},
    { url:'http://farm4.static.flickr.com/3641/3595250019_5a1237899a_b.jpg', size:{x:1024,y:768}},
    { url:'http://farm3.static.flickr.com/2592/4018062274_1f7f23597d_o.jpg', size:{x:1158,y:756}}
 );

 // Choosing a random picture to be passed to the PhotoShoot jQuery plug-in:
 var bg = pics[parseInt(Math.random()*4)];

 // Creating an options object (try tweeking the variables):
 var opts = {
  image  : bg.url,
  onClick  : shoot,
  opacity  : 0.8,
  blurLevel : 4
 }

 // Calling the photoShoot plug-in and converting the #main div to a photo shoot stage:
 main.photoShoot(opts);

 // Adding the album holder to the stage:
 $('<div class="album">').html('<div class="slide" />').appendTo(main);

 // Our own shoot function (it is passed as onClick to the options array above):
 function shoot(position){
  // This function is called by the plug-in when the button is pressed

  // Setting the overlay's div to white will create the illusion of a camera flash:
  main.find('.overlay').css('background-color','white');

  // The flash will last for 100 milliseconds (a tenth of the second):
  setTimeout(function(){main.find('.overlay').css('background-color','')},100);

  // Creating a new shot image:
  var newShot = $('<div class="shot">').width(150).height(100);
  newShot.append( $('<img src="'+bg.url+'" width="'+(bg.size.x/2)+'" height="'+(bg.size.y/2)+'" />').css('margin',-position.top*0.5+'px 0 0 -'+position.left*0.5+'px') );

  // Removing the fourth shot (the count starts from 0):
  $('.shot').eq(3).remove();

  // Adding the newly created shot to the album div, but moved 160px to the right.
  // We start an animation to slide it in view:

  newShot.css('margin-right',-160).prependTo('.album .slide').animate({marginRight:0},'slow');
 }
});
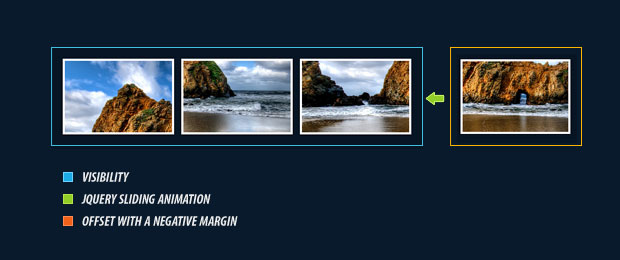
Each time you click the area, a new shot is added to the slide div with a negative margin to the right. After this an animation starts, which slides it in view and pushes the other shots to the left, hiding the leftmost one.
It is important to remove the shots that are not visible with the remove() method. This way we prevent cluttering of the DOM with unneeded elements.
With this our Photoshoot effect is complete!
You might also like

Tags
accordion accordion menu animation navigation animation navigation menu carousel checkbox inputs css3 css3 menu css3 navigation date picker dialog drag drop drop down menu drop down navigation menu elastic navigation form form validation gallery glide navigation horizontal navigation menu hover effect image gallery image hover image lightbox image scroller image slideshow multi-level navigation menus rating select dependent select list slide image slider menu stylish form table tabs text effect text scroller tooltips tree menu vertical navigation menu