 Subscribe
 Follow Us
WanderWall – A jQuery, CSS3 & HTML5 Hover-Based Interface
 13 years ago
 19201
19201 2224
2224
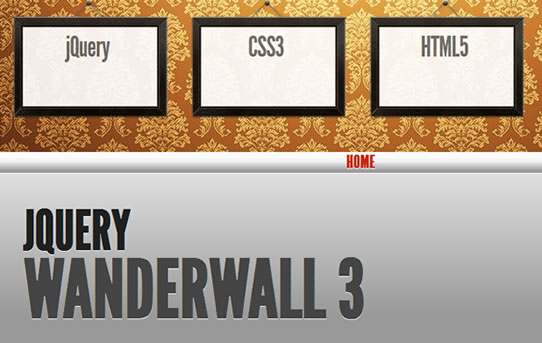
We'LLgoing to teach you how to create a useful hover-based user interface using jQuery, CSS3, HTML5 and @font-face. Why a hover-based interface? you might ask. Well, with the popularity of touch-based web applications simplifying the way that people can use sites on mobile devices, I think that there’s room for us to look into ways of making it even easier for people to use sites in desktop-based browsers too. Today’s project,WanderWall, achieves that and what we’ll be creating today could easily be used for a portfolio or business site but the concepts you’ll learn could certainly be used to expand the idea further.
Let’s Create a WanderWall
The first thing to do when creating a Hover-based interface is plan out how your interaction is going to work. I probably went through 12 different iterations planning this project before I was happy and it’s important to try thinking from a user’s perspective before you dive into the coding. Once that’s done, you’ll first want to write some HTML to define your page’s structure.
HTML for the header frames (links)
<div id="wanderwall">
<div class="wrapper">
<div class="frame first" id="frame1"> <a alt="jQuery is used to power WanderWall's animations" href="#" id="link1" style="display: block;">  <span>jQuery</span>  </a></div>
<div class="frame two" id="frame2"> <a alt="CSS3 is used for linear gradients and styling" href="#" id="link2" style="display: block;">  <span>CSS3</span>  </a></div>
<div class="frame three" id="frame3"><a alt="HTML5 powers the data-tooltip tooltips" href="#" id="link3" style="display: block;"> <span>HTML5</span> </a></div>
<div class="frame fourth" id="frame4"> <a alt="Font-Face powers the fonts" href="#" id="link4" style="display: block;">  <span>@font-face</span>  </a></div>
</div>
</div>
HTML for the sliding pages
<div class="page">
<div class="mantletext">
<h3>jQuery</h3>
<h2>Wanderwall 1</h2>
</div>
</div>
<div class="page">
<div class="mantletext">
<h3>jQuery</h3>
<h2>Wanderwall 2</h2>
</div>
</div>
<div class="page">
<div class="mantletext">
<h3>jQuery</h3>
<h2>Wanderwall 3</h2>
</div>
</div>
<div class="page">
<div class="mantletext">
<h3>jQuery</h3>
<h2>Wanderwall 4</h2>
</div>
</div>
In real life, you’ll probably define some very simple CSS to structure your design next, but to keep things simple, I’m first going to show you the important parts of the JavaScript in this project and then the final CSS3. (I recommend waiting until you’ve finishing the JavaScript side of things before ‘touching up’ the design, but you do whatever feels most comfortable.)
jQuery For Background Animation (on frame hover)
$("div.frame a").hover(function()
 {

    var currentLink = $(this);
    hideTheRest(id); id = this.id.replace("link", "");
    position = -295*id;
    marginnew =  pagewidth * id * -1;

                                /*Display the Home link if not currently on Default Page*/
    if(id > 0)
    {
      $('#homelink').show();
    }else{
      $('#homelink').hide();
    }

    /*Move the page-slider in the correct direction depending on the ID*/
    $('.pageslider').stop().animate({marginLeft: marginnew}, 800);

    /*Animate the background*/
    $('#wanderwall').stop().animate({backgroundPosition:
                               '(50% ' + position +'px )'}, 500, function()
    {
        distance = 0;
        topdis   = -190;
        text     = currentLink.attr('alt');
        infoframe  = $('#infoframe');

      /* Define offset for text*/
      switch(id)
      {
        case "1":
          distance = 500;
       break;
        case "2":
          distance = 730;
       break;
        case "3":
          distance = 200;
       break;
     case "4":
          distance = 400;
       topdis = -198;
       break;
      }

      infoframe.html(text);
      infoframe.css('margin-left', distance + 'px');
      infoframe.css('margin-top', topdis + 'px');
      infoframe.fadeIn();
    });

 }, function()
 {

    $('#infoframe').hide();
    var id = this.id.replace("link", "");
    $('#wanderwall').stop().animate({backgroundPosition: '(50% 0px)'}, 500 );
     showTheRest();

 });
jQuery For Showing And Hiding Other Elements On Hover Of One
function hideTheRest(id){
   for (var i=1; i<5; i++){
   if (i!=id)
   {

    $('#frame' + i + ' a').css('display', 'block');
                                /*Set the alpha transparency*/
    $('#frame' + i).css('filter', 'alpha(opacity=80)');
                                /*Fast-fade animation*/
    $('#frame' + i).stop().fadeTo("fast",0);
                                /*Don-t display the link*/
    $('#frame' + i + ' a').css('display', 'none');

    }
   }
   $('#infoframe').css('visibility','visible');
  }

 function showTheRest(){

  for (var i=1; i<5; i++){
    $('#frame' + i).stop().fadeTo("fast",0.8);
    $('#frame' + i).css('filter', 'alpha(opacity=80)');
           $('#frame' + i + ' a').css('display', 'inline');
           $('#frame' + i + ' a').css('display', 'block');
   }

   $('#infoframe').css('visibility','hidden');

  }
These are some extracts of the most important jQuery code used to power WanderWall. If you would like to take a deeper look into the code, I recommend checking out the source which can be downloaded at the beginning or end of this post. Let’s now take a look at some of the important CSS3.
CSS3 for the background gradient and 3D ‘mantle’ bar
body{

background:
-webkit-gradient(
    linear,
    left bottom,
    left top,
    color-stop(0.09, rgb(153,153,153)),
    color-stop(0.55, rgb(242,242,242)),
    color-stop(0.78, rgb(240,237,240))
);
background:
-moz-linear-gradient(
    center bottom,
    rgb(153,153,153) 9%,
    rgb(242,242,242) 55%,
    rgb(240,237,240) 78%
);

}

#mantle { width:100%;  height:30px; background:
-webkit-gradient(
    linear,
    left bottom,
    left top,
    color-stop(0.09, rgb(153,153,153)),
    color-stop(0.55, rgb(242,242,242)),
    color-stop(0.78, rgb(252,252,252))
);

background:
-moz-linear-gradient(
    center bottom,
    rgb(153,153,153) 9%,
    rgb(242,242,242) 55%,
    rgb(252,252,252) 78%
);

-webkit-background-origin: padding;
-webkit-background-clip: content;
border-bottom:1px solid #fff;

     }
CSS3 for Frame Rotation
 .frame:hover{
  -webkit-transform: rotate(-9deg);
  -moz-transform: rotate(-9deg);
 }
Cross-Browser @font-face
@font-face {
 font-family: 'LeagueGothicRegular';
 src: url('league_gothic-webfont.eot');
 src: local(''),
        url('league_gothic-webfont.woff') format('woff'),
        url('league_gothic-webfont.ttf') format('truetype'),
        url('league_gothic-webfont.svg#webfontwJ2IAlek') format('svg');
 font-weight: normal;
 font-style: normal;
}
CSS3 @font-face consumption and text-shadow (indentation effect) Sample
color:#444444;
letter-spacing:-1px;
text-shadow:0 1px 0 #FFFFFF;
font-family: 'LeagueGothicRegular', sans-serif;
font-size-adjust: 0.55;
font-size:40px;
margin-top:30px;
and that’s it!. You can very easily customize WanderWall for your own projects and remember that you’re not just limited to using 4 links/frames on the top. You can modify the code to have as many as you’d like and to look however you’d like too (in case for example you’d rather use buttons for the links instead of frames).
You might also like


Tags
accordion accordion menu animation navigation animation navigation menu carousel checkbox inputs css3 css3 menu css3 navigation date picker dialog drag drop drop down menu drop down navigation menu elastic navigation form form validation gallery glide navigation horizontal navigation menu hover effect image gallery image hover image lightbox image scroller image slideshow multi-level navigation menus rating select dependent select list slide image slider menu stylish form table tabs text effect text scroller tooltips tree menu vertical navigation menu