 Subscribe
 Follow Us
mootools Content Slideshow Full Of Image
 13 years ago
 10665
10665 1220
1220
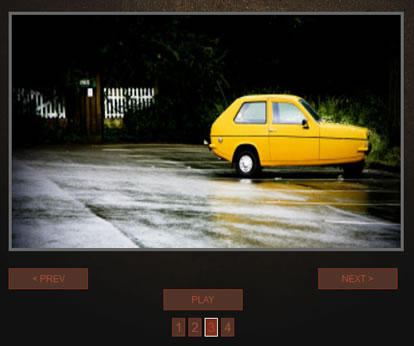
Basically, we're just going to set up everything as we normally do with the content slider - but we're going to use the functionality of MooTools' Assets package to preload the images, and at the same time use David's ProgressBar to visually display that preloading.
The HTML
You'll need to add a tiny bit of extra markup to your existing content slider page. (Hint: I usually add it inside my 'container' element.)
<div id="preloader"> </div>
I know, take a breather... that was rough.
And A Little CSS
It really depends on your layout needs, but I typically add something along these lines:
#preloader {
    visibility: hidden;  //will fade in when needed
    position: absolute;
    top: 0px;
    left: 0px;
    z-index: 9000;
    width: 200px; //arbitrary value
    height: 30px; //setting a height helps w/ lame IE issues
}

#pre_box  { border:1px solid #3dcdfe; width:200px; height:10px; background-color: #095b81;}
#pre_perc  { background:#bee1e9; height:10px; }
#pre_text { font-size:10px; color:#fff; padding:3px 0 0 10px; text-align: center; background: transparent; }
And Finally, The Javascript
Of course, to begin this we need to include our scripts.
<script type="text/javascript" src="js/moo_12.js"></script>
<script type="text/javascript" src="js/moo_12.js"></script>
<script type="text/javascript" src="js/sl_slider.js"></script>
<script type="text/javascript" src="js/dw_progress.js"></script>
And then like always, we wrap our code in a 'domready' wrapper, instantiate our classes... and make use of the Assets function. That's where things get a little different. Here's the whole block of code, and I'll breakdown the new parts afterwards:
//slider variables for making things easier below
var itemsHolder = $('container');
var myItems = $$(itemsHolder.getElements('.item'));

//controls for slider
var theControls = $('controls1');
var numNavHolder = $(theControls.getElement('ul'));
var thePlayBtn = $(theControls.getElement('.play_btn'));
var thePrevBtn = $(theControls.getElement('.prev_btn'));
var theNextBtn = $(theControls.getElement('.next_btn'));
var thePreloader = $('preloader');


//create array from images to preload, and hide (will unhide when loaded)
var theImages = new Array();
myItems.each(function(el, i){
 var tempImg = $(el.getElement('img'));
 var tempSrc = tempImg.getProperty('src');
 theImages.push(tempSrc);
 el.set('opacity', 0);
});

//some preloader positioning stuff
//(note: you can just set this in the CSS, but I'm setting it dynamically)
var contentCoords = itemsHolder.getCoordinates();
var contW = contentCoords.width;
var contH = contentCoords.height;
var preCoords = thePreloader.getCoordinates();
var preW = preCoords.width;
var preH = preCoords.height;

var preX = (contW - preW)/2;
var preY = (contH - preH)/2;
thePreloader.setStyles({ 'top': preY, 'left': preX});


//tween preloader into view
thePreloader.set('tween', {duration: 500, transition: 'cubic:out'}).tween('opacity', 1);


//determine how much to increment preloader per image load
var numImgs = theImages.length;
var percentBump = (100/numImgs).toInt();

//thanks to David Walsh for the loader bar class
var pb = new dwProgressBar({
 container: thePreloader,
 startPercentage: 0,
 speed:500,
 boxID: 'pre_box',
 percentageID: 'pre_perc',
 step:percentBump,
 allowMore: 0,
 displayID: 'pre_text',
 displayText: true,
 onComplete: function() {
    //alert('Done!');
 }
});


//starts loading images here
var myImages = new Asset.images(theImages, {
 onProgress: function(counter){
  pb.step();
 },

 onComplete: function(){


  //create instance of the slider, and start it up
  var mySlider = new SL_Slider({
   slideTimer: 6000,
   orientation: 'horizontal',
   fade: true,
   isPaused: true,
   container: itemsHolder,
   items: myItems,
   numNavActive: true,
   numNavHolder: numNavHolder,
   playBtn: thePlayBtn,
   prevBtn: thePrevBtn,
   nextBtn: theNextBtn
  });
  mySlider.start();

  //unhide slides
  myItems.each(function(el){
   el.set('opacity', 1);
  });

  thePreloader.tween('opacity', 0);

 }

});
//end images load
I tried to comment a lot of the above code, but just in case things aren't clear I want to explain a few parts. First,
var theImages = new Array();
myItems.each(function(el, i){
 var tempImg = $(el.getElement('img'));
 var tempSrc = tempImg.getProperty('src');
 theImages.push(tempSrc);
 el.set('opacity', 0);
});
In this block above, we create an array of the image sources from our content items. (We're going to feed this array of image sources into the Assets class a bit later in the script.) We also hide each item for now, since things may look a bit weird if there's a lot of images/slides to load.
The next part handles positioning the preloader. This isn't required, as you could just position it with CSS.
var contentCoords = itemsHolder.getCoordinates();
var contW = contentCoords.width;
var contH = contentCoords.height;
var preCoords = thePreloader.getCoordinates();
var preW = preCoords.width;
var preH = preCoords.height;

var preX = (contW - preW)/2;
var preY = (contH - preH)/2;
thePreloader.setStyles({ 'top': preY, 'left': preX});


//tween preloader into view
thePreloader.set('tween', {duration: 500, transition: 'cubic:out'}).tween('opacity', 1);
Basically, I'm just getting the coordinates and dimensions of the container element, and then centering the preloader element with that info. But remember - that's just optional stuff! Aftter that, I am just fading in the preloader. Moving along...
In this next code block, we figure out how much to increment the preloader bar per image load, and then instantiate David's progress bar class with the appropriate info - all of which we now have.
//determine how much to increment preloader per image load
var numImgs = theImages.length;
var percentBump = (100/numImgs).toInt();

//thanks again to David Walsh for the sweet loader bar class
var pb = new dwProgressBar({
 container: thePreloader,
 startPercentage: 0,
 speed:500,
 boxID: 'pre_box',
 percentageID: 'pre_perc',
 step:percentBump,
 allowMore: 0,
 displayID: 'pre_text',
 displayText: true,
 onComplete: function() {
    //alert('Done!');
 }
});
Finally, we just make use of Mootools' Asset.images method to handle the actual preloading. Note the use of the onProgress function to bump the progress bar up each time an image loads. After all the images are loaded, we just instantiate the content slider class like normal - but inside the onComplete function.
//starts loading images here
var myImages = new Asset.images(theImages, {
 onProgress: function(counter){
  pb.step();
 },

 onComplete: function(){


  //create instance of the slider, and start it up
  var mySlider = new SL_Slider({
   slideTimer: 6000,
   orientation: 'horizontal',
   fade: true,
   isPaused: true,
   container: itemsHolder,
   items: myItems,
   numNavActive: true,
   numNavHolder: numNavHolder,
   playBtn: thePlayBtn,
   prevBtn: thePrevBtn,
   nextBtn: theNextBtn
  });
  mySlider.start();

  //unhide slides
  myItems.each(function(el){
   el.set('opacity', 1);
  });

  thePreloader.tween('opacity', 0);

 }

});
//end images load
And that's all there is to it. It may seem a little complex at first glance, but I promise it's really not. Go check out the demo, look at the example code and you'll see for yourself.
You might also like


Tags
accordion accordion menu animation navigation animation navigation menu carousel checkbox inputs css3 css3 menu css3 navigation date picker dialog drag drop drop down menu drop down navigation menu elastic navigation form form validation gallery glide navigation horizontal navigation menu hover effect image gallery image hover image lightbox image scroller image slideshow multi-level navigation menus rating select dependent select list slide image slider menu stylish form table tabs text effect text scroller tooltips tree menu vertical navigation menu